NewLine RAY1000CHR-PIVOT Скачать руководство пользователя страница 8

22mm

Page 6

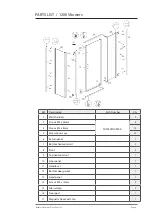
Raymor Showers / Pivot Door Set

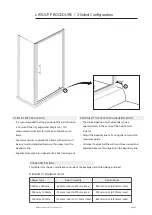
 INSTALLATION STEPS  /  2-Sided Configuration
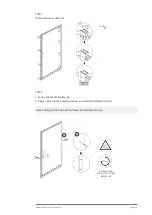
STEP 1
1.  Referring to the Assembly Layout Plan (Page 5), set up and plumb Wall Channels on 

boundary line. 

2.  Apply silicone to back of wall channels and fasten to the wall ensuring that they remain 

plumb.

Tiling Note: Some authorities do not allow the waterproof layer to be penetrated. In this 
instance we recommend using Bostik V60 to fix Wall Channels. Allow to cure as per 
manufacturers instructions before proceeding with shower installation.

 
STEP 2
Slide door assembly and Return Panel into the Wall Channels. Place the two panel 
assemblies together at the corner.

2

1

Содержание RAY1000CHR-PIVOT

Страница 1: ...ION MANUAL PRODUCT CODES RAY900CHR PIVOT RAY900WHT PIVOT RAY1000CHR PIVOT INSTRUCTION MANUAL VERSION 16 0003 RAY1000WHT PIVOT RAY1200CHR PIVOT RAY1200WHT PIVOT Newline Group Limited Freephone 0508 639...

Страница 2: ...you are referring to the correct Layout Procedure and installation steps for your shower configuration before commencing installation CONTENTS PAGE Important Information 1 Preparation Checklist 2 Supp...

Страница 3: ...he glass panel Installation Glass panels and assemblies are heavy Two man lifting is recommended for handling and installation Determine positioning of wiring and piping within wall cavities before sh...

Страница 4: ...lining installation Shower waste and supply fittings must be installed by a registered plumber TILE INSTALLATION OPTION WITH STANDARD PROFINISHTM TILE TRAY The ProFinishTM Tile Tray must be installed...

Страница 5: ...Parts Number Qty 2 Wall Posts 2 3 Screws M4x35mm FASTE 16 4 Screws M4x8mm 12 5 Screw Cover Caps 20 6 Return Panel 1 7 Bottom Horizontal Rail 1 8 Pivot 2 9 Top Horizontal Rail 1 10 Door Panel 1 11 Hand...

Страница 6: ...Screws M4 x 35mm 8 4 Screws M4 x 8mm 12 5 Screw cover caps 12 6 Return panel 1 7 Bottom horizontal rail 1 8 Pivot 2 9 Top horizontal rail 1 10 Door panel 1 11 Handle set 1 12 Bottom door gasket 1 13 F...

Страница 7: ...PLICATION It is recommended that the position of the wall channels is 22mm off the tray edge refer Diagram A This measurement will allow for walls out of plumb up to 8mm Greater variances to plumb tha...

Страница 8: ...els and fasten to the wall ensuring that they remain plumb Tiling Note Some authorities do not allow the waterproof layer to be penetrated In this instance we recommend using Bostik V60 to fix Wall Ch...

Страница 9: ...turn Panel evenly to the walls and tray 4 Square up the door frame and door and ensuring the magnetic door catch is in line 5 Fasten as detail in diagram below B1 B2 and B3 STEP 4 1 Fasten the handle...

Страница 10: ...ng outlined MINIMUM TO MAXIMUM GUIDE ACRYLIC TRAY APPLICATION Frame to precisely fit the specific tray you are using Mark out the outside boundary line at 15mm in from the outside of the tray Plumb up...

Страница 11: ...tik V60 to fix Wall Channels and allow to cure as per manufacturers instructions STEP 2 1 Slide the Wall Channels onto each side of the door assembly 2 Install the door assembly complete with Wall Cha...

Страница 12: ...sten as detail A STEP 4 1 Fasten the handle in place A1 2 Apply silicone to the outer boundaries as indicated by dotted line A2 Note Sealing on the inside of the shower will void the warranty 3 2 DRIL...

Отзывы: