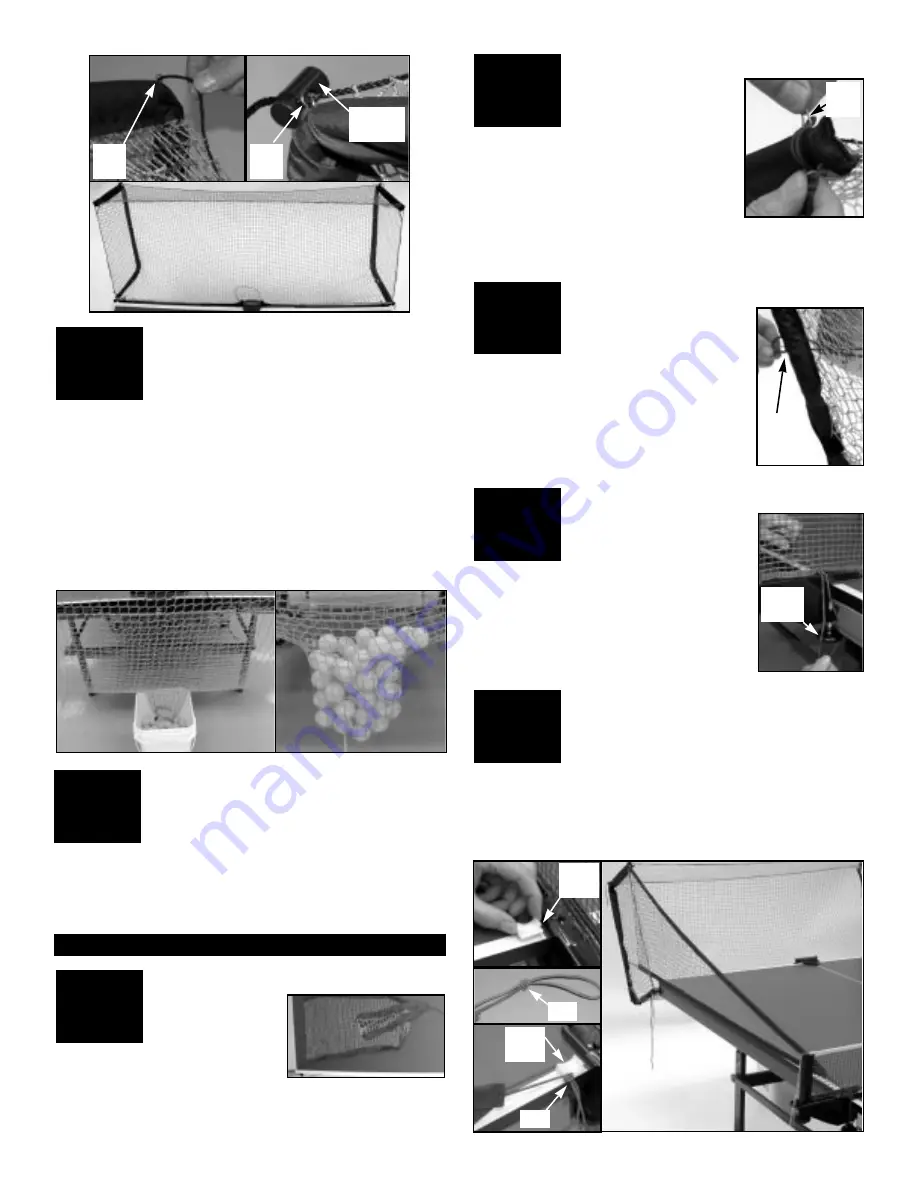
ATTACH TOP REAR CORNER
Pull out the Wire Clip
that holds the black
Front Upper
Adjustment
String in place. Take the
short
flexible
band at the
broad
end of the Side Net
and, from the
interior
of the net, pass it
through the net hole closest to where
the clip was. Secure the flexible band
in place with the Wire Clip. Both the flexible band and the
black adjustment string will pass through the Wire Clip.
POSITION COLLECTION BUCKET
Locate a suitable bucket or box and place it
underneath the ball exit hole. (
TIP
: if you
purchased the net with a robot, the robot
box makes a handy collection box!)
Completely
loosen the
cordlock at the ball exit so balls can fall out (A). If you do
not have a suitable bucket, you may temporarily use the
net by closing the ball exit with the cordlock and letting
the balls collect in the bottom of the net (B). Of course, this
will negate the convenience of the balls collecting in a
bucket and will change net tension, possibly resulting in
more balls rebounding out of the net. Using the net in this
manner will strain the net and frame due to the weight of
the balls, so only use this set-up for short periods of time.
14
C
A
B
YOU’RE DONE!
Try out your new net by setting up your
robot in front of the net and practicing
against the robot. When the robot stops
picking up balls, shut off your robot, go to the back of the
net, and pick up the collection bucket. Refill your robot
with balls from the bucket and you’re ready to go again!
(See first photo on Page 1).
15
LAYOUT NET ON TABLE
Skip this section if
you didn’t purchase
the Side Nets.
The
optional Side Nets block off the
sides of the table and direct wide
angled shots into the main net. Lay a Side Net along the
side of the table with the
broad
end closest to the endline
of the table as shown.
16
17
ATTACH BOTTOM REAR CORNER
Locate a buttonhole in the
frame pocket of the main
net about 8 inches from
the bottom of the Rear Frame. From the
interior
of the net, pass the
long
flexible
band at the
broad
end of the net through
the net hole closest to this buttonhole.
Capture the band inside the clip and
press the clip into the hole in the frame.
18
SIDE NET ASSEMBLY
ATTACH FRONT CORNER
If the table net has a clamp
screw, pass the flexible
band at the
front
of the
Side Net over the
top
of the net support
and wrap it around the clamp screw.
Repeat Steps 16–19 with the other Side
Net. If your table net doesn’t have a
clamp screw, proceed to Step 20. Other-
wise, installation is complete (see 20D).
19
ALTERNATIVE FRONT ATTACHMENT
If your table net does
not
have a clamp
screw, use the Plastic Clips. Remove the
backing on the bottom of a clip and press it
onto the table top along the sideline about an inch from
the net (A). The open end of the clip should face forward.
Create a knot close to the centerpoint of the front flexible
band of the Side Net (B). Insert the band into the clip
where the knot is located (C). Side Net should look like D.
20
A
B
C
D
A
B
➨
➨
Wire
Clip
Wire
Clip
Plastic
Clip
Plastic
Clip
Knot
Round
Cordlock
Wire
Clip
Wire
Clip
Knot
Clamp
Screw


