Thank you for purchasing the Newer Technology miniStack!
Please follow this guide to get up and running quickly.
Getting started using your Newer Technology miniStack:
Remove the Newer Technology miniStack USB 2.0 from it’s
packaging. You will see that the miniStack includes all cables that
you need to connect the drive to your system. Included are:
• NewerTech miniStack USB 2.0 Drive enclosure
• USB 2.0 A-B cable
• Power Supply
• Power Cord
• Dantz Retrospect OEM
• Intech Hard Disk SpeedTools OEM
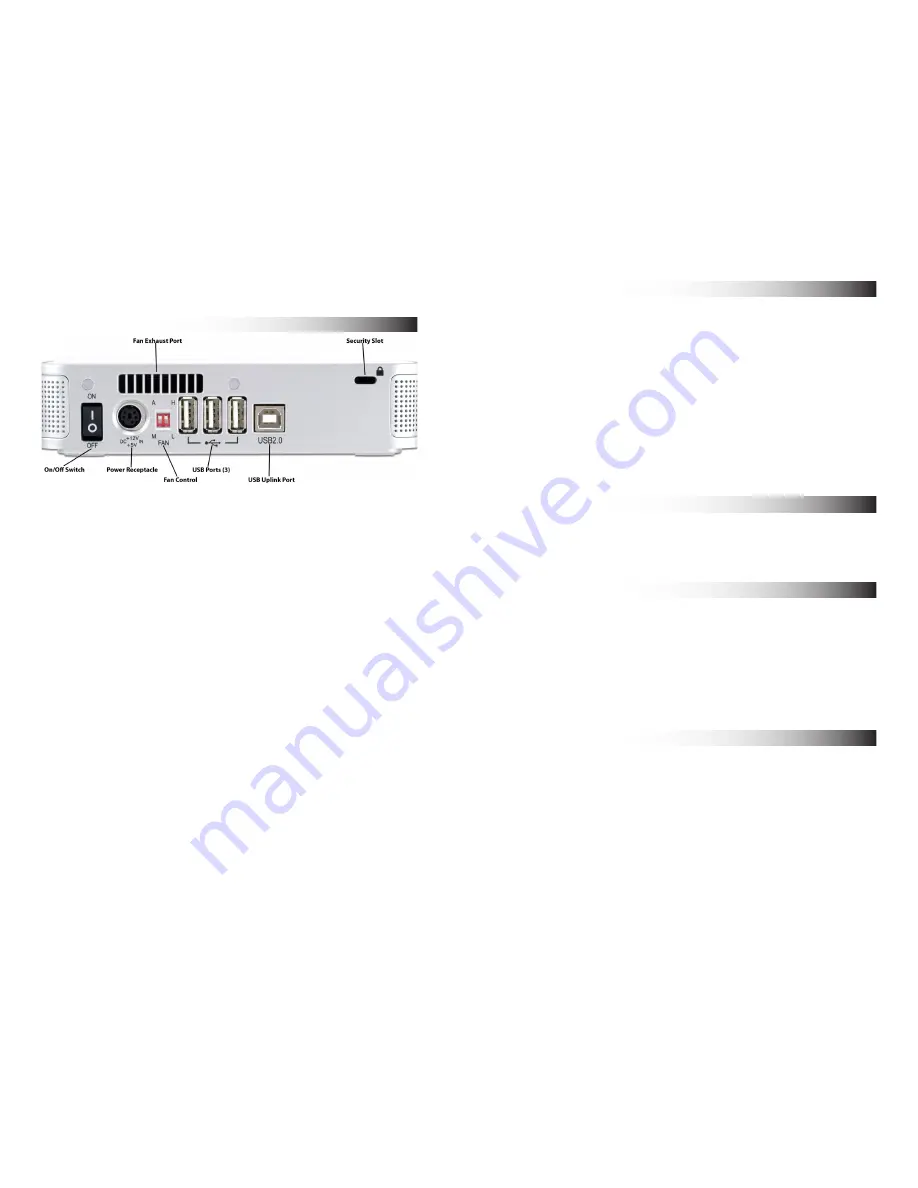
Turn the miniStack USB 2.0 around and examine the back of the
enclosure. You will see the following ports:
On/Off Switch
- used to turn the miniStack on. As long as the
power switch is in the ON position, the miniStack will power on
and off with your Mac mini - no need to shut the enclosure off
when done using your mini(not supported with older systems)
acrobat
Power Receptacle
- used to power the miniStack
Fan Control
- The miniStack has 2 speed settings for fan speed,
and an automatic setting (recommended)
USB Ports
- add USB devices to your miniStack here
USB Uplink Port
- connect your Mac mini to the miniStack here
Fan Exhaust Port
- Warm air is vented here from your miniStack
Security Slot
- Secure your miniStack to your desk using a
System Setup:
Your miniStack external drive enclosure and expansion hub is
simple to connect to your Mac mini.
Here are a few tips to get the most out of your new external
storage and expansion device:
• Place your miniStack enclosure underneath your Mac mini
• Do not place anything behind your miniStack that would block
airflow
• Treat your miniStack just like you treat your Mac mini - keep it
dry, cool, and out of direct sunlight
• Always check any peripheral cable that you are going to use
with your miniStack enclosure for damage before hooking them
up
Hard Disk Mode:
Your miniStack USB 2.0 will function as an external hard disk
drive, however you cannot boot to the drive due to limitations
in the Mac OS. You can boot to this device with Intel based
Macintosh systems.
Hub Connection:
To use the USB 2.0 Hub feature, you must interconnect the cables
provided between your Mac mini and the miniStack. Connect
the FireWire cable between the computer and enclosure using
any of the 3 FireWire ports on the miniStack, and the one
FireWire connection on the Mac mini. The USB 2.0 connection
between the machines is the same, except use the USB 2.0
Uplink port on the miniStack and any of the 3 ports on the Mac
mini.
Fan Settings:
The miniStack has 3 fan modes available for you to select to keep
the unit cool with.
It ships in automatic mode (recommended), or you can set it to
full speed by following these directions:
To set for manual HIGH speed, locate the dip switches on the
back of the enclosure and, using a ball point pen, flip the switch
marked “A” (for Automatic) to “M” for manual. This will turn the
unit onto Manual, High Speed. For manual LOW speed, simply
flip the switch from “H” to “L” using the above instructions for
entering manual mode.


