background image


Read This Manual 


Dear Customer, 
This instruction manual will provide you with valuable information necessary for the proper care 
and maintenance of your new appliance.  Please take a few moments to carefully read this 
manual, as it contains safety, operating and installation instructions, as well as troubleshooting 
tips.  We also recommend retaining it for future reference and giving it to any subsequent 
owners of this appliance.   

 
Before Calling for Service 


Occasionally a minor problem may arise and a service call may not be necessary.  Please refer 
to our troubleshooting tips located in the back of the manual for a possible solution.  If the 
problem persists, please contact an authorized service department or customer service.   
 

Note: 


Due to a policy of constant product development and updates, the manufacturer may make 
modifications without giving prior notice.   

 
Table of Contents 

1)Safety Information  ---------------------------------------------------------------  1
2)Operating Instructions  ----------------------------------------------------------  2

Control Panel  

--------------------------------------------------------------------------  

2

Dishwasher Features  

----------------------------------------------------------------  

2

3)Before Using for the First Time  ------------------------------------------------  3

A.Filling the Rinse Aid Dispenser  --------------------------------------------------  3
B.Using Detergent  --------------------------------------------------------------------  4

C.Loading the Dishwasher Basket  ----------------------------------------------  6

Loading the Basket  -------------------------------------------------------------------  7
The Cutlery Basket  -------------------------------------------------------------------  8

4)Starting a Wash Cycle  -----------------------------------------------------------  9

Wash Cycle Table  ---------------------------------------------------------------------  9
Turning on the Appliance  ------------------------------------------------------------  9
Changing Wash Cycles  -------------------------------------------------------------- 10
At the End of the Wash Cycle    ------------------------------------------------------- 10

5)Maintenance and Cleaning  ----------------------------------------------------- 11

Filtering System  ---------------------------------------------------------------------- 11
Maintaining Your Dishwasher  ------------------------------------------------------ 12

6)Installation Instructions  -------------------------------------------------------- 13

Positioning the Appliance  ----------------------------------------------------------- 14
Power Connection  -------------------------------------------------------------------- 14
Water Connection  --------------------------------------------------------------------- 15
Starting the Dishwasher  -------------------------------------------------------------  16

7)Troubleshooting Tips  ------------------------------------------------------------  17

Before Calling for Service  -----------------------------------------------------------  17
Error Codes  ----------------------------------------------------------------------------  19
Technical Information  ----------------------------------------------------------------  20
Detailed Parts Diagram  --------------------------------------------------------------  21

Electrical Diagram  -------------------------------------------------------------- 

22

Содержание ADW-2600W

Страница 1: ... Please read and save these instructions NewAir ADW 2600W Portable Dishwasher Instruction Manual ...

Страница 2: ...r customer service Note Due to a policy of constant product development and updates the manufacturer may make modifications without giving prior notice Table of Contents 1 Safety Information 1 2 Operating Instructions 2 Control Panel 2 Dishwasher Features 2 3 Before Using for the First Time 3 A Filling the Rinse Aid Dispenser 3 B Using Detergent 4 C Loading the Dishwasher Basket 6 Loading the Bask...

Страница 3: ...ment only applicable with a visible heating element Make sure the detergent receptacle is empty after a wash cycle is completed Do not wash plastic items in the dishwasher unless they are marked dishwasher safe For plastic items that are not marked as such check with the manufacturer Only use detergent and rinse additives that are designed for automatic dishwashers Never use soap laundry detergent...

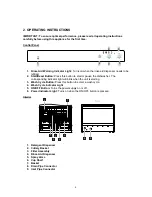
Страница 4: ...The corresponding indicator light will blink when the unit is starting 3 Wash Cycle Button Press this button to select a wash cycle 4 Wash Cycle Indicator Light 5 ON OFF Button Turns the power supply on or off 6 Power Indicator Light Turns on when the ON OFF button is pressed Interior 1 Detergent Dispenser 2 Cutlery Basket 3 Filter Assembly 4 Rinse Aid Dispenser 5 Spray Arms 6 Cup Shelf 7 Basket 8...

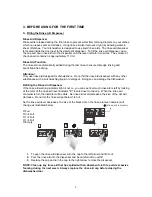
Страница 5: ...s dishwashing liquid or detergent Doing so can damage the dishwasher Refilling the Rinse Aid Dispenser If the rinse aid warning indicator light is not on you can see how much rinse aid is left by looking at the color of the rinse aid level indicator C located next to the cap When the rinse aid container is full the indicator will be dark As rinse aid level decreases the size of the dot will decrea...

Страница 6: ...water white spots will often appear on dishes and glassware If this is the case add more detergent to achieve better cleaning results Detergent without chlorine may not be able to remove large heavy stains In this case please choose a wash cycle with a higher temperature Concentrated Detergent Based on their chemical composition dishwashing detergents can be split into 2 basic types Conventional a...

Страница 7: ...n Filling the Detergent Dispenser Fill the detergent dispenser with detergent according to the dosage levels as illustrated on the right A Accommodates 15g of detergent B Accommodates 25g of detergent Please observe the manufacturer s dosing and storage recommendations as stated on the detergent packaging After filling the detergent dispenser close the lid and make sure it locks into place If dish...

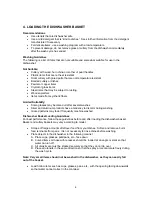
Страница 8: ...everal washes Silver and aluminum products have a tendency to discolor during washing Glazed patterns may fade if frequently machine washed Dishwasher Basket Loading Guidelines For best performance follow these guidelines before and after loading the dishwasher basket Basket and cutlery baskets may vary according to model Scrape off large amounts of leftover food from your dishes Soften and remove...

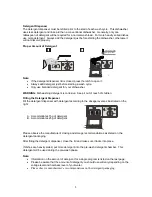
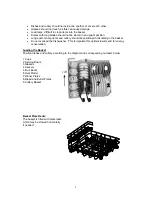
Страница 9: ...d horizontally in the basket Do not overload the dishwasher This is important for optimal results and for energy conservation Loading the Basket Position dishes and cutlery according to the diagram and corresponding numbers below 1 Cups 2 Serving Bowls 3 Glasses 4 Saucers 5 Fruit Bowls 6 Oval Platter 7 Dinner Plates 8 Bread and Butter Plates 9 Cutlery Basket Basket Plate Racks The basket is fitted...

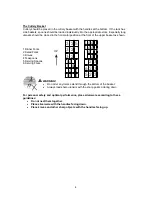
Страница 10: ...r Forks 2 Salad Forks 3 Knives 4 Teaspoons 5 Serving Spoons 6 Serving Forks WARNING Do not let any items extend through the bottom of the basket Always load sharp utensils with the sharp points pointing down For personal safety and optimal performance place silverware according to these guidelines Do not nest them together Place silverware with the handles facing down Place knives and other sharp ...

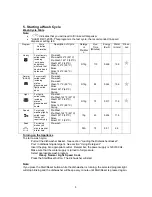
Страница 11: ...tes glassware and bowls Pre wash Pre Wash122º F 50º C Wash122º F 50º C Rinse Rinse 140º F 60º C Drying 3 15g 75 0 317 11 5 Speed For quickly washing lightly soiled loads that do not require drying Pre Wash Pre Wash122º F 50º C Wash122º F 50º C Rinse Rinse131º F 55º C 15g 45 0 236 11 5 Soak For rinsing dishes you plan to wash at a later time Pre wash N A 10 0 01 2 5 Turning on the Appliance To star...

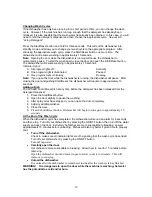
Страница 12: ...ly 10 seconds Adding a Dish You can add an additional dish at any time before the detergent has been released from the detergent dispenser 1 Press the Start Reset button 2 Open the door slightly to pause the washing 3 After spray arms have stopped you can open the door completely 4 Add any additional dishes 5 Close the door 6 Press the Start Reset button Dishwasher will begin to run again in appro...

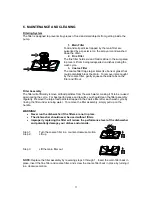
Страница 13: ...m the wash water making it fit to be re used again during the cycle For best performance and results you should clean the filter assembly regularly Remove the large food particles trapped in the coarse filter after each wash cycle by rinsing the filter under running water To remove the filter assembly simply pull up on the handle WARNING Never run the dishwasher if the filters are not in place The...

Страница 14: ...sh chemical cleaners on any part of your dishwasher Cleaning the Door Clean the edge around the door with a soft cloth that is lightly damp Never use any type of spray cleaners to ensure that water does not enter the door lock and affect electrical components WARNING Never use a spray cleaner to clean the door panel The door lock and electrical components may be damaged Never use abrasive cleaning...

Страница 15: ...e interior surface use a soft cloth with vinegar or a product specifically designed for interior use on dishwashers Vacation If you plan on leaving for an extended period of time run one wash cycle with the dishwasher completely empty Then unplug your dishwasher from the electrical outlet turn off the water supply and leave the door slightly open The door seals will last longer and you will elimin...

Страница 16: ...oltage and frequency of the power you are using corresponds to those listed on the dishwasher rating plate Only insert the plug into an electrical outlet that is properly grounded If the electrical outlet is not appropriate replace the outlet Do not use adapters or anything similar they can cause overheating and burns Grounding Instructions This dishwasher must be grounded If there is any type of ...

Страница 17: ...patible with faucets that have either inside female or outside male threaded connections Quick Connect Assembly Drain Hose 1 Drain port connection 2 Quick connect connection Inlet Hose 3 Inlet port connection 4 Quick connect connection Faucet Adapter 5 Faucet adapter 6 Faucet washer Quick Connect 7 Pressure relief valve 8 Faucet adapter connection 9 Locking collar 10 Inlet hose connection 11 Drain...

Страница 18: ...ater pressure from inside the inlet hose first make sure the water line faucet is closed then press and hold the red pressure relief button on the quick connect until the water stops flowing WARNING Failure to relieve water pressure before disconnecting the quick connect from the faucet will result in back pressure and over spray This water can be very hot and can potentially cause severe burns an...

Страница 19: ...k is draining properly If not you may need to contact a professional plumber Lingering detergent suds Wrong detergent You must use the proper dishwasher detergent to eliminate sud build up If suds do accumulate open the door and allow them to evaporate Then pour in a gallon of cold water to the bottom of the dishwasher close the door and turn the machine to the Soak cycle to allow the water to dra...

Страница 20: ...e shortest cycle possible for washing glassware Dishes appear to have black or gray marks Aluminum cutlery has been rubbed against the dishes A mild abrasive cleaner will eliminate the marks Unsatisfactory Washing Results Detergent dispenser still has detergent remaining after the wash Dishes were likely blocking the dispenser and preventing it from opening properly Re load the dishes properly and...

Страница 21: ...cted or the water pressure is too low The Start Reset light blinks intermittently Overflow The dishwasher is leaking WARNING If overflow occurs turn off the main water supply and call an authorized service department or customer service If there is lingering water in the tub due to an overfill or leak be sure to remove the water before starting the dishwasher again 19 ...

Страница 22: ...RMATION Height 17 25 inches Width 21 70 inches Depth 19 70 inches Voltage See Rating Label Water Pressure 0 04 1 0MPa Hot Water Connection Max 140º F 60 º C Power Supply See Rating Label Capacity 6 place settings 20 ...

Страница 23: ...DETAILED PARTS DIAGRAM 21 ...

Страница 24: ...ELECTRICAL DIAGRAM 22 ...

Отзывы: