background image

Содержание AP-490U

Страница 1: ...rs to boiler call your heating contractor When seeking information on boiler provide Boiler Model Number and Serial Number as shown on Rating Label Boiler Model Number Boiler Serial Number Installation Date AP U Heating Contractor Phone Number Address 8147101 R7 1 10 RESIDENTIAL HEATING BOILERS Price 3 00 ...

Страница 2: ...ssembly and operations of controls and safety devices The following terms are used throughout this manual to bring attention to the presence of hazards of various risk levels or to important information concerning product life Indicates an imminently hazardous situation which if not avoided will result in death serious injury or substantial property damage Indicates a potentially hazardous situati...

Страница 3: ...floor shield available at extra cost Do not install boiler on carpeting When boiler is installed on concrete which is over a material that is subject to melting PVC PEX radiant tubing etc the combustible floor shield must be used A concrete pad is not sufficient to protect combustible flooring Do not tamper with or alter the boiler or controls Retain your contractor or a competent serviceman to as...

Страница 4: ...n and should be inspected periodically throughout the heating season for any obstructions Clean and unobstructed venting and air intake systems are necessary to allow noxious fumes that could cause injury or loss of life to vent safely and will contribute toward maintaining the boiler s efficiency This boiler is supplied with controls which may cause the boiler to shut down and not re start withou...

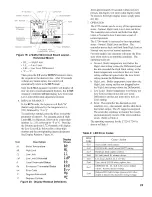
Страница 5: ...NT VIEW FP DRNN VALVE CONNECTION AQUASTAT CONTROL BURNER FLOOR LiNE RIGHT SIDE VIEW Boiler Model Number AP 490U AP 590U AP 690U AP 790U Dimension A _ 34 9 16 41 Minimum Recommended Chimney Sizes Rectangular Round 8 x 8 x 15 6 x 15 7 x 15 Water Capacity gallons 10 7 10 1 16 3 15 4 Approx Shipping Weight lb 290 300 340 355 Figure 1 AP U Series Boiler Dimensional Data ...

Страница 6: ...base such as concrete if floor is not level or if water may be encountered on floor around boiler PROVIDE SERVICE CLEARANCE of at least 48 from the front of the jacket for servicing of burner and removal of tankless heater For minilnuln clearances to combustible materials See Figure 2 Do not support boiler by placing blocks at the four 4 corners of the boiler Boiler base must be evenly supported u...

Страница 7: ...uilding of unusually tight construction provide outdoor air with the use of two permanent openings which colnlnunicate directly or by duct with the outdoors or spaces crawl or attic freely colmnunicating with the outdoors Locate one opening within 12 inches of top of space Locate remaining opening within 12 inches of bottom of space Minimum dimension of air opening is 3 inches Size each opening pe...

Страница 8: ...icated in Figure 3 These dimensions will assure that the boiler jacket will be at least 18 from the side and rear walls and 48 from the front wall as required by ANSI NFPA 31 Fasten shield to combustible floor to keep shield from shifting position during setting of boiler 4 Set boiler squarely on top of shield such that base plate of boiler rests flat on top surface of shield and does not over han...

Страница 9: ...arton Install the Wrap Around jacket panel first Bend Wrap Around panel as shown in Figure 5 Attach the bent panel to base using three 10 1 2 slotted hex washer head screws supplied Engage all screws but do not tighten yet Remove 5 16 18 hex nut 5 16 flat washer observation cover spring and Observation Port Cover and set aside 4 5 6 Attach Lower Front Jacket panel to installed Wrap Around panel wi...

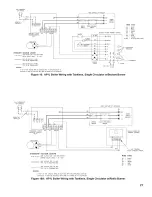
Страница 10: ... Install provided 1 1 4 x 3 4 reducing hex bushing and drain valve into lower right hand 1 1 4 forged coupling drain taping 3 4 5 6 Install provided 1 1 4 x 3 black nipple into lower left hand 1 1 4 forged coupling return taping Mount installer supplied aquastat onto the ilmnersion well Wire the control per Figure 15 or Figure 16 Section IV Electrical of the Installation and Operating Instructions...

Страница 11: ...t installer supplied burner onto base front panel studs and secure with provided 5 16 flat washers and brass 5 16 18 hex nuts Refer to Figure 7 Wire the burner per instructions provided with the burner and Figure 15 15A 16 or 16A as applicable OBSERVATION PORT COVER OBSERVATION COVER SPRING 5 i6 FLAT WASRER 5 16 18 HX NUT H_ W HX BURNER MOUNTING FLANGE W KEYHOLE SLOTS L BURNER Figure 7 Burner Moun...

Страница 12: ...tem circulator the pressure drop of all radiators baseboard and radiant tubing and all connecting piping must be considered 3 Connect System supply and return piping to boiler See Figures 9 and 10 Also consult I B R Installation and Piping Guides Maintain minilnuln 1 2inch clearance from hot water piping to combustible materials 12 a If this boiler is used in connection with refrigeration systems ...

Страница 13: ...t off valves plugs or caps Co AIR VENT An air vent or purge must be incorporated in the system to easily remove air from the boiler when the system is filled The boiler has a built in dip tube which works with the air vent to clear the boiler of air Improper application of the air vent will cause steaming in the boiler See Figure 9 D INSTALL DRAIN VALVE in return piping See Figures l0 and ll E 17 ...

Страница 14: ...E WATER NEAT_ OR ZONE 1 SHUT OFF V VES NOES_ RUN EACH ZONE PIPE _WN THEN UP TO ZONE TO PRD_ENT MR AC CUMU_T_ON iN PiPiNG SHUTOFF VALVE TO NY_MATE WATER H_T_ _ usED ZONE C_RCULa TOR TO ZONE 2 TO _DO_T ONAL ZONES 6 OF PLOOR FRONT VIEW Figure 10 Recommended Boiler Piping for Circulator Zoned Heating Systems ...

Страница 15: ...b tNEVE _DI_ONAL _TEM UMiT i iF REQU RED Lt SUPPLY VALVE _S_M SUPPLY EXPANSION T_NK NOTES RUN EACH ZONE PiPE DOWN THEN UP TO ZONE TO PR_NT AiR ACCUMULATION iN PIP NG_ PRESSURE REDU NG V_VE _ l SHUT OW VALVE C O_ WATER SUPPLY TO _ _NO_ AL i i TO TO NY_MATE ZONE 2 HDATE R USED OR ZONE 6 OF _OOR FRONT VI_ Figure 11 Boiler Piping for Zone Valve Zoned Heating Systems ...

Страница 16: ... hot water 3 4 required by dishwashers and automatic washers is possible by piping the hot water from the heater prior to entering the mixing valve The mixing valve should be trapped by installing it below the cold water inlet to heater to prevent lime formation in the valve Refer to Figure 12 FLUSHING OF HEATER All water contains some sediment which settles on the inside of the coil Consequently ...

Страница 17: ... and sends less heat up the chimney A new boiler probably has a higher efficiency than the boiler being replaced That probably 3 means that the stack temperature from the new boiler will be lower than that from the old boiler and with less room air being drawn up the chimney to dilute the stack gases The combination of a large uninsulated chimney reduced firing rate reduced firing time lower stack...

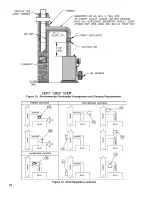
Страница 18: ... SLOPE UPWARD NOT LESS T_N ONE INCH _N FOUR FEF AiR GAP REGU_TOR DILUTION NR CL_NOUT O_L BURNER FLOOR UNE VIEW Figure 13 Recommended Smokepipe Arrangement and Chimney Requirements 18 PROPER LOCATIONS UNACCEPTABLE LOCATIONS _ A L 1 ACCEPTABLE LOCATION _EER 0 I BOILER 5 0 BOILER _ LER I I Figure 14 Draft Regulator Locations ...

Страница 19: ...sdiction or in absence of such requirements the National Electrical Code ANSI NFPA 70 and or the CSA C22 1 Electric Code A separate electrical circuit must be run from the main electrical service with an over current device disconnect in the circuit A service switch is recommended and may be required by some local jurisdictions 3 Wiring should conform to Figure 15 and or 16 B SYSTEM CONTROLS AND W...

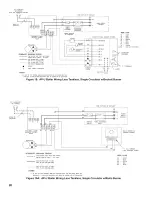
Страница 20: ... W_EECODE _ BLACK BLUE GR GRHN OR O_NCE RB REi YE YEIOB BL _ BLUE Wi _ TE TRACE ZNV _EJOM_ TERMINN_S x_ _ 1 oT TERMINAtS Figure 15 AP U Boiler Wiring Less Tankless Single Circulator w Beckett Burner B LLO BURNER W PRIMA_Y CONTROL SCHEMATIC D AQRAM LEGEND tO_ VOLTA_Z SIZE 18 2 AWG POWER L M T_D CIRCLIT C_I 25 i05 C LINE VOL ABE SIZE 14 AWO T f_E TW OR D4_ AWM WIRE UNZ VOLJAGE SiZE 18 AWG TYPE I OR ...

Страница 21: ...S RVffC FUSED DISCON EC S_TTO S ffOH SCHEMATIC DIAGP AM _GEND LG W VO TA_E SIZE 18 2 A _G POWER UM TED CtRCU_ CABLE 75 IOB C UNE COLLAGE SiZE 14 A_ G tYPE OR _EW AW_ tR_ SUPPgY R _U_O BURNER W PR_ARY COtITROL 2 ONSTA _T POWER SIRE dODE _L BLUE RD R_ 14 WHITE UN8 VOLTAGE SIZE 8 A G NOTES I ANY O_ THE ORIG _ _L W RE AS SUPPU_D WITH TH_ PPU_k_CE MUST 8_ R_LAI FD IT M_ST _ R_PLACFO WIT _WIR A S 4OWN O...

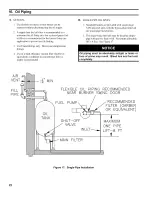
Страница 22: ...conventional filter is highly recommended B SINGLE PIPE OIL LINES 1 Standard burners are provided with single stage 3450 rpm fuel units with the bypass plug removed for single pipe installations 2 The single stage fuel unit may be installed single pipe with gravity feed or lift Maximum allowable lift is 8 feet See Figure 17 Oil piping must be absolutely airtight or leaks or loss of prime may resul...

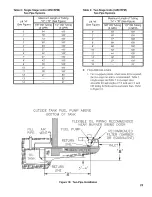
Страница 23: ...gure 3 8 OD Tubing 3 GPH 93 85 77 69 60 52 44 36 27 1 2 OD Tubing 3 GPH 100 100 100 100 100 100 100 100 100 76 C TWO PIPE OIL LINES 1 For two piped systems where more lift is required the two stage fuel unit is recommended Table 2 single stage and Table 3 two stage show allowable lift and lengths of 3 8 inch and 1 2 inch OD robing for both suction and return lines Refer to Figure 18 OUTSIDE TANK F...

Страница 24: ...e boiler and system have no water leaks CHECK CONTROLS WIRING AND BURNER to be sure that all connections are tight and burner is rigid Verify that all electrical connections have been completed fuses installed that the oil tank is filled and oil lines have been tested LUBRICATION Follow instruction on burner and circulator label to lubricate ifoil lubricated Most motors currently used on residenti...

Страница 25: ...e in any of four operational states Nounal High Limit Low Limit and Error The controller moves back and forth from High Limit to Nounal to Low Limit state as part of nounal operation The L7248 model is restricted to three operational states Nounal High Limit and Error The controller moves back and forth from High Limit to Nounal state as part of nounal operation For both models the controller will...

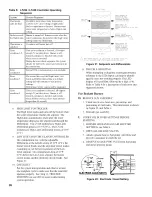
Страница 26: ... and through the Differential The L7248 models have High Limit Differential presets of 15 F 8 C The L7224 models have High Limit Differential presets of 10 F 6 C 9 LOW LIMIT AND CIRCULATOR CONTROLLER On a temperature rise with the adjustable Differential at the default setting of 10 F 6 C the burner circuit breaks and the circulator circuit makes assuming no call for heat is present at the Low Lim...

Страница 27: ...necessary the air band Refer to Table 6 preliminary settings ADJUST DRAFT REGULATOR for a draft of 02 water gauge over the fire after chimney has reached operating telnperature and while burner is running READJUST AIR BANDS on burner for a light orange colored flame while draft over the fire is 02 w c Use a smoke test and adjust air for minilnuln smoke not to exceed 1 with a minilnuln of excess ai...

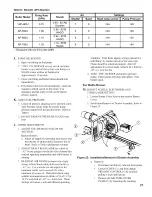
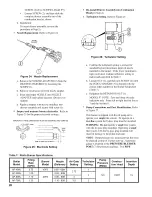
Страница 28: ...ln input is desired readjust turbulator setting to index mark specified in Table 7 b Loosen NUT 1 and then turn SCREW 2 until the INDEX MARKER 3 is aligned with the correct index number in the Burner Setup chart Table 7 c Retighten the RETAINING NUT 1 MODEL F3 NOTE Zero and three are scale indicators only From left to right the first line is 3 and the last line 0 Pump Connections and Port Identifi...

Страница 29: ...r approximately 10 seconds 3 Close vent fitting and burner flame should start ilnlnediately P ADJUST OIL PRESSURE 1 Locate oil pressure adjusting screw and turn screw to obtain proper pump pressure refer to Table 7 Qo ADJUST OIL BURNER WHILE OPERATING flame present 1 ADJUST DRAFT REGULATOR for a draft of 0 02 water gauge over the fire after chilnney has reached operating temperature and while burn...

Страница 30: ...such as a Fitting leaks due to misflared tubing or damaged fitting b Fuel line leak due to crushed or bent tubing c Filter connection leaks d Tank connection leaks The following actions can eliminate air leaks a Bleed pump as detailed in System Start Up Section of this manual b Replace flare fittings c Replace oil supply line d Repair oil filter leaks e Replace or repair tank fittings 5 GASKET LEA...

Страница 31: ...cond on 1 2second off Push red reset button to reset safety switch c Simulate power failure Follow the starting procedure to turn on the burner With the burner running turn off the power to the system by tripping the circuit breaker or removing the fuse Burner should stop Restore power Burner should start The CleanCut Oil Pump s Solenoid Calveis a bypass valve not a blocking valve VERIFY HIGH LIMI...

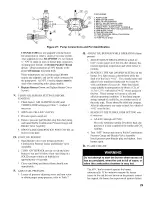
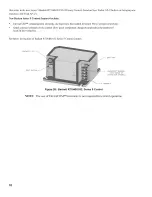
Страница 32: ...tion terminals and logic have been added for furore HVAC system networking Quick connect terminals on the control allow quick component change out and reduce the number of leads in the wiring box See below for location of Beckett R7184B 1032 Series 5 Control features _ESE _ BUWON NOTE T TER_ AiNAL Figure 28 Beckett R7184B1032 Series 5 Control The use of EnviraCOM TM terminals is not required for c...

Отзывы: