


- 42 -
www.NewLeader.com
(800) 363-1771
305438-J
L5034G4
Lubrication & Maintenance
Lubrication
Make sure unit is clean and completely dry�
Lubricate conveyor chain at the end of each
day of usage using a mixture of 75% diesel fuel
and 25% SAE 10 oil� Shut down spinner and run
conveyor at 20 RPM for two full revolutions to
lubricate chain� After each unit washing, allow
to dry, then lubricate�
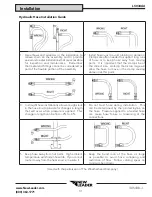
Spray Nozzle
Guards Removed for Clarity
Figure 1 - Spray Nozzle
Lubricate chain through two full revolutions� After each unit washing, allow to dry, then lubricate�
Before filling the unit with spreading material, activate the controller or power switch to run the pump oiler.
Bleed all air from the lines and adjust the two spray nozzles so that the oil mixture sprays vertical onto the
sprockets and chain�
Do not allow lubricants to contact belting as they will
cause the belt to deteriorate and fail prematurely�
Tension
Over-tensioning of conveyor chain will lead to excessive load on the system, causing
excessive chain and sprocket wear and can cause extremely high starting pressures. Under-
tensioning allows conveyor chain to “wrap” around drive sprockets and not exit sprocket
freely, causing excessive excessive chain stretch and surging of the conveyor which will result
in interrupted flow of material to the spinners.
Keep hands, feet, hair and clothing away from moving parts while system is operating as there
may be danger of entanglement! Failure to comply with this requirement could result in death
or serious injury�
Proper chain tension is also a factor in chain and sprocket life� This adjustment is made by turning the
idler screws on each side of the unit at the front idler bearings� See Figure 2� Loosen the idler jam nut
(A) and turn the idler adjustment screw (B) to adjust tension� Turn clockwise to increase tension and, turn
counterclockwise to decrease tension� Adjust idlers equally on each side� Measure from rear of sill to point
where conveyor chain contacts bottom flange of sill. Verify that measurements on both sides of conveyor
are equal and within specified range. See Figure 3.
Figure 2
Figure 3
Содержание L5034 G4
Страница 6: ...Insert Current New Leader Warranty Warranty...
Страница 7: ...SAFETY...
Страница 26: ...INSTALLATION...
Страница 35: ...33 This page is intentionally left blank L5034G4 www NewLeader com 800 363 1771 305438 J Notes...
Страница 36: ...34 This page is intentionally left blank www NewLeader com 800 363 1771 305438 J L5034G4 Notes...
Страница 37: ...OPERATIONS MAINTENANCE...
Страница 50: ...47 L5034G4 www NewLeader com 800 363 1771 305438 J Troubleshooting Hydraulic Schematic...
Страница 54: ...CONTROLLER...
Страница 90: ...86 www NewLeader com 800 363 1771 305438 J L5034G4 This page is intentionally left blank Notes Notes...
Страница 91: ...SPREAD PATTERN...
Страница 102: ...PARTS...
Страница 106: ...100 www NewLeader com 800 363 1771 305438 J L5034G4 Feedgate Body 2 3 4 5 7 1 13 14 15 8 9 11 10 8 9 11 12...
Страница 114: ...108 www NewLeader com 800 363 1771 305438 J L5034G4 Main Bin Body Hydraulics...
Страница 115: ...109 L5034G4 www NewLeader com 800 363 1771 305438 J Main Bin Cont Body Hydraulics...
Страница 116: ...110 www NewLeader com 800 363 1771 305438 AA J L5034G4 This page is intentionally left blank Notes...
Страница 127: ...121 L5034G4 www NewLeader com 800 363 1771 305438 AA J This page is intentionally left blank Notes...
Страница 135: ...129 L5034G4 www NewLeader com 800 363 1771 305438 AA J This page is intentionally left blank Notes...
Страница 138: ...132 www NewLeader com 800 363 1771 305438 J L5034G4 Rear Wipers Conveyor 2 3 4 9 11 15 10 1 5 6 7 8 12 13 14 16 17 18...
Страница 141: ...135 L5034G4 www NewLeader com 800 363 1771 305438 J 2 3 4 5 6 7 8 9 10 1 8 9 4 11 12 13 14 Enclosure Assembly...
Страница 145: ...139 L5034G4 www NewLeader com 800 363 1771 305438 AA J This page is intentionally left blank Notes...
Страница 150: ...144 www NewLeader com 800 363 1771 305438 J L5034G4 Spinner Speed Sensor Spinners 1 3 4 5 6 7 8 4 5 7 5 7 1 3 6 5 7...


