background image

SECTION 00 - GENERAL INFORMATION

00-5

SAFETY PRECAUTION INFORMATION

CAUTION

Unsafe operating practices and improper use of

the skid steer and its attachments on the part of

the operator can result in injuries. Observe the

following safety precautions at all times:
1. For servicing, the skid steer should be on

level terrain, engine stopped with the wheels

blocked or the entire skid steer solidly

supported with the wheels off the ground

before servicing any component of the

drivetrain.

2. For servicing under the operator’s seat, raise

the seat and pan assembly to the raised

latched position and securely latch.

3. Do not operate the skid steer unless the seat

is latched in the operate position.

4. Do not service the skid steer with a raised

boom unless the boom is resting on the

boom lock pins.

5. Do not service the skid steer with the engine

running unless the skid steer is properly and

securely supported with all four wheels off

the ground.

6. Use caution when servicing the unit around

moving parts.

7. Do not tilt the boom and cab without proper

instruction.

8. Do not tilt the boom and cab without using

the proper cab tilting tool.

9. Reinstall all shields removed for service.

10. Never loosen any hydraulic connections

before relieving the pressure in the hydraulic

system.

11. Wear eye protection such as goggles, etc.

12. Wear ear protection such as earplugs, etc.

When

you

feel

the

noise

level

is

uncomfortable.

13. If any servicing or adjustments require the

battery to be disconnected, disconnect the

(--) negative ground cable.

14. When servicing electrical components,

disconnect the (--) negative ground cable.

15. If the electronic instrument cluster (EIC)

requires removal from the dash area of the

skid steer, disconnect the (--) negative

ground battery cable. this will shut off power

to the eic and prevent damage to the eic

board or blowing the 5-amp fuses if the board

is accidentally grounded.

16. If welding is required on the skid steer,

disconnect the (--) negative ground cable.

Failure to disconnect the battery may result

in damage to the EIC (electronic instrument

cluster) monitoring system and other

electrical components.

17. If welding is required on an attachment,

remove the attachment from the skid steer.

18. Give complete and undivided attention to the

job at hand so that complete control of the

skid steer is maintained at all times.

19. Drive slowly over rough ground and on

slopes; keep alert for holes, ditches and

other irregularities that may cause the skid

steer to overturn.

20. Avoid steep hillside operation which could

cause the skid steer to overturn.

21. Never transport a loaded bucket at full height.

Operate the skid steer with the load as low as

possible until it becomes necessary to raise

the boom to discharge the load into a truck,

container, etc.

22. Reduce speed when turning so there is no

danger of the skid steer overturning.

23. Never drive up or back up a hill or incline with

a raised boom or the skid steer could

overturn.

24. Always look behind you before backing up

the skid steer.

25. Maintain proper transmission oil level to

prevent loss of hydrostatic braking.

26. Do not allow passengers to ride on the skid

steer at any time.

27. Do not allow children to operate the skid

steer or ride on the skid steer at any time.

28. Do not allow anyone to operate the skid steer

without proper instruction. OSHA requires

that all operators be instructed on the proper

operation of the machine before they operate

the unit.

29. Do not operate the skid steer in any position

other than while in the operator’s seat with

the seat belt securely fastened.

Содержание LS140

Страница 1: ...LS140 LS150 87036977 1 04 ...

Страница 2: ... MOUNTING PLATE 19 SECTION 88 ACCESSORIES 20 SECTION 90 PLATFORMS CAB BODYWORK AND DECALS 20 The following pages are the collation of the contents pages from each section and chapter of the LS140 LS150 Repair manual Complete Repair part 87036977 The sections used through out all New Holland product Repair manuals may not be used for each product Each Repair manual will be made up of one or several...

Страница 3: ...indicated and insert the label into the plastic pocket on the spine of the binder 87036977 SKID STEER REPAIR LS140 LS150 Vol 1 87036977 SKID STEER REPAIR LS140 LS150 Vol 1 87036995 Find manuals at https best manuals com ...

Страница 4: ... of Adjustable Fittings in Straight Thread O Ring Bosses 12 Standard Torque Data for Hydraulic Tubes and Fittings 12 Pipe Thread Fitting Torque 13 Lubricants and Coolants 13 Sealants 13 Properly Support a Raised Machine 14 Properly Support Boom on Boom Lock Pins 14 Raising Boom Without Hydraulic Oil Flow 14 Raising Boom Without Battery Voltage 12V 15 Reattaching Cylinders After Repair with Boom Re...

Страница 5: ...ne Disassembly Sequence 25 Engine Component Maintenance 33 10 101 55 Valve Seat 36 10 101 56 Cylinder Block 39 10 105 22 Piston and Piston Rings 40 Connecting Rod 44 10 103 10 Bearing Holder 48 Front Crankshaft Bearing Bushing 50 10 103 30 Crankshaft 52 10 103 76 Flywheel and Ring Gear 54 10 106 40 Camshaft Assembly 55 10 106 66 Camshaft Gear and Bearing Assembly 55 Timing Gear 56 10 304 41 Oil Pu...

Страница 6: ...ection Pump Installation 69 Spill Timing Procedure 70 29 100 50 Reinstallation of Engine into Skid Steer Frame 79 How to Operate the Engine After Overhaul 81 Cooling System 82 Cooling System Operation 82 Water Pump Assembly and Thermostat Housing 83 Radiator 85 Fuel System 86 Fuel Specifications 86 Diesel Fuel 86 Diesel Fuel Storage 86 Fuel System Components 87 Fuel Guage 88 Cold Start Aid 89 Fuel...

Страница 7: ...ectrical Diagram 18 10 001 10 Engine Removal 19 Engine Disassembly Sequence 25 Engine Component Maintenance 33 10 101 55 Valve Seat 36 10 101 56 Cylinder Block 39 10 105 22 Piston and Piston Rings 40 Connecting Rod 44 10 103 10 Bearing Holder 48 Front Crankshaft Bearing Bushing 50 10 103 30 Crankshaft 52 10 103 76 Flywheel and Ring Gear 54 10 106 40 Camshaft Assembly 55 10 106 66 Camshaft Gear and...

Страница 8: ...r and Oil Pump Assembly 67 Timing Gear Case Installation 68 Crankshaft Pulley 69 Injection Pump Installation 69 29 100 50 Reinstallation of Engine into Skid Steer Frame 76 How to Operate the Engine After Overhaul 78 Cooling System 79 Cooling System Operation 79 Water Pump Assembly and Thermostat Housing 80 Radiator 82 Fuel System 83 Fuel Specifications 83 Diesel Fuel 83 Diesel Fuel Storage 83 Fuel...

Страница 9: ...4 Hydraulic Hydrostatic System Air Ingress Test 29 26 Hydrostatic Pumps 29 27 29 100 40 Hydrostatic Pump Removal 29 27 29 100 46 Hydrostatic Pump Disassembly 29 31 Hydrostatic Pump Parts Inspection 29 37 Hydrostatic Pump Reassembly 29 40 Hydrostatic Pump Reinstallation 29 46 Hydrostatic Motor 29 48 29 100 60 Hydrostatic Motor Removal 29 48 29 100 66 Hydrostatic Motor Disassembly 29 52 Hydrostatic ...

Страница 10: ...eft Control Handle With Boom Control Removal 29 84 Left Control Handle With Boom Control Disassembly 29 85 Left Control Handle With Boom Control Inspection 29 86 Left Control Handle With Boom Control Reassembly 29 87 Left Control Handle With Boom Control Reinstallation 29 88 Right Control Handle With Auxiliary or Bucket Control 29 90 29 100 15 Right Control Handle With Auxiliary or Bucket Control ...

Страница 11: ...tion Page 35 000 General Information 35 3 Hydraulic System Compatibility 35 4 Boom Cylinder Pivot Pins 35 6 Boom Cylinder Pivot Pin Location and Machine Usage 35 6 Control Valve Power Beyond 35 7 Specifications 35 8 Troubleshooting 35 10 Auxiliary Boom Hydraulics Troubleshooting 35 14 Hydraulic System Testing 35 16 Hydraulic System Oil Flow Neutral Position 35 22 Control Valve Bucket Spool Shifted...

Страница 12: ...rts Inspection 35 48 Control Valve Reassembly 35 49 Control Valve Reinstallation 35 53 Hydraulic Pump Specifications 35 54 35 710 10 Hydraulic Pump Removal 35 55 35 710 20 Hydraulic Pump Disassembly 35 57 Hydraulic Pump Parts Inspection 35 58 Hydraulic Pump Reassembly 35 60 Hydraulic Pump Installation 35 63 Cylinders Boom and Bucket 35 64 35 710 10 Boom Cylinder Removal 35 65 35 730 18 Boom Cylind...

Страница 13: ... Reinstallation With Boom and Bucket Hand Controls 35 83 35 300 Hydraulic Cooling Filter Reservoir System 35 86 35 705 Filter System 35 87 35 705 04 Filter Removal 35 87 35 705 05 Base Removal 35 87 Reassembly 35 88 Oil Cooler 35 88 35 300 10 Oil Cooler Removal 35 88 Oil Cooler Reassembly 35 89 35 300 Oil Reservoir 35 90 35 300 10 Oil Reservoir Removal 35 91 Oil Reservoir Reinstallation 35 92 SECT...

Страница 14: ...scription Page 44 100 General Information 44 2 Specifications 44 4 Troubleshooting 44 5 Testing 44 7 44 106 Axles 44 8 44 106 10 Axle Housing Assembly Removal 44 8 44 106 16 Axle Disassembly 44 9 Axle Parts Inspection 44 11 Axle Reassembly 44 12 Axle Housing Reinstallation 44 14 Final Drive 44 16 44 106 48 Final Drive Removal 44 16 Final Drive Parts Inspection 44 23 Final Drive Reassembly 44 24 44...

Страница 15: ...7036981 Chapter 1 Advanced Warning System Circuits Alternator and Starter CONTENTS Section Description Page 55 000 General Electrical Information 55 6 Definition of Terms 55 7 Adapting Attachments Requiring 12V Electrical Power 55 9 Specifications 55 12 Electrical Diagram 55 15 55 418 Advanced Warning System 55 19 Electronic Instrument Cluster EIC 55 19 EIC Electronic Instrument Cluster Front Pane...

Страница 16: ...2 Blown Fuse Symptom and Testing 55 52 Testing Other EIC Functions 55 54 EIC Board Reading Accuracy 55 57 EIC Board Claims Warranty 55 59 Electrical Circuits 55 60 Seat Switch Circuit to EIC Board 55 61 Seat Belt Switch Circuit to EIC Board 55 62 Ignition Switch Circuit to EIC Board 55 63 Cranking Circuit Starter Motor 55 64 Service Run Switch in the Run Position 55 65 Cranking Circuit Ground 55 6...

Страница 17: ...n Key Switch Removal 55 78 Ignition Key Switch Installation 55 78 Cab Fuse Panel Wiring 55 79 Cab Fuse Block and Panel Removal 55 80 Cab Fuse Block and Panel Installation 55 80 Service Run Switch Wiring 55 81 Service Run Switch Service Position 55 81 Service Run Switch Run Position 55 81 55 418 30 Service Run Switch Removal 55 82 Service Run Switch Installation 55 82 Seat and Seat Belt Switch Wiri...

Страница 18: ...llation 55 93 Alternator Excite Resistor Wiring 55 94 55 301 16 Alternator Excite Resistor Removal 55 94 Alternator Excite Resistor Installation 55 94 Start Relay Wiring 55 95 55 100 34 Start Relay Removal 55 95 Start Relay Installation 55 95 Preheat Relay Wiring 55 96 55 100 34 Preheat Relay Removal 55 97 Preheat Relay Installation 55 97 Preheat Glow Plug Removal 55 98 Preheat Glow Plug Installat...

Страница 19: ... Sender Removal 55 106 Hydraulic Oil Temperature Sender Installation 55 107 Boom Bucket Control Valve Spool Lock Solenoids 55 108 35 724 90 Boom Bucket Control Valve Spool Lock Solenoids Removal 55 108 Boom Bucket Control Valve Spool Lock Solenoids Installation 55 108 Wire Harness 55 109 55 100 74 Main Wire Harness Removal 55 109 Main Wire Harness Installation 55 114 55 404 Road Work Lights 55 118...

Страница 20: ...ator and Starter Continued CONTENTS Section Description Page Starter Inspection and Repair 55 152 Starter Reassembly 55 158 Starter Reinstallation 55 161 Miscellaneous Engine Components 55 162 Glow Plug 55 162 Glow Plug Troubleshooting 55 162 Oil Pressure Switch 55 163 Fuel Shut off Solenoid 55 163 ...

Страница 21: ...allation Procedure 82 10 82 100 Dirt Tooth Kit Installation 82 13 Bucket Tooth Spacing 82 14 Boom Lock Pin Linkage 82 16 82 100 77 Boom Lock Pin Linkage Removal 82 16 Boom Lock Pin Linkage Reinstallation 82 17 Boom Upper and Lower Link 82 19 Boom Upper and Lower Link Removal 82 19 82 100 70 Front Boom Mounting Plate Pivot Hub Replacement 82 25 Boom Upper and Lower Link Reinstallation 82 27 Attachm...

Страница 22: ...ic Power Supply 12 Volt 15 Amp 88 12 10 254 Exhaust Engine 88 13 10 254 Aspirator Precleaner Muffler 88 13 55 000 Horn 88 15 90 000 Shoulder Belt Seat 88 16 88 000 Slow moving Vehicle SMV Sign Kit 88 17 55 000 Warning Light Rotary Beacon 88 18 55 000 Warning Lights Four way Flashers Turn Signal Horn 88 21 SECTION 90 PLATFORMS CAB BODYWORK AND DECALS BOOK 4 87036981 Chapter 1 Cab and Seat CONTENTS ...

Страница 23: ...LS140 LS150 Section 00 General Information Section 10 Engine 87042550 1 04 ...

Страница 24: ...ATE CONTROL SECTION 55 ELECTRICAL SYSTEM SECTION 82 FRONT LOADER BOOM AND MOUNTING PLATE SECTION 88 ACCESSORIES SECTION 90 PLATFORMS CAB BODYWORK AND DECALS The sections used through out all New Holland product Repair manuals may not be used for each product Each Repair manual will be made up of one or several books Each book will be labeled as to which sections are in the overall Repair manual an...

Страница 25: ...pecifications 10 Installation of Adjustable Fittings in Straight Thread O Ring Bosses 12 Standard Torque Data for Hydraulic Tubes and Fittings 12 Pipe Thread Fitting Torque 13 Lubricants and Coolants 13 Sealants 13 Properly Support a Raised Machine 14 Properly Support Boom on Boom Lock Pins 14 Raising Boom Without Hydraulic Oil Flow 14 Raising Boom Without Battery Voltage 12V 15 Reattaching Cylind...

Страница 26: ... to read and follow all safety instructions in this manual Your New Holland dealer is interested in your obtaining the most from your investment and will be glad to answer any questions you may have about your skid steer When major service is required your dealer s staff of trained service technicians is ready to serve you When in need of parts always order genuine New Holland service parts from y...

Страница 27: ...ccessories have been specifically designed for NEW HOLLAND MACHINES We would like to point out that NON GENUINE parts and accessories have not been examined and released by NEW HOLLAND The installation and or use of such products could have negative effects upon the design characteristics of your machine and thereby affect its safety NEW HOLLAND is not liable for any damage caused by the use of NO...

Страница 28: ...dent involvement WARNING The word WARNING denotes a potential or hidden hazard which has a potential for serious injury It is used to warn operators and others to exercise every appropriate means to avoid a surprise involvement with machinery DANGER The word DANGER denotes a forbidden practice in connection with a serious hazard FAILURE TO FOLLOW THE CAUTION WARNING AND DANGER INSTRUCTIONS MAY RES...

Страница 29: ...h area of the skid steer disconnect the negative ground battery cable this will shut off power to the eic and prevent damage to the eic board or blowing the 5 amp fuses if the board is accidentally grounded 16 If welding is required on the skid steer disconnect the negative ground cable Failure to disconnect the battery may result in damage to the EIC electronic instrument cluster monitoring syste...

Страница 30: ...b floor or foot control pedal area that may hinder safe machine operation 40 Never operate the skid steer with any of the shielding removed 41 Never operate the skid steer without windows and or screens in place 42 Never extend any part of the body outside of the operator s area 43 Always properly tie down the skid steer to a truck or trailer before transport 44 Make sure all bystanders are at a s...

Страница 31: ...cally removed within a few hours or gangrene may result Doctors unfamiliar with this type of injury should reference a knowledgeable medical source AVOID HEATING NEAR PRESSURIZED FLUID LINES Flammable spray can be generated by heating near pressurized fluid lines resulting in severe burns to yourself and bystanders Do not heat by welding soldering or using a torch near pressurized fluid lines Pres...

Страница 32: ...on remove any attachment from the boom mounting plate and support the boom on the boom lock pins If servicing requires the complete skid steer to be in the supported position support the unit with adequate jack stands or blocking with all four wheels off the ground If servicing requires the engine to be operated raise the machine and properly support the unit with adequate jack stands or blocking ...

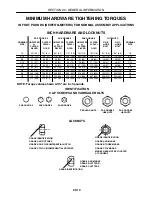
Страница 33: ...s located on the right front interior of the operator s cab at 1 1 ENGINE MODEL AND SERIAL NUMBER LOCATION The engine model and serial number is located on the left side of the block at 1 2 For the tightening torques for reassembly use the following hardware torque chart unless the torque is specified in the instructions ...

Страница 34: ...15 13 149 17 178 20 229 26 250 28 324 37 125 14 176 20 5 16 1 4 55 6 2 72 8 1 86 9 7 112 13 121 14 157 18 61 6 9 86 9 8 1 4 MINIMUM HARDWARE TIGHTENING TORQUES IN FOOT POUNDS NEWTON METERS FOR NORMAL ASSEMBLY APPLICATIONS INCH HARDWARE AND LOCKNUTS NOMINAL UNPLATED PLATED UNPLATED PLATED UNPLATED PLATED GR B GR C NOMINAL SIZE or W ZnCr or W ZnCr or W ZnCr w GR5 w GR8 SIZE PLATED PLATED PLATED BOLT...

Страница 35: ...671 195 265 M24 303 411 392 531 478 648 619 839 662 897 855 1160 338 458 MINIMUM HARDWARE TIGHTENING TORQUES IN FOOT POUNDS NEWTON METERS FOR NORMAL ASSEMBLY APPLICATIONS METRIC HARDWARE AND LOCKNUTS SIZE UNPLATED PLATED UNPLATED PLATED UNPLATED PLATED W CL8 8 W ZnCr W ZnCr W ZnCr BOLT CLASS 5 8 CLASS 8 8 CLASS 10 9 PROPERTY CLASS LOCKNUT CL 8 NOMINAL CLOCK MARKING NOTE Torque values shown with ar...

Страница 36: ... 175 240 FOOT POUNDS Min Max 6 4 7 9 9 5 12 7 15 9 19 1 22 2 25 4 31 8 38 1 50 8 4 5 6 8 10 12 14 16 20 24 32 1 4 5 16 3 8 1 2 5 8 3 4 7 8 1 1 1 4 1 1 2 2 7 16 20 1 2 20 9 16 18 3 4 18 7 8 14 1 1 16 12 1 3 16 12 1 5 16 12 1 5 8 12 1 7 8 12 2 1 2 12 12 16 29 47 72 104 122 149 190 217 305 16 20 33 54 79 111 136 163 204 237 325 6 10 15 25 35 60 70 80 95 120 250 10 15 20 30 40 70 80 90 115 140 300 TUB...

Страница 37: ... CG4 10W 30 All lubrication fittings Tube 9613310 High viscosity lithium base grease Engine 1 qt 9613313 2 5 gal 9613314 1 L 9613358 20 L 9613360 API Service SH CG4 10W 30 Refer to Operator s Manual for Temperature Oil usage Chart Cooling System 1 gal FGCC2701DS Antifreeze Water 50 50 Mixture Ethylene Glycol SEALANTS Description New Holland Part No Typical Applications Strength Color Thread Lock L...

Страница 38: ...CK PINS Before servicing the machine or any of its attached equipment be sure that the attachments are lowered to the ground or the boom arms are supported by the boom lock pins 1 If the boom is to be raised on the boom lock pins remove any attachment Opening a hydraulic line could cause a mounted attachment to dump over unexpectedly 5 RAISING BOOM WITHOUT HYDRAULIC OIL FLOW Engine Or Hydraulic Sy...

Страница 39: ... controls pivot the left hand control lever down into the boom float position 6 Slowly raise the boom above the boom lock pins 1 7 Operator sitting in seat engage the boom lock pins 1 8 Lower the boom and rest on the boom lock pins 1 9 Return the boom control to the NEUTRAL position 10 Turn the ignition key to the OFF position CAUTION The operator must not leave the operator s seat until the boom ...

Страница 40: ...AUTION Attach suitable chains or straps capable of handling the weight of the boom 454 kg 1000 lbs Attach chains securely to prevent themfrom coming loose during lifting of the boom 2 1 10995766 10 4 Remove the rod end top pivot pins 1 from both cylinders By remove retaining hardware 2 from pivot pin and boom 2 1 10995768 11 5 Support the cylinders on the fenders 1 as shown 1 10995769 12 ...

Страница 41: ...This as a preview PDF file from best manuals com Download full PDF manual at best manuals com ...

Отзывы: