4
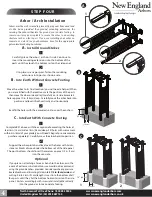
Carefully place the ar
b
or
/ arch
on its side. Continue to
insert the
mounting extensions
in
to the
b
ottom of the
posts until they touch
the
b
ottom rail on the side panel.
1
STEP FOUR
Arbor
/ Arch
Installation
2
A
- Install Ground Stakes
www.newenglandarbors.com
www.newenglandarbors.co.uk
2
North America Toll Free Phone: 1 800 282 9346
United Kingdom Tel: (44) 2038 687160
A
1
1
2
Arbors must be well secured to prevent tipping over from wind load
etc. We have provided four ground
mounting extensions
for
securing the arbor either into the ground or a concrete footing. In
some cases it may be acceptable to secure the arbor to an existing
structure such as a fence post. If you are installing your arbor on
concrete or a deck, see your hardware store for the appropriate
galvanized bracketing hardware.
1
8
" (46 cm)
6
"
(15 cm)
Move the ar
b
or to its final location (you will need a helper).
W
hen
you are satisfied with the location, mark the positions of the posts,
then move the ar
b
or aside and lay it carefully on its side.
E
x
cavate 4
holes appro
x 10
in.
(24 cm)
deep. Carefully move the ar
b
or
b
ack into
position and level it
b
oth vertically and horizontally.
Backfill the holes with the e
x
cavated soil to cover the anchors.
1
2
Complete B #1 a
b
ove, with the e
x
ception of e
x
cavating the holes at
leas
t 6
in.
(15 cm)
wide
x 18
in.
(46 cm)
deep. Fill holes with wet cement
within 3in.
(8 cm)
of your grade (yo
u will need 2 bag
s of pre-m
ix
concrete
- purchase separately). Carefully move the ar
b
or
b
ack into position.
1
2
Using two screws per post, fasten the
mounting
extensions
in
to
post as shown aside.
B
- Into Earth Without Concrete Footing
C
- Into Earth With Concrete Footing
Support the ar
bor plumb and l
evel ov
er the holes with b
ricks
,
stones o
r blo
cks of wood under the
b
ottom rail of the side panel.
The post
b
ottoms should insert themselves appro
x 1/2i
n.
(1 cm)
into the concrete.
Optional
If you plan on attaching a fence or
b
ench to the ar
b
or, or in the
event of e
x
treme wind conditions we would not recommend
using the ground anchors provided. Consider purchasing pressure
treated lum
b
er and trimming it down to
3 1/4in.
(8 cm)
wide
and
cutting it int
o 36in
.
(91 cm)
lengths. Insert into the
b
ottom of all
four posts until they hit the
b
ottom horizontal rail on the side
panel. Fasten accordingly with screws and install either directly
into the ground or into a concrete footing.
B
10
”
(25 cm)
4
"
(10 cm)
C


