Draft. Nr.: BDA 380
Update: 13.07.2016
Data subject to change without prior notice. 2015 NEUTRIK . ALL RIGHTS RESERVED. NEUTRIK are registered trademark.
I
I
®
®
©
NEUTRIK AG
LI
T:
+423
/
237
24
24
F:
+423
/
232 53 93
NEUTRIK USA Inc.
USA
T:
+1
704
/
972 3050
F:
+1
704
/
438 9202
(
)
NEUTRIK UK Ltd.
UK
T:
+44
1983
/
811
441
F:
+44
1983
/
811
439
NEUTRIK
Vertriebs
GmbH
DE
/
NL
/
AT/DK T:
+49
8131
/
280
890
F:
+49
8131
/
280
830
NEUTRIK France
FR
T:
+33 1
/
4131 6750
F:
+33 1
/
4131 0511
NEUTRIK Tokyo Ltd.
JP
T:
+81 3
/
3663 4733
F:
+81 3
/
3663 4796
NEUTRIK Hong Kong Ltd.
HK
T:
+852
/
2687 6055
F:
+852
/
2687 6052
NEUTRIK India Pvt. Ltd.
IND
T:
+91
/
982 05 43 424
F:
+91
/
22 26163 540
ASSEMBLY INSTRUCTION
powerCON TRUE1
I
R
20
250
P S
E
JET
16
250
20
250
NA
C3M
X-W
20
250
P S
E
JET
16
250
20
250
NA
C3M
X-W
Torque Value 0.7 Nm
5.
Torque Value 2.0Nm
PRESS FIRMLY
Torx size
T8
1.
2.
4.
Wrench size
13 mm
6.
3.
Important:
Push and turn simultaneously.
FOR DISASSEMBLY - OPEN TWIST LOCK!
1.
Press with screw driver to unlock
2.
Turn bushing 360°.
3.
Repat step 1 + 2 until bushing is unscrewed.
1.
2.
CAUTION
To ensure protection
category, do not expose the
connection to bending forces
(e.g. do not attach loads to
the cable, no free-dangling
cable windings etc.).
LIECHTENSTEIN
20
250
P S
E
JET
G
E
F
Important:
Align rubber key
and latch.
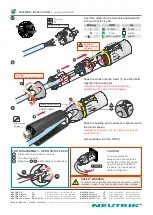
Insert the wires into the terminals and fasten the
screw with Torx size T8.
Wiring
VDE
UL
L
brown
black
Þ
N
blue
white
Þ
green
/
yellow
green
Þ
Slide the chuck onto the insert (1) and then both
together into housing (2).
Important: Align the chuck and insert by
positioning the nose into the keyway.
Slide the bushing up the cable and tighten it with
the tool as shown.
Important:
Yellow O-ring to hide to achieve IP
protection (6).
(Tool available: Art. No. HTAC)
FORCE
SAFETY WARNING
For safety and certification reasons the connector must be
replaced in case of any broken parts or serious damage.


