background image

14


www.neutonpower.com


Chapter 3:


Operating Your NEUTON Mower


NOTE:  

If the Mower Battery is not fully charged or if you are unpacking a new Mower for the first time, read “Chapter 4:  Charging and 

Caring for the Battery” before operating the Mower.  You should charge the Battery for eight (8) to fourteen (14) hours before 
use.


Starting the Motor and Engaging the Blade 


• 

Starting, stopping, and restarting an electric Motor repeatedly within a few seconds can generate a great deal of heat and 
damage the Motor.  To protect the life of your NEUTON Mower, always wait at least five (5) seconds after stopping before 
restarting the Mower. 

• 

The cutting Blade always turns when the Motor is running; there is no clutch to allow the Blade to stop rotating while the 
Motor is running.


• 

Perform the Daily Checks listed on the back cover of this manual.


Starting the Mower 

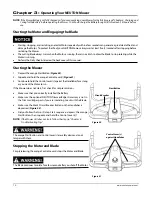
1.  Depress the orange Start Button (

Figure 20

). 

2.  Squeeze and hold the orange Control Lever(s) (

Figure 21

). 

3.  Continue to hold the Control Lever(s) against the Handlebar for as long 

as you want the Motor to run.


If the Mower does not start, first check for simple solutions:


• 

Make sure that you correctly installed the Battery. 

• 

Make sure the optional NEUTON Trimmer/Edger Accessory is not in 
the Trimmer/Edger ports if you are intending to cut with the Blade. 

• 

Make sure the black Circuit Breaker Button on the Handlebar is 
depressed (

Figure 20

). 

• 

Did you follow the two (2)-step Start sequence:  depress the orange 
Start Button, then squeeze and hold the Control Lever(s)? 

NOTE:  

If the Mower still does not start, follow the steps in “Chapter 6:  

Troubleshooting Tips”.


The orange Start Button and Control Lever(s) are safety devices; do not 
tamper with them. 


Stopping the Motor and Blade


Simply releasing the orange Control Lever(s) stops the Motor and Blade. 


The Blade continues to rotate for a few seconds after you shut off the Motor.  

Figure 20 

Figure 21

Control Lever(s) 
against Handlebar 

Circuit Breaker 

Start Button 

Содержание CE5.4

Страница 1: ... CE5 4 NEUTON Power Equipment 75 Meigs Road Vergennes VT 05491 Toll Free phone 1 866 NEUTON1 638 8661 Fax 1 802 877 1213 Web site www neutonpower com E MAIL INFO NEUTONPOWER COM Read and understand this manual and all instructions before operating this Mower ...

Страница 2: ...teinjury This information is important in the proper use of your mower Failure to follow this instruction could result in damage to your machine or property This is a helpful hint to guide you in getting the most out of your NEUTON Mower NOTE ThisinformationmaybehelpfultoyouinusingyourMower Tools Needed This indicates you will need a special tool to perform a maintenance function on your Mower Neu...

Страница 3: ... pets in your work area when operating the Mower Stop the machine if anyone enters the area Only allow responsible individuals who have a thorough understanding of these instructions to operate the Mower Never allow children to operate the machine Before and while pulling the machine backwards look behind and down for small children and for secure footing Be sure to shut off the motor before pulli...

Страница 4: ... come loose and cause injury Mow only in daylight or in an area well lit by artificial light Do not charge the Mower battery in wet or rainy conditions Operating Your Mower Safely Your Mower can operate as a Discharging Mulching or Bagger Mower Learn how to use the Side Discharge Chute sold separately Mulching Plug and Rear Bagger as appropriate Always stop the Motor and wait for the Blade to stop...

Страница 5: ...ry in the rain or in wet conditions Use only the Charger provided to charge the Battery Use of a different charger may not allow the Battery to fully recharge and may cause a fire or explosion Exercise care in handling the Battery in order not to short circuit it with conducting materials such as rings bracelets and keys When short circuited the Battery or conductor may overheat and cause burns Ne...

Страница 6: ...r Assembly 268761 Mulching Plug 203831 2 Handlebar Connector Knobs 175791 2 Upper Handlebar Carriage Bolts 175781 2 Green Quick Connect Knobs 243751 2 Lock Washers 200061 2 Main Cable Retainers 268961 Lower Handlebar 268801 Bagger 208921 Battery 268611 Battery Charger 268591 36mm Wrench 176281 Figure 1 Safety Operating Instructions Manual 268001 ...

Страница 7: ...ntal starting and help avoid serious personal injury Step 1 Read the Safety OperatingInstructionsbefore proceeding The NEUTON Mower is a motorized cutting machine that uses a sharp Blade For your safety and for best results it is important to read the information in Chapter 1 Important Safety Considerations before you assemble or use the Mower To familiarize yourself with the assembly features and...

Страница 8: ...OTE Forthefirstfive 5 hours theChargerwillbewarmtothetouch Thisis normalanddoesnotindicateaproblem Step 4 Attach the Lower Handlebar To keep the Mower from moving while you assemble it place your foot behind one of the wheels NOTE YouwillusethegreenQuick ConnectKnobstoattachtheLowerHandlebartotheMower 1 Set the Cutting Height Lever Figure4 to the highest adjustment position 6 Lever all the way dow...

Страница 9: ...from the inside of the Handlebars outward through the predetermined holes in the Upper and Lower Handlebars on each side of the Mower and lightly screw on the black Connector Knobs just enough to hold the Upper and Lower Handlebar sections together Figure5 4 Swing the Upper Handlebar Assembly into an upright position so that the Upper and Lower Handlebars line up and slide into place Figure6 Tight...

Страница 10: ...h the top of the Plug in first Then put pressure towards the bottom and slide in the Plug Rear Bagger The NEUTON Rear Bagger lets you cut and catch your grass clippings eliminating the need to rake The Rear Bagger easily attaches to the rear of the Mower Figure 9 The Bagger shipped unassembled The following instructions outline the steps necessary to assemble install and remove the Bagger Assembli...

Страница 11: ...Discharge Guard 4 To empty the Bagger tilt the Top Handle forward Use the Cloth Handle Figure14 at the rear of the Bagger to move the contents toward the front as you empty the Bagger Step 7 Insert the Battery after being fully charged 1 Orient the Battery with the indentations on the bottom of the Battery lining up with the metal tabs in the bottom of the Battery compartment 2 After confirming th...

Страница 12: ...ng Height Lever Figure17 adjust the Cutting Height so that you cut off only one 1 to two 2 inches of grass at a time 1 Make sure all four 4 Wheels are level 2 Pull the Lever out of its present notched position and rotate the Lever up or down to the desired level When you reach the desired level simply release the Lever into the notch NOTE EachpositionadjuststheMower sBladeleveltoadifferent Cutting...

Страница 13: ... insertion Ports Access Cover Latch OPTIONAL ACCESSORIES NEUTON Trimmer Trimmer Cord Spare Battery Spare Cutting Blade Blade Sharpener Protective Cover Rear Side Discharge Chute To learn more about these accessories call us at 1 866 Neuton1 638 8661 or visit us on our web site www neutonpower com Shown without the Rear Discharge Chute or Bagger Battery Circuit Breaker Button Analog Battery Gauge ...

Страница 14: ...ount of Battery life remaining The yellow area indicates acceptable voltage whereas the red area indicates low voltage You should raise the Cutting Height or mow slower if the gauge momentarily drops into the red area Recharge the Battery if the Gauge stays in the red area Figure 19 Analog Voltage Gauge ...

Страница 15: ...g Height Easily Adjustable from 1 2 3 0 inches Discharge Rear Discharge Chute sold separately Bagger Rear Bagger Included Bagger Capacity 1 Bushel 1 26 cubic ft Mulching Mulching Plug Included Trimming Optional Trimmer Edger Attachment Lawn Size Up to 1 4 acre on a single Battery charge Battery Voltage 24V DC AMP 10 Amp Hour Type Sealed Lead Acid Weight 15 lbs 5 oz Approximate Run Time 45 60 minut...

Страница 16: ...re20 2 Squeeze and hold the orange Control Lever s Figure21 3 Continue to hold the Control Lever s against the Handlebar for as long as you want the Motor to run If the Mower does not start first check for simple solutions Make sure that you correctly installed the Battery Make sure the optional NEUTON Trimmer Edger Accessory is not in the Trimmer Edger ports if you are intending to cut with the B...

Страница 17: ...ery ready so you can continue mowing It may take up to five 5 charging and discharging cycles before your Battery provides maximum life A Battery may last much longer if you charge it as soon as it starts to lose power and not let it completely discharge You should not try to coax a little more power out of your Battery Recharge the Battery as soon as possible after each use for eight 8 to fourtee...

Страница 18: ...nted process To find the location of the East Penn distribution center nearest you visit http www dekabatteries com You can also visit the Web site of Earth 911 for more information www earth911 org Once there click the Household tab at the top of the page and then enter your zip code The site lists recycling centers located near you You can also visit our website www neutonpower com and click on ...

Страница 19: ...l height adjustments while the Motor is running Grass catcher components are subject to wear damage and deterioration which could expose moving parts or allow the Blade to throw objects Check components frequently and replace them with the manufacturers recommended parts when necessary Check the Blade and Motor mounting bolts at frequent intervals for proper tightness Use only authorized NEUTON re...

Страница 20: ... Figure23 and make sure to properly seat the Blade NOTE BesurethatthestampingontheBlade THISSIDETOWARDSMOWER isfacingtheMower Also ifreplacingtheBladewitha newone usethenewNutsupplied IfyouassembletheBlademorethanten 10 times replacetheBladeNutwithanew one 5 Place the 36mm Wrench over the Steel Hex Adapter then place a 3 4 Wrench or optional Torque Wrench with a 3 4 Socket over the Blade Nut Figur...

Страница 21: ...ss raise the cutting height walk more slowly or cut a narrower swath If the grass is wet let it dry before mowing Excessive vibration or noise The Blade may be loose Remove the Battery turn the Mower over and check that the Blade is securely attached The Blade may be unbalanced bent or damaged Remove the Battery turn the Mower over remove the Blade and check its condition Replace with a new Blade ...

Страница 22: ...nd Charger Connector back into the Charger Receptacle on the Battery and make sure that it is fully depressed into the Receptacle Plug the Battery Charger into a standard 110V wall outlet The LED on the Battery Charger and the LED on the Battery should turn RED If the Battery Charger LED begins to flash again between RED and GREEN please check that you have followed all of the steps outlined here ...

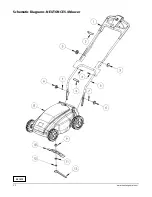
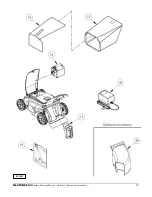
Страница 23: ...b Handlebar Connector Black 4 175781 Bolt Handlebar Connector 5 268801 Lower Handlebar 6 243751 Knob Quick Connect Green 7 200061 Washer Lock 8 269011 Mower Body Assembly 9 196731 Blade Adapter 10 243601 Aero Cutting Blade 11 196671 Hex Adapter 12 243611 Blade Nut w Flange 13 176281 Wrench 36 mm 14 210501 Frame Rear Bagger 15 216001 Mesh Rear Bagger 16 268611 24V Battery 17 203831 Plug Mulching 18...

Страница 24: ...22 www neutonpower com Schematic Diagrams NEUTON CE5 4 Mower 091019 ...

Страница 25: ...NEUTON CE5 4 Battery Powered Mower Safety Operating Instructions 23 091021 ...

Страница 26: ...______________________________________________________________________________ E Mail ________________________________________________________________________________________________ Street Address _______________________________________________ __________________________ __________________ City State Province Zip Code Postal Code _________________________________ _________________________________...

Страница 27: ...y registration page and follow the instructions as indicated on that page The warranty is applicable only to the original owner The owner is responsible for the performance of all the required maintenance as defined by the manufacturer s owner manual The owner is responsible for the replacement of normally wearing parts including the Blade Battery and Bagger Mesh The Battery carries a one 1 year l...

Страница 28: ...long or thick for optimal cutting raise the Height and mow the yard in multiple passes cutting it slightly shorter each time It is best to mow more frequently rather than let the grass become excessively long Push the Mower before starting it to the lawn area that you wish to mow NOTE ThelengthoftimethataBatterycanholdachargewhilemowingdependsuponlawnconditions tallorthickgrass makestheMowerworkha...

Страница 29: ...IPMENT 75 Meigs Road Vergennes VT 05491 États Unis Téléphone sans frais 1 866 NEUTON1 638 8661 Télécopieur 1 802 877 1213 Site Internet www neutonpower com COURRIEL INFO NEUTONPOWER COM Veillez à lire et à bien comprendre le présent manuel et toutes les instructions avant d utiliser cette tondeuse ...

Страница 30: ...tte information est importante pour l utilisation correcte de votre tondeuse Le non respect de ces instructions pourrait provoquer des dommages matériels Conseil utile pour vous permettre de tirer le meilleur parti de votre tondeuse NEUTON REMARQUE cetteinformationpeutvousêtreutilepourl utilisationdevotretondeuse Outils requis indique que vous aurez besoin d un outil spécial pour effectuer l entre...

Страница 31: ... animaux rester dans votre zone de travail lorsque vous utilisez la tondeuse Arrêtez la machine si quelqu un pénètre dans la zone N autorisez l usage de cette tondeuse que par des personnes responsables comprenant parfaitement ces instructions Ne laissez jamais des enfants se servir de la machine Avant et pendant que vous reculez la machine regardez derrière vous et vers le sol pour vous assurer d...

Страница 32: ...et causer des blessures Ne tondez qu à la lumière du jour ou sous un bon éclairage artificiel Ne chargez pas la batterie de la tondeuse par temps humide ou pluvieux Utilisation sécuritaire de votre tondeuse Votre tondeuse peut servir de tondeuse à éjection de tondeuse déchiqueteuse ou de tondeuse ensacheuse Apprenez à utiliser la goulotte d éjection latérale vendue séparément la plaque de déchique...

Страница 33: ...as la batterie de la tondeuse sous la pluie ou par temps humide N utilisez que le chargeur fourni pour charger la batterie L usage d un chargeur différent peut empêcher la recharge complète de la batterie et causer un incendie ou une explosion Manipulez la batterie avec précaution afin de ne pas la court circuiter avec des objets constitués de matériaux conducteurs tels que des bagues des bracelet...

Страница 34: ...e déchiquetage 203831 2 Boutons connecteurs du guidon 175791 2 Boulons de carrosserie du guidon supérieur 175781 2 Bouton verts pour connexion rapide 243751 2 Rondelles de blocage 200061 2 Retenues de câble principal 268961 Guidon inférieur 268801 Ensacheuse 208921 Batterie 268611 Chargeur de batterie 268591 Clé de 36 mm 176281 Figure 1 Manuel de sécurité et d utilisation 268001 ...

Страница 35: ...ures graves Étape 1 Lisez les Instructions de sécurité et d utilisation avant de commencer La tondeuse NEUTON est un engin de coupe motorisé doté d une lame tranchante Pour votre sécurité et pour des résultats optimaux il est important de bien lire les informations du Chapitre 1 Importantes consignes de sécurité avant d assembler ou d utiliser la tondeuse Pour vous familiariser avec l assemblage l...

Страница 36: ...echargeurserachaudau toucher Celaestnormaletn indiquepasdeproblème Étape 4 Fixez le guidon inférieur Pour empêcher la tondeuse de bouger durant l assemblage placez le pied derrière l une des roues REMARQUE vous utiliserez les boutons verts de connexion rapide pour fixer le guidon inférieur sur la tondeuse 1 Mettez le levier de réglage de la hauteur de coupe Figure 4 à la hauteur maximale position ...

Страница 37: ...depuis l intérieur des guidons et vers l extérieur au travers des trous pré percés des guidons supérieur et inférieur de chaque côté de la tondeuse et vissez les boutons connecteurs noirs juste assez pour maintenir assemblés les guidons supérieur et inférieur Figure 5 4 Faites pivoter le guidon supérieur à la verticale de manière à ce que les guidons supérieur et inférieur s alignent et glissent e...

Страница 38: ...Exercez ensuite une pression vers le bas et faites glisser la plaque Ensacheuse arrière L ensacheuse arrière NEUTON vous permet de couper et de ramasser l herbe coupée éliminant ainsi la nécessité de ratisser L ensacheuse arrière se fixe facilement à l arrière de la tondeuse Figure 9 L ensacheuse n est pas assemblée pour l expédition Les instructions suivantes décrivent les étapes nécessaires à l ...

Страница 39: ...3 Abaissez la protection du dispositif d éjection 4 Pour vider l ensacheuse inclinez la poignée supérieure vers l avant Utilisez la poignée en tissu Figure 14 à l arrière de l ensacheuse pour faire avancer le contenu vers l avant à mesure que vous videz l ensacheuse Étape 7 Insérez la batterie lorsqu elle est pleinement chargée 1 Orientez la batterie de manière à ce que les indentations du dessous...

Страница 40: ...re 4 roues soient de niveau 2 Tirez le levier hors de sa position actuelle dans l encoche et déplacez le vers le haut ou le bas en le faisant pivoter jusqu au niveau désiré Lorsque vous atteignez le niveau désiré relâchez simplement le levier pour le remettre dans l encoche 3 REMARQUE Chaquepositionpermetd ajusterlalamedela tondeuseàunehauteurdifférente Sivousfaites pivoterlelevierdehauteurdecoupe...

Страница 41: ... latérale arrière Pour de plus amples détails sur ces accessoires appelez nous au 1 866 NEUTON 638 8661 ou visitez notre site Internet www neutonpower com Figure 17 Couvercle d accès Orifices d insertion optionnels du coupe herbe taille haies taille bordures Loquet du couvercle d accès Levier de réglage de la hauteur de coupe Présenté sans goulotte d éjection arrière ni ensacheuse Batterie Mancher...

Страница 42: ...restante La zone en jaune indique une tension acceptable tandis que la zone en rouge indique une tension insuffisante Si la jauge tombe momentanément dans la zone rouge il faut relever la hauteur de coupe ou tondre plus lentement Rechargez la batterie si l indicateur reste dans la zone rouge Figure 19 Indicateur de tension analogique ...

Страница 43: ...ulotte d éjection latérale vendue séparément Ensacheuse Ensacheuse arrière incluse Capacité de l ensacheuse 1 Boisseau 1 26 pieds cubes Déchiquetage Plaque de déchiquetage incluse Taille d herbe et de bordures Coupe herbe taille haies talle bordures optionnel Dimension de pelouse Jusqu à 1 335 m2 1 1 62 ha avec une seule charge de batterie Batterie Tension 24V DC AMPÈRES 10 ampères heure Type Scel...

Страница 44: ...âcher sur le mancheron de commande orange Figure 21 3 Maintenez le mancheron de commande contre le guidon tant que vous voulez faire tourner le moteur Si la tondeuse ne démarre pas commencez par rechercher les solutions les plus simples Assurez vous de l installation correcte de la batterie Veillez à ce que le coupe herbe taille haies taille bordures NEUTON ne soit pas connecté aux orifices réserv...

Страница 45: ...argée prête à vous permettre de continuer à tondre Avant qu une durée de vie maximale soit atteinte votre batterie peut requérir jusqu à cinq 5 cycles de charge et décharge Une batterie peut durer beaucoup plus longtemps si vous la chargez dès qu elle commence à perdre de la puissance et si vous ne la laissez pas se décharger complètement N essayez pas de tirer un peu plus de puissance de votre ba...

Страница 46: ... distribution East Penn le plus proches de votre domicile visitez le site http www dekabatteries com Vous pouvez également visiter le site Internet de Earth 911 pour plus de détails www earth911 org Une fois sur le site cliquez sur l onglet Household en haut de la page et saisissez votre code postal Le site donne la liste des centres de recyclage proches de votre domicile Vous pouvez également vis...

Страница 47: ...lages de hauteur des roues moteur en marche Les composants du sac à herbe peuvent s user s abîmer et se détériorer exposant les pièces mobiles ou permettant à la lame de projeter des objets Vérifiez fréquemment les composants et remplacez les si nécessaire par les pièces recommandées par le fabricant Vérifiez à intervalles réguliers le serrage des boulons de montage de la lame et du moteur N utili...

Страница 48: ...aler la lame REMARQUE assurez vous que la mention THIS SIDE TOWARDS MOWER ce côté vers la tondeuse estampé sur la lame se trouve face à la tondeuse D autre part si vous remplacez la lame par une lame neuve utilisez le nouvel écrou fourni Au bout de dix 10 montages démontages de la lame remplacez l écrou par un écrou neuf 5 Placez la clé de 36 mm sur l adaptateur hexagonal en acier puis placez la c...

Страница 49: ...vez la hauteur de coupe avancez plus lentement ou coupez des bandes moins larges Si l herbe est mouillée laissez la sécher avant de tondre Vibrations ou bruits excessifs La lame est peut être desserrée Retirez la batterie mettez la tondeuse à l envers et vérifiez la lame La lame n est peut être pas équilibrée est peut être tordue ou endommagée Retirez la batterie mettez la tondeuse à l envers reti...

Страница 50: ...ecteur rond du chargeur dans la prise pour chargeur de la batterie et veillez à ce qu il soit complètement enfoncé dans la prise Branchez le chargeur sur une prise murale ordinaire de 110 volts La DEL du chargeur et la DEL de la batterie doivent s allumer en ROUGE Si la DEL du chargeur se remet à clignoter du ROUGE au VERT veuillez vous assurer que vous avez bien suivi toutes les étapes décrites i...

Страница 51: ...nnecteur du guidon noir 4 175781 Boulon connecteur du guidon 5 268801 Guidon inférieur 6 243751 Bouton connexion rapide vert 7 200061 Rondelle blocage 8 269011 Carrosserie de la tondeuse 9 196731 Adaptateur lame 10 243601 Lame coupe aéro 11 196671 Adaptateur Hex 12 243611 Écrou de lame avec collerette 13 176281 Clé 36 mm 14 210501 Cadre ensacheuse acier 15 216001 Maillage ensacheuse 16 268611 Batt...

Страница 52: ...22 www neutonowners com Schémas Tondeuse NEUTON CE5 4 091019 ...

Страница 53: ...Tondeuse électrique sans fil NEUTON CE5 4 Instructions de sécurité et d utilisation 23 091113 ...

Страница 54: ...lle ________________________________________________________________________________________________ COURRIEL ________________________________________________________________________________________________ Adresse _______________________________________________ __________________________ __________________ Ville État Province Code postal _________________________________ _________________________...

Страница 55: ...t de garantie et suivre les instructions figurant sur cette page La garantie s applique uniquement au propriétaire d origine Il incombe au propriétaire d effectuer tous les entretiens requis tels que définis dans le manuel d utilisation fourni par le fabricant Le propriétaire est responsable du remplacement des pièces sujettes à une usure normale notamment la lame la batterie et le maillage de l e...

Страница 56: ...ectuant plusieurs passages et en coupant un peu plus court à chaque fois Il est préférable de tondre plus souvent que de laisser l herbe devenir trop haute Poussez la tondeuse avant de la mettre en marche jusqu à la pelouse que vous voulez tondre REMARQUE la durée de maintien de la charge de la batterie pendant la tonte dépend de l état de la pelouse l herbe haute ou épaisse sollicite davantage la...

Отзывы: