Network Technologies XTENDEX ST-C5VA-WL500 Скачать руководство пользователя страница 13

NTI XTENDEX Wall Mount Extenders 


10


INTERCONNECTION CABLE WIRING METHOD 


The CAT5 connection cable between the remote and local is terminated with RJ45 connectors and must be wired according to the 
EIA/TIA 568 B industry standard.   Wiring is as per the table and drawing below.    
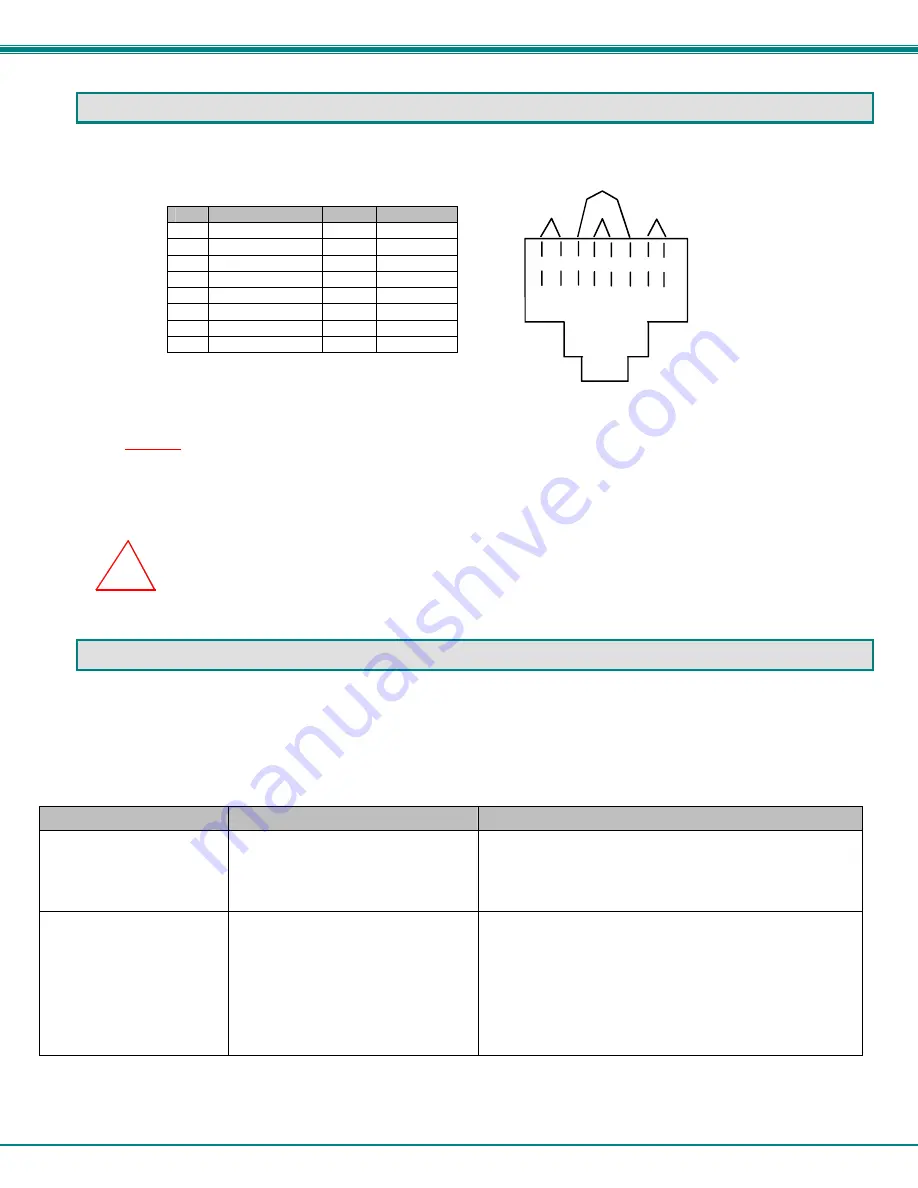


Pin 

Wire Color 

Pair 

Function 

 1 

White/Orange 

 2 

Orange 

 3 

White/Green 

 4 

Blue  1 

 5 

White/Blue 

 6 

Green 3 

 7 

White/Brown 

 8 

Brown 4 


                                                                                              Figure 8- View looking into RJ45 female 


Note: Shielded CAT 5,5e, or 6 cable must be used to connect to LOCAL and REMOTE units in order to meet CE emission 
requirements


Note: CAT5 connection cable used between NTI XTENDEX Series Local and Remote or any XTENDEX Series products 
should not be run underground, outdoors or between buildings.       


WARNING: Outdoor or underground runs of CAT5 cable could be dangerous and will void the warranty. 


TROUBLESHOOTING 


Each and every piece of every product produced by Network Technologies Inc is 100% tested to exacting specifications.   We 
make every effort to insure trouble-free installation and operation of our products. If problems are experienced while installing this 
product, please look over the troubleshooting chart below for answers any questions that might arise.    If the answer is not found 
in the chart, please check the FAQs (Frequently Asked Questions) at our website at http://www.networktechinc.com or contact us 
directly for help at 1-800-742-8324 (800-RGB-TECH) in US & Canada or 1-330-562-7070 worldwide.    We will be happy to assist 
in any way we can.  


Problem 

Cause 

Solution 

Remote or Local Unit 
power indicator LED does 
not illuminate 


Power supply is not connected or 
plugged-in. 


Make sure outlet is live and AC adapter is plugged-in.  


Make sure 12VDC power connector is fully inserted    


Make sure CAT5 cable is connected at both ends 
(Remote Unit is powered via the CAT5 cable) 


No Video on monitor 


One or more video cables is loose 
or disconnected. 


No power to Remote or Local 
Units. 


Video Cable was not attached 
when CPU was booted. 


CAT5 cable is not connected. 


Check all video cable connections 


Make sure power LEDs are illuminated for Local and 
Remote (green LEDs). If not, see solutions for first two 
problems above.   


With all the cables properly connected, reboot the CPU. 


Check cable connections.  Make sure they are snapped-
in properly and completely and reboot. 


T

1
+

R

2
-

T

3
+

R

4
-

T

5
+

R

6
-

T

7
+

R

8
-

Pair 2

Pair 1

Pair 4

Pair 3

!

Содержание XTENDEX ST-C5VA-WL500

Страница 1: ...500 WALL MOUNT VGA VIDEO AND STEREO AUDIO EXTENDER Installation and Operation Manual XTENDEXTM Series NETWORK TECHNOLOGIES INCORPORATED Tel 330 562 7070 Fax 330 562 1999 1275 Danner Dr Aurora OH 44202...

Страница 2: ...rora Ohio 44202 CHANGES The material in this guide is for information only and is subject to change without notice Network Technologies Inc reserves the right to make changes in the product design wit...

Страница 3: ...8 Video Quality 9 Technical Specifications 9 Interconnection Cable Wiring Method 10 Troubleshooting 10 Warranty Information 11 TABLE OF FIGURES Figure 1 Install Local Unit to 2 gang outlet box 4 Figu...

Страница 4: ...eet see page 8 for more details Compatible with all NTI switches and splitters enabling the joining of products to create a system that satisfies all networking needs Video quality adjustment for vary...

Страница 5: ...when there is communication between the Local and Remote Units 10 Green LED power indicator illuminates when power has been supplied to the Remote Unit supplied through the CAT5 cable 11 Audio Jack 3...

Страница 6: ...the video signal i e AC motors welding equipment etc All cables should be installed in such a way that they do not cause stress on their connections to the equipment Extended lengths of cable hanging...

Страница 7: ...Connect the CAT5 cable to the Local Unit When properly inserted the cable end should snap into place WARNING Never connect the XTENDEX to an Ethernet card Ethernet router hub or switch or other Ethern...

Страница 8: ...ck marked line out The line out jack is typically lime green and may be marked with this symbol The spkr jack is typically orange and may be marked with this symbol The headphones jack may be marked w...

Страница 9: ...he local speakers to the 3 5mm stereo audio jack labeled AUDIO OUT on the Local Unit Figure 3 Connect the local user to the XTENDEX Local Unit VIDEO AUDIO OUT IN IN OUT AUDIO VIDEO NTI R www nti1 com...

Страница 10: ...ach reach the Remote Unit without putting strain on the cables Figure 4 Attach wall mount brackets to Remote Unit Connect Monitor and Speakers 1 Position the Remote Unit such that the CAT5 cable the m...

Страница 11: ...5 connector of an Ethernet device Damage to devices connected to the Ethernet may result Figure 6 Connect the CAT5 cable to the Remote Unit Plug in and Power Up 1 Plug the power cord from the monitors...

Страница 12: ...rs 3 5mm stereo jack to CPU Signal Type Line Level stereo unbalanced Audio Frequency Response 20Hz to 20Khz 2dB Signal to noise ratio 73 dBA Total Harmonic Distortion and Noise 0 011 Stereo Crosstalk...

Страница 13: ...are experienced while installing this product please look over the troubleshooting chart below for answers any questions that might arise If the answer is not found in the chart please check the FAQs...

Страница 14: ...round The CAT5 cable is not properly connected Make sure the interconnection cable is not near any power lines Check cable connections Make sure they are snapped in properly and completely Image is no...

Отзывы: