Network Technologies RACKMUX-UW15-4USB, RACKMUX-UW1 Скачать руководство пользователя страница 22

NTI RACKMUX Console Drawer with UNIMUX Switch 


18

 
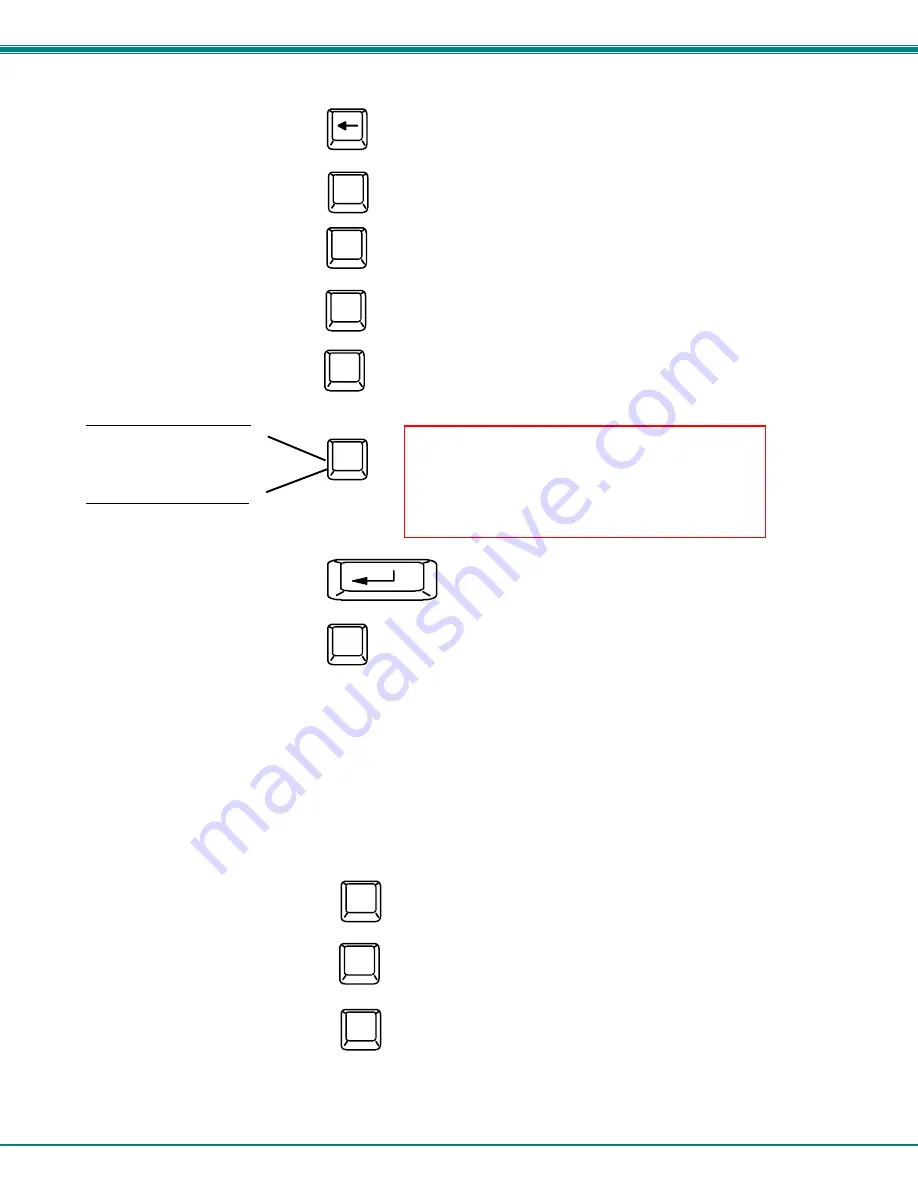
Maintenance Mode  (Cont'd) 
Function:  


              Keystroke: 

 
Move OSD menu to the left 


Make OSD menu taller  


Make OSD menu shorter 
 
 
Change user password.  
(Present only when a standard 
user is logged in.)  
 
Log current user out and return  
to User Login Mode.  


Activate security features.   

Present only when security is  
available but not active. 
 
 
Enter Administration Mode.   
Option present only when Administrator 
is logged in. 


Save OSD window parameters  
for the port 
 
 
Return to Command Mode 


Help Mode 

 
To enter Help Mode press the <F1> key from the Command Mode menu (see page 11). 
 
Help Mode displays a list of commands with a short explanation of their function.  These lists are organized in pages for each 
mode (i.e. COMMAND, EDIT, and SEARCH).  The following options enable the user to quickly obtain information on any 
command


Function:  


   Keystroke: 


View the previous page of help 
if available 
 
 
View the next page of help 
if available 
 
 
Exit HELP and return to previous 
mode 


T

S

P

Q

A

Esc

Enter

Esc

Page
Down

Page
  Up

Note: If activating security features, the user will be 
prompted for a “Y” (yes) or “N” (no) to confirm the 
menu choice, at which point the user will be asked 
for a username and password before continuing.   
Only the administrator can activate the security 
features.    

Содержание RACKMUX-UW15-4USB, RACKMUX-UW1

Страница 1: ...W15 8USB RACKMUX UW17 4USB RACKMUX UW17 8USB KVM Drawer with USB KVM Switch Installation and Operation Manual RACKMUX Series NETWORK TECHNOLOGIES INCORPORATED Tel 330 562 7070 Fax 330 562 1999 1275 Da...

Страница 2: ...es Inc All rights reserved No part of this publication may be reproduced stored in a retrieval system or transmitted in any form or by any means electronic mechanical photocopying recording or otherwi...

Страница 3: ...ist 9 Edit user 10 Alternate Command Hot Key 11 USER ACCESS FUNCTIONS 11 Introduction 11 Command Mode 11 Broadcast Mode 13 Scan Mode 13 Normal Mode 13 Edit Mode 13 Change Settings 14 Select Ports For...

Страница 4: ...Figure 12 Edit Mode screen 13 Figure 13 Change Settings menu 14 Figure 14 Select ports for broadcasting 15 Figure 15 Select ports for scanning 15 Figure 16 Select the keyboard language 16 Figure 17 Co...

Страница 5: ...KVM Drawer with 15 TFT LCD monitor and 8 port UNIMUX RACKMUX UW17 8USB KVM Drawer with 17 TFT LCD monitor and 8 port UNIMUX Available Option The integrated USB KVM switch UNIMUX is available with DDC...

Страница 6: ...er set of keys for keylock This manual Materials Not supplied but REQUIRED A USBVEXT xx MM cable for each USB CPU being connected to the switch must be used for monitor keyboard and mouse interface wh...

Страница 7: ...a CPU to control the functions of one or more switches 9 CPU x USB type B female connector for connection of USB device cable from CPU s 10 12VDC for connection of a 12VDC AC Adapter to power the KVM...

Страница 8: ...Connect each CPU to the UNIMUX switch using a USBVEXT xx MM video and input device interface cable REQUIRED not supplied See Fig 2 on page 5 2 Group the input device and monitor interface cables from...

Страница 9: ...C P U 6 C P U 5 8 4 7 3 6 2 5 1 V I D E O V I D E O N E T W O R K T E C H N O L O G I E S I N C T e l 3 3 0 5 6 2 7 0 7 0 1 2 7 5 D a n n e r D r A u r o r a O H 4 4 2 0 2 w w w n t i 1 c o m R e a r...

Страница 10: ...trol access to CPU ports for each user Up to 63 users can be created These users have controlled access to any CPU Only the administrator can activate or deactivate the security features Security can...

Страница 11: ...or this information Once logged in a user can follow the Command Mode functions described on page 10 to control the switch within the limitations as determined by the administrator User Login Mode Use...

Страница 12: ...Hot Key Figure 6 Administration Mode menu Selects the idle time in minutes Exit Administration Mode and return to previous mode Administrator Password To change the administrator password press C fro...

Страница 13: ...ay be up to 12 characters long may not contain spaces and are not case sensitive Passwords may be up to 15 characters long may not contain spaces and are case sensitive Function Keystroke Select previ...

Страница 14: ...scribes the functions available in the Edit User mode Function Keystroke Add a character to user name string password string or verify password string whichever is selected Switch sequentially between...

Страница 15: ...de After setting it the user can enter into Command Mode either with Ctrl or with Ctrl Alternative Command Hot Key combination To disable it the administrator should set as the Alternate Command Hot K...

Страница 16: ...t and clicking Clicking twice on a selected port will switch to that port and exit Command Mode To change the displayed ports on the screen simply click on the up and down arrows located to the right...

Страница 17: ...board and mouse must remain idle for the full scan dwell time before the switch selects the next active port Note The scan dwell time set by the user only effects that user and has no effect on other...

Страница 18: ...Change Settings menu functions available from the keyboard Function Keystroke Go to Broadcast Mode Configuration Go to Scan Mode Configuration Go to Language Selection Menu Option only available if t...

Страница 19: ...e display will return to the Change Settings menu The broadcast selection list is automatically saved Figure 14 Select ports for broadcasting Select Ports For Scan To Select Ports For Scanning press S...

Страница 20: ...llation time or whenever necessary After setting the configuration is stored in non volatile memory and will be retrieved whenever the switch is power ON When the port is connected to a Windows or SUN...

Страница 21: ...and select the best matching CPU name Exit Search Mode return to Command Mode Switch to selected port Figure 18 Search Mode screen Maintenance Mode To enter Maintenance Mode press Ctrl M from the Comm...

Страница 22: ...press the F1 key from the Command Mode menu see page 11 Help Mode displays a list of commands with a short explanation of their function These lists are organized in pages for each mode i e COMMAND ED...

Страница 23: ...Level 1 and through port 3 of the slave connected to port 4 Level 2 See Fig 20 below Figure 20 Information provided by the F3 command No Sun Sleep Mode PLEASE NOTE It is necessary to configure a Sun...

Страница 24: ...or all multi user switches but not a combination of both Cascaded Installation a Using the 15HD video cable ends of a USBVEXT xx MM cable connect the USB KVM slave s MONITOR port to the master s VIDE...

Страница 25: ...BVEXT xx MM USBVEXT xx MM USER PORT 1 USER PORT 1 USER PORT 1 USER PORT 1 C P U 8 D E V I C E S C P U 7 C P U 6 C P U 5 C P U 4 C P U 3 C P U 2 C P U 1 5 V D C 2 A V I D E O 8 N E T W O R K T E C H N...

Страница 26: ...ommand Mode will be recognized M O N I T O R 1 M O N I T O R 2 M O N I T O R 3 M O N I T O R 4 U S E R 1 U S E R 2 U S E R 3 U S E R 4 R S 2 3 2 N T I R C P U 1 6 M O N I T O R 1 M O N I T O R 2 M O N...

Страница 27: ...ed together This is accomplished by performing keyboard to computer translations automatically i e translate the Windows keyboard and mouse to a SUN type CPU The chart below shows the capabilities of...

Страница 28: ...llowing the instruction on page 16 for Language Selection DDC SUPPORT Optional DDC information allows the CPU to automatically select the optimal resolution for the monitor by receiving at power up in...

Страница 29: ...In WxDxH Rack Depth Range RACKMUX UW15 4USB 15 4 19x21 6x1 75 21 6 31 5 RACKMUX UW15 8USB 15 8 19x21 6x1 75 21 6 31 5 RACKMUX UW17 4USB 17 4 19x22 2x1 75 22 2 33 5 RACKMUX UW17 8USB 17 8 19x22 2x1 75...

Отзывы: