background image


4.6 Restore to Factory Setting 

In the power-on state, press  and hold  the Reset  button at  the bottom  of the device for more than 5 
seconds, and the device can be restored to factory settings. 


5. Set up R207


5.1 Connect to the device 

Please connect the R207 LAN port to your computer with a network cable, power on the R207, and 
turn on the DHCP service in the router. 

5.2 Find the IP address of R207 

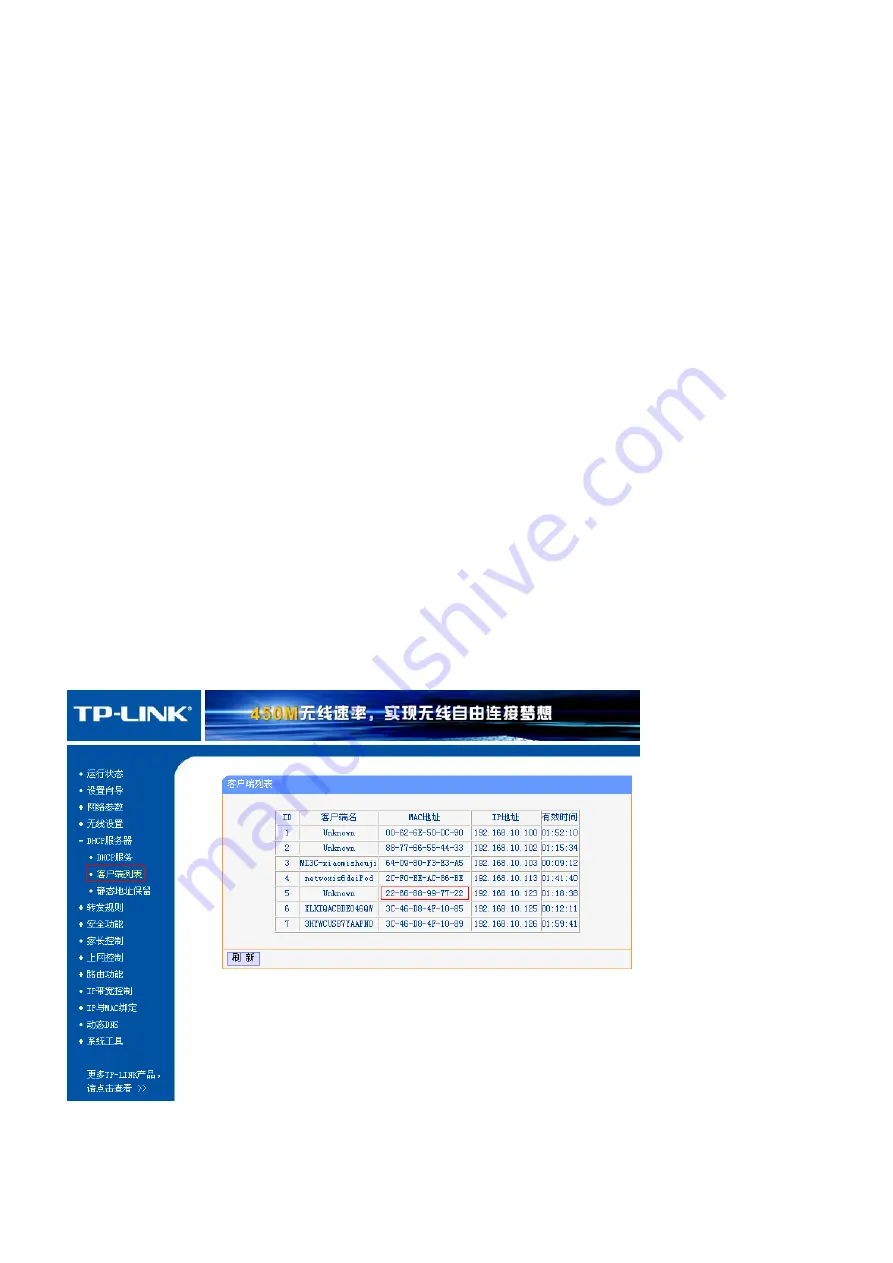
Log in to your router's settings interface with a browser. Here is a TP-link as an example: 
Connect  the  computer  to  the  home  router,  wired  connection  or  WIFI  connection.  Log  in  to  the 
TP-link setting interface (refer to the TP-link manual for login method and password), select DHCP 
server  →  client  list  in  the  left  column,  you  can  see  the  content  as  shown  in  the  figure,  find  the 
corresponding IP address according to the provided R207 MAC address.   


Содержание R207

Страница 1: ...R207 Smart IOT Controller Smart Home Controller Manual For IPK Version 0 0 0 59 and above...

Страница 2: ...nection 3 4 3 Power on 3 4 4 Restart the Device 3 4 5 Indicator 3 4 6 Restore to Factory Setting 4 5 Set up R207 4 5 1 Connect to the device 4 5 2 Find the IP address of R207 4 5 3 Log in to the manag...

Страница 3: ...greatly increases the communication distance compared with other communication methods and can be widely used in long distance low rate IoT wireless communication fields in various occasions Such as...

Страница 4: ...3 Power on Plug a DC 5V 1 5A power adapter to R207 The power indicator will be on and ready for use No other operations are required 4 4 Restart the Device Press the Reset button at the bottom of the...

Страница 5: ...07 and turn on the DHCP service in the router 5 2 Find the IP address of R207 Log in to your router s settings interface with a browser Here is a TP link as an example Connect the computer to the home...

Страница 6: ...ck the go button in the address bar to access the R207 setting interface as following Figure Enter the corresponding username and password the administrator username and password are operator the clie...

Страница 7: ...odule The module mainly has LAN interface settings and WAN interface settings LAN interface setting this page is used to configure the LAN parameters connected to your access point LAN port You can ch...

Страница 8: ...e shows the count of sending and receiving packets for wireless and Ethernet networks as shown below 2 Time zone settings you can maintain system time by synchronizing the public time server on the In...

Страница 9: ...connected to the cloud 3 Denial of service a hacker tries to block the legitimate user of the service to use the service as shown in the following figure the general user does not have to set it and t...

Страница 10: ...9 below 5 Upgrade the firmware you can upgrade the access point firmware to the new version on this page as shown below...

Страница 11: ...s page or reload the settings from the previously saved files as shown below 7 The password setting is as follows You can modify the login password of the R207 setting interface including user license...

Страница 12: ...er management upgrade communication software backup and restore user data data import and communication settings Eight functional modules As shown below 6 1 Device List Click Device List to view curre...

Страница 13: ...the detailed information of the device and click Delete to delete the corresponding device Click Detail to enter the device details interface you can view the basic information of the device as shown...

Страница 14: ...Enter the IEEE address of the device to be added click Add and then perform the screening operation The user can refresh the device list to check whether the device has joined the network 6 3 Client u...

Страница 15: ...he left page and the following detailed function interface appears Click the View button select the upgrade file and then click the Upgrade button to upgrade the communication software Note During the...

Страница 16: ...backup divided into automatic and manual backup date and delete the backup data When the user chooses to restore the data you can enter the backup start time and backup end time and then click the Sea...

Страница 17: ...to update the intelligent scenario control scheme 6 7 Communication settings Click on the communication settings on the left page and the following detailed function interface appears At this point th...

Страница 18: ...tions Your device is a product of superior design and craftsmanship and should be used with care The following suggestions will help you use the warranty service effectively Keep the equipment dry Rai...

Отзывы: