Netis WF-2301 Скачать руководство пользователя страница 13


150Mbps Wireless-N Outdoor AP User Manual 


Figure 3-2 

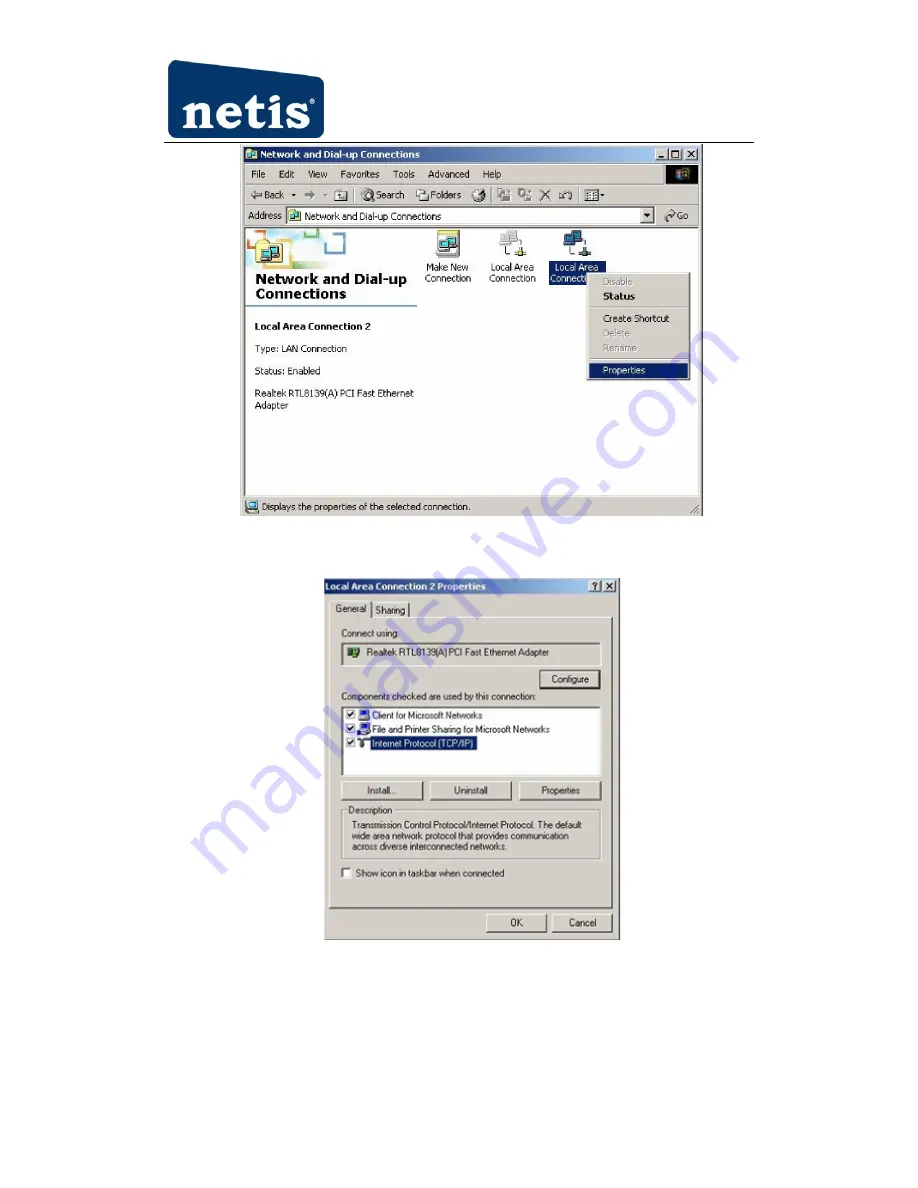
4. Highlight Internet Protocol (TCP/IP), and then press Properties button 


Figure 3-3 

5. Choose Obtain an IP address automatically and Obtain DNS server address automatically, and 

then press OK to close the Internet Protocol (TCP/IP) Properties window 

Содержание WF-2301

Страница 1: ...1095 Budapest Mester u 34 Tel 218 5542 215 9771 215 7550 216 7017 216 7018 Fax 218 5542 Mobil 30 940 1970 20 949 2688 1141 Budapest Fogarasi út 77 Tel 220 7940 220 7814 220 7959 220 8881 364 3428 Fax 220 7940 E mail info delton hu Web www delton hu www netis systems hu Mobil 30 531 5454 30 939 9989 ...

Страница 2: ...ect the equipment into an outlet on a circuit different from that to which the receiver is connected Consult the dealer or an experienced radio TV technician for help To assure continued compliance any changes or modifications not expressly approved by the party responsible for compliance could void the user s authority to operate this equipment Example use only shielded interface cables when conn...

Страница 3: ...lling This manual is designed to help you correctly use this outdoor AP before you install the outdoor AP please read the manual Brand and Copyright Announcement Copyright 2010 Netis Corporation All rights reserved is a registered trademark of Netis Corporation Other trademarks and trade names may be used in this document to refer to either the entities claiming the marks and names or their produc...

Страница 4: ...3 1 CONFIGURE COMPUTER 11 3 1 1 Windows 98 Me 11 3 1 2 Windows 2000 12 3 1 3 Windows XP 14 3 1 4 Windows Vista 18 3 1 5 Windows 7 22 3 1 6 MAC OS 24 3 2 CHECKING CONNECTION WITH THE ADAPTER 26 3 3 LOGIN 28 4 SYSTEM SETTING 30 4 1 SYSTEM INFORMATION 30 4 1 1 System 30 4 1 2 LAN Info 30 4 1 3 Wireless Info 31 4 1 4 Secondary AP 31 4 1 5 Statistics 32 4 2 SYSTEM LOG 32 4 3 WIRELESS MANAGEMENT 33 4 3 ...

Страница 5: ...HRESHOLDS 46 4 5 LAN SETUP 46 4 5 1 LAN IP Address 46 4 5 2 DHCP Server 47 4 5 3 DHCP Client Info 47 4 6 APPLICATIONS GAME 48 4 6 1 UPnP 48 4 7 ROUTING 48 4 8 SYSTEM MANAGEMENT 49 4 8 1 Password Setup 49 4 8 2 Upgrade 49 4 8 3 Reboot 49 4 8 4 Restore 50 4 8 5 WOL 50 4 8 6 System Time 50 5 TROUBLESHOOTING 51 ...

Страница 6: ...tdoor environments Support WEP WPA WPA2 WPA WPA2 wireless encryption modes improve security and prevent loiter network WEB management and remote management of your real time monitoring for network management and provides convenience 1 2 Main Features Ø Comply with to IEEE802 11n g b IEEE802 3 10 Base T IEEE802 3u 100 Base TX standards Ø Support firmware upgrade Ø Support WEP WPA WPA2 WPA WPA2 encr...

Страница 7: ...11b g n Ø IEEE 802 11e Ø IEEE 802 11h Ø IEEE 802 11k Ø IEEE 802 11i Ø IEEE 802 3 10Base T Ø IEEE 802 3u 100Base TX 1 4 Working Environment Temperature Ø 10 to 70 C operating Ø 30 to 80 C storage Humidity Ø 10 to 90 non condensing operating Ø 5 to 90 non condensing storage Power Ø DC 18V 0 7A ...

Страница 8: ...et access service DSL Cable Ethernet Ø Internet Explorer 5 0 Firefox 2 0 or Safari 1 4 or higher for Web configuration Ø 802 11n 802 11g or 802 11b compliant wireless adapters for wireless connection Ø Windows 98 2000 XP 2003 Vista or higher operating system 2 2 Panel Figure 2 1 Power Adapter Figure 2 2 Outdoor AP Ethernet port ...

Страница 9: ...tion If the AP ever freezes in a setting change process or if you can t access it because you can t remember the IP you have given it or other problem you may have to utilize the reset button on the back of the AP Power to put it back to factory settings You have to press this button for a few seconds 2 6s when it is working then release and it will restore settings to the factory configuration Th...

Страница 10: ... the WAN ports of your router Ø Step 2 connecting the power adapter Attach one end of an Ethernet cable to the Internet access router LAN port the other end to the Internet port of power adapter Then plug the Power Adapter into an AC outlet Ø Step 3 connecting the 150Mpbs outdoor adapter Connect one side of your Ethernet cable to the POE port of your power adapter the other side to the LAN port of...

Страница 11: ...tion label and ensure that you have network card 4 Select TCP IP If TCP IP appears more than once please select the item that has an arrow à pointing to the network card installed on your computer DO NOT choose the instance of TCP IP with the words Dial Up Adapter beside it 5 Click Properties The TCP IP Properties dialog box appears 6 Ensure the Obtain IP Address Automatically is checked 7 From th...

Страница 12: ...ws 2000 Please follow the steps below to setup your computer 1 Go to Start à Settings à Control Panel Figure 3 1 2 Double click the icon Network and Dial up Connections 3 Highlight the icon Local Area Connection right click your mouse and click Properties ...

Страница 13: ...e 3 2 4 Highlight Internet Protocol TCP IP and then press Properties button Figure 3 3 5 Choose Obtain an IP address automatically and Obtain DNS server address automatically and then press OK to close the Internet Protocol TCP IP Properties window ...

Страница 14: ... Outdoor AP User Manual Figure 3 4 6 Press OK to close the Local Area Connection Properties window Figure 3 5 3 1 3 Windows XP Please follow the steps below to setup your computer 1 Go to Start à Settings à Control Panel ...

Страница 15: ...ireless N Outdoor AP User Manual 2 Click Network and Internet Connections Figure 3 6 3 Click Network Connections Figure 3 7 4 Highlight the icon Local Area Connection right click your mouse and click Properties ...

Страница 16: ...e 3 8 5 Highlight Internet Protocol TCP IP and then press Properties button Figure 3 9 6 Choose Obtain an IP address automatically and Obtain DNS server address automatically and then press OK to close the Internet Protocol TCP IP Properties window ...

Страница 17: ...150Mbps Wireless N Outdoor AP User Manual Figure 3 10 7 Press OK to close the Local Area Connection Properties window Figure 3 11 ...

Страница 18: ...e follow the steps below to setup your computer 1 Go to Start à Settings à Control Panel 2 Click Network and Sharing Center Figure 3 12 3 Click Manage Network Connections Figure 3 13 4 Highlight the icon Local Area Connection right click your mouse and click Properties ...

Страница 19: ...150Mbps Wireless N Outdoor AP User Manual Figure 3 14 5 Highlight Internet Protocol Version 4 TCP IP and then press Properties button ...

Страница 20: ... Wireless N Outdoor AP User Manual Figure 3 15 6 Choose Obtain an IP address automatically and Obtain DNS server address automatically and then press OK to close the Internet Protocol TCP IP Properties window ...

Страница 21: ...150Mbps Wireless N Outdoor AP User Manual Figure 3 16 7 Press OK to close the Local Area Connection Properties window ...

Страница 22: ...ow the steps blow to setup your computer 1 Go to Start Control Panel Network and Internet 2 Click Network and Sharing Center Change adapter settings 3 Highlight the icon Local Area Connection right click your mouse and click Properties Highlight Internet Protocol version 4 TCP IPv4 ...

Страница 23: ...150Mbps Wireless N Outdoor AP User Manual Figure 3 18 Figure 3 19 ...

Страница 24: ...cally and Obtain DNS server address automatically and then press the OK to close the window Figure 3 20 5 Press OK to close the Local Area Connection Properties window 3 1 6 MAC OS Please follow the steps blow to setup your computer 1 Go to Start System preference Settings Network ...

Страница 25: ...150Mbps Wireless N Outdoor AP User Manual Figure 3 21 2 Click Network Select Use DHCP at the Configuration bar the system will get the IP address automatically ...

Страница 26: ...cute the ping command open the DOS window and Ping the IP address of the 150Mbps Outdoor AP at the DOS prompt Ø For Windows 98 Me Start Run Type command and click OK Ø For Windows 2000 XP Start Run Type cmd and click OK Ø For Windows Vista 7 Start Type cmd at the start search bar and press the Enter Ø For MAC OS The system will complete this operation automatically At the DOS prompt type the follo...

Страница 27: ...n between the AP and your computer has been successfully established If the computer fails to connect to the AP the Command window will return the following C Documents and Settings admin ping 192 168 1 1 Pinging 192 168 1 1 with 32 bytes of data Request timed out Request timed out Request timed out Request timed out Ping statistics for 192 168 1 1 Packets Sent 4 Received 0 Lost 4 100 loss Verify ...

Страница 28: ...1 in the address bar and press Enter Figure 3 23 Ø In the pop up window enter the user name guest and password guest and then click OK Figure 3 24 Ø After you have logged in the router s user interface will be displayed The left menu shows the main options to configure the system and the right screen is the summary information for viewing and adjusting the configurations ...

Страница 29: ...150Mbps Wireless N Outdoor AP User Manual Figure 3 25 ...

Страница 30: ...nning status information and detailed information about router 4 1 1 System This item provides current running information of System Figure 4 1 4 1 2 LAN Info This item provides information about router s LAN port display LAN port s physical address IP address and current situation of DHCP server Figure 4 2 ...

Страница 31: ...d or not Ø Wireless Mode Current wireless mode of wireless router Ø Channel Display current channel of your wireless router Ø SSID SSID Service Set Identifier is your wireless network s name shared among all points in a wireless network Ø MAC Address The MAC address is used for wireless communication 4 1 4 Secondary AP This item provides current running information of Secondary AP Figure 4 4 ...

Страница 32: ...AP User Manual 4 1 5 Statistics This item provides statistics information about the bits router sends and received Figure 4 5 4 2 System Log Figure 4 6 View the system log You can set the number of records per page default is 10 ...

Страница 33: ...ose is Disable the AP function of wireless router will be turned off Ø Radio band You can select the wireless standards running on your network if you have Wireless N and Wireless B G devices in your network keep the default setting 802 11b g n Ø Radio mode You can select radio mode of wireless router it contains Access Point Client AP WDS Repeater and Lazy The default setting is AP mode Ø SSID Th...

Страница 34: ...uter use higher or lower channel when working on 40MHz Ø Region please select the region where you live in Ø Channel In 20MHz you can select one channel from 1 to 13 manually and in 40MHz you can select one channel from 1 to 9 or 5 to 13 which provides a choice of avoiding interference 4 3 1 2Security The item allows you to encrypt your wireless communication and you can also protect your wireless...

Страница 35: ...bits of password it should be 64 bits or 128 bits Then choose the format of password it should be HEX or ASCII The valid character for HEX format should be numbers from 0 to 9 and letters from A to F HEX support mixed letter and number mode And ASCII supports all characters that in keyboard Ø Key Length description when you select 64bits you need to input 10 chars for HEX and 5 chars for ASCII and...

Страница 36: ...ryption System which utilizes a symmetric 128 Bit block data Ø Key Renewal you can configure the renewal time between 60 to 86400 seconds Ø Key Length description you need to input 8 to 63 ASCII characters no matter which type you select 4 3 1 2 4WPA2 PSK The WPA2 PSK is similar to WPA PSK and with stronger encryption method than WPA PSK using WPA2 PSK you should input password leave this value in...

Страница 37: ...2 PSK This item mixed WPA PSK and WPA2 PSK mode which provides higher security level you can configure it according with WPA PSK or WPA2 PSK Figure 4 12 4 3 1 3WDS If you have selected WDS or AP WDS mode in Wireless Basic Radio Mode please do the following configurations ...

Страница 38: ... also need to configure to WDS or AP WDS mode Ø Current WDS Information It illustrates basic information of all wireless bridge that in connection status you may delete unnecessary bridge I S P A P 1 S S I D Ne t i s 1 C h a n n e l 6 R a d i oMo d e A P WD S A P 2 S S I D N e t i s 2 C h a n n e l 6 R a d i oMo d e A P WD S R o u t e r Figure 4 14 AP1 Ø Select radio mode is WDS or AP WDS in wirel...

Страница 39: ...HCP server Ø 4 Input WDS name e g Default input MAC address of AP1 00 22 4f cc ae f5 click add then the record named Default will appears in WDS list Ø Select Channel is Channel 6 in wireless management basic of AP2 Note Before you setup WDS connection please make sure that AP1 and AP2 is in the same network that is if the IP address of AP1 is 192 168 1 1 then the IP address of AP2 should be 192 1...

Страница 40: ... the Allow wireless connection table in the MAC MAC to prohibit other wireless connection the bottom of the MAC access control list does not record then any host are can not access the wireless network 4 3 1 5Host List Figure 4 16 All this shows the current wireless access point by access to the state of the wireless station easy to manage 4 3 1 6WPS Wi Fi Protect Setup WPS function can let you cr...

Страница 41: ... that support WPS function Click connect when it connect successfully it will be encrypted to WPA2 PSK Ø WPS PBC settings Click connect when it connect successfully it will be encrypted to WPA2 PSK WPS can connect the wireless adapter and the router in a safe way If you have a wireless network card which has WPS button you may set up a safe network via the following methods Method 1 1 Input the PI...

Страница 42: ... Input Config PIN in the Wi Fi protect setup of the adapter Figure 4 20 3 Select this AP in the pop up window then click Select Figure 4 21 4 Please wait until the following window appears the connect between the adapter and the AP will connect automatically ...

Страница 43: ... s WPS PBC configure page Figure 4 23 2 Push the Push button Config PBC in the Wi Fi protect setup of the adapter until the following picture appears Figure 4 24 3 The next is the safe connection between the adapter and the AP please wait 4 The connect between the adapter and the AP is success ...

Страница 44: ...The interval time of this 150Mbps Wireless N Gigabit Router broadcast a beacon Beacon is used to synchronize the wireless network The valid interval is 20 1000 the default is 100 Ø RTS Threshold You can set RTS Threshold value in this field the valid range should be 256 2347 and default value is 2347 If a network packet is smaller than the preset RTS threshold size the RTS CTS mechanism will not b...

Страница 45: ...ork Ø Preamble Type Short Preamble is suitable for heavy traffic wireless network Long Preamble provides much communication reliability the default setting is Long Preamble 4 3 2 Multiple AP Setup The wireless AP supports multiple AP if you need to open more than one AP you can choose to open vice AP function As priority vice AP only set the SSID and security management The default status of secon...

Страница 46: ... strength the corresponding LED will be lit 4 5 LAN Setup According to actual needs you can choose on or off the DHCP server and also modify the DHCP address pool range 4 5 1 LAN IPAddress The IP address of LAN port is used for access router itself by computers that connect to the router directly here you can set IP address you need The IP address format is like and default IP address is 192 168 1...

Страница 47: ...elect Disable Ø IP Address Pool The IP Address pool is used for allocate IP address by DHCP server The IP Address pool range is also changeable Ø DHCP IP Address Reserving reserve IP address for designed physical address host If you want to configure a fixed IP address for some host please input physical address and IP address then click add 4 5 3 DHCP Client Info Figure 4 32 Display the state of ...

Страница 48: ...environment Figure 4 34 Ø Destination Network or IP Address Specify a certain destination Network or IP address which static route forward to Ø Subnet Mask Subnet mask is used for distinguish Network portion and Host portion for an IP address Ø Next hop IP Address This is an IP address of the next hop device and also is the gateway address for local host that allows forwarding data between router ...

Страница 49: ...suggested that you change the default password to one of your choice here enter a new password and then Re enter it again to confirm your new password Click Save button to save settings Figure 4 35 4 8 2 Upgrade Click Upgrade and select a File to upgrade after you have selected the appropriate file click Upgrade button to execute upgrade procedure Do not cut off the power supply during the process...

Страница 50: ...eplace them with the factory defaults make sure you have backup current settings before click this button Figure 4 38 4 8 5 WOL Input host MAC address and then click button of Wake up to wake up the target host which in the LAN Figure 4 39 4 8 6 System Time You can choose the time server and the time zone for the system time Figure 4 40 ...

Страница 51: ...e Default button on the back panel of the AP when it is working wait for a few seconds until the SYS LED indicator stays green Ø After the above those steps the manufacture s parameters will be restored in the AP The default password is guest 3 My wireless client cannot communicate with another Ethernet computer Ø Ensure the wireless adapter functions properly You may open the Device Manager in Wi...

Отзывы: