Installation Guide
AC2000 802.11ac Wireless Access Point/Router
WAC124
Package contents
• Wireless access point/router
• DC power adapter (varies by region)
• Ethernet cable
• Installation guide
Step 1. Connect the WAC124.
The WAC124 is both a WiFi router and a WiFi access point.
IMPORTANT:
In firmware version 1.0.4.2 and later versions, the
default
mode of
the WAC124 is router mode. In earlier firmware versions, the
default
mode of the
WAC124 is access point mode. This installation guide is for firmware version 1.0.4.2
and later versions. That means that the WAC124 initially starts up in router mode.
If you want to use the WAC124 as an access point only, see
1.
Unplug the modem’s power, leaving the modem connected to the wall jack for
your Internet service. (If the modem uses a battery backup, remove the battery.)
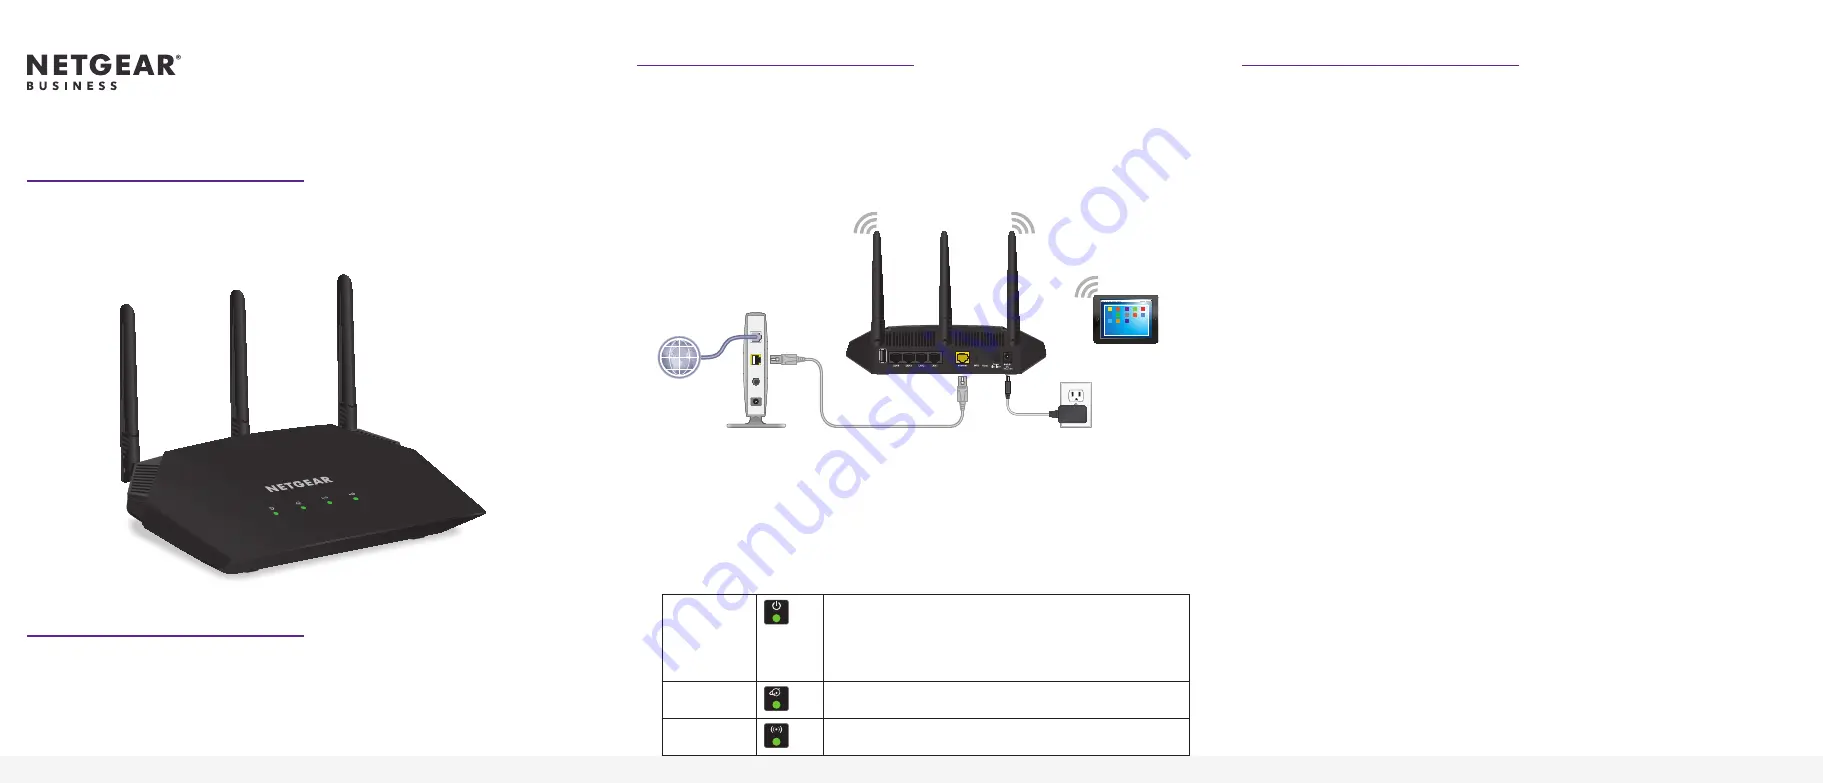
2. Connect the Ethernet cable to the yellow Internet port on the WAC124.
3.
Connect the other end of the cable to a LAN port on your modem.
4.
Plug in and turn on the modem. (If the modem uses a battery backup, put the
battery back in before you turn on the modem.)
5.
Power on the WAC124 and check the LEDs.
Power LED
The Power LED lights solid green, then blinks green, and
then lights solid green again when the startup procedure
is finished. This process takes about 90 seconds. If the
Power LED does not light at all, press the
Power On/Off
button on the back panel.
Internet LED
The Internet LED blinks green or lights solid green when
the Internet connection is established.
WiFi LED
The WiFi LED lights solid green.
USB 2.0
WiFi device
Modem
Internet
WAC124 in
router mode
Step 2. Use WiFi to log in to the WAC124.
The first time that you log in to the WAC124, the Smart Setup Wizard starts and
detects your modem’s Internet connection type. Most likely, you do not need to
provide any information for the WAC124 to establish an Internet connection.
However, if the Internet connection type is PPPoE, L2TP, or PPTP, or requires a
static IP address, follow the prompts and provide the required information.
After the WAC124 is connected to the Internet, it contacts a NETGEAR server for
registration.
1.
On a WiFi device such as a WiFi-enabled computer, smartphone, or tablet,
open the software utility that manages your WiFi connections.
Note:
For information about how to access the
WAC124
from a wired
computer (using an Ethernet cable), see the user manual, which you can
netgear.com/support/download/.
2.
Find and select the WAC124’s default WiFi network name (SSID) and connect
to its WiFi network.
The default SSID is NETGEAR-1. The default passphrase is
sharedsecret
.
3.
Launch a web browser and enter
http://www.routerlogin.net
in the address
field.
The Smart Setup Wizard starts. Follow the prompts. During the setup process,
you can specify a new password for local login and update the firmware, if a
new version is available.
Note:
If you cannot connect the
WAC124
to the Internet, see the user manual
for troubleshooting information and for information on how to log in to the
WAC124 without Internet access.
When the WAC124 is connected to the Internet, the NETGEAR Business page
displays.
4.
Click the
Login
button.
The NETGEAR Account Login page displays.
Note:
If you do not own a NETGEAR account, click the
Create
button, create a
NETGEAR account, and log in.
5.
Enter your NETGEAR account email address and password and click the
LOG
IN
button.
(Continued on the next page)
Sample router
connections


