background image

Installation Overview

11

 ReadyDATA 5200

13. 

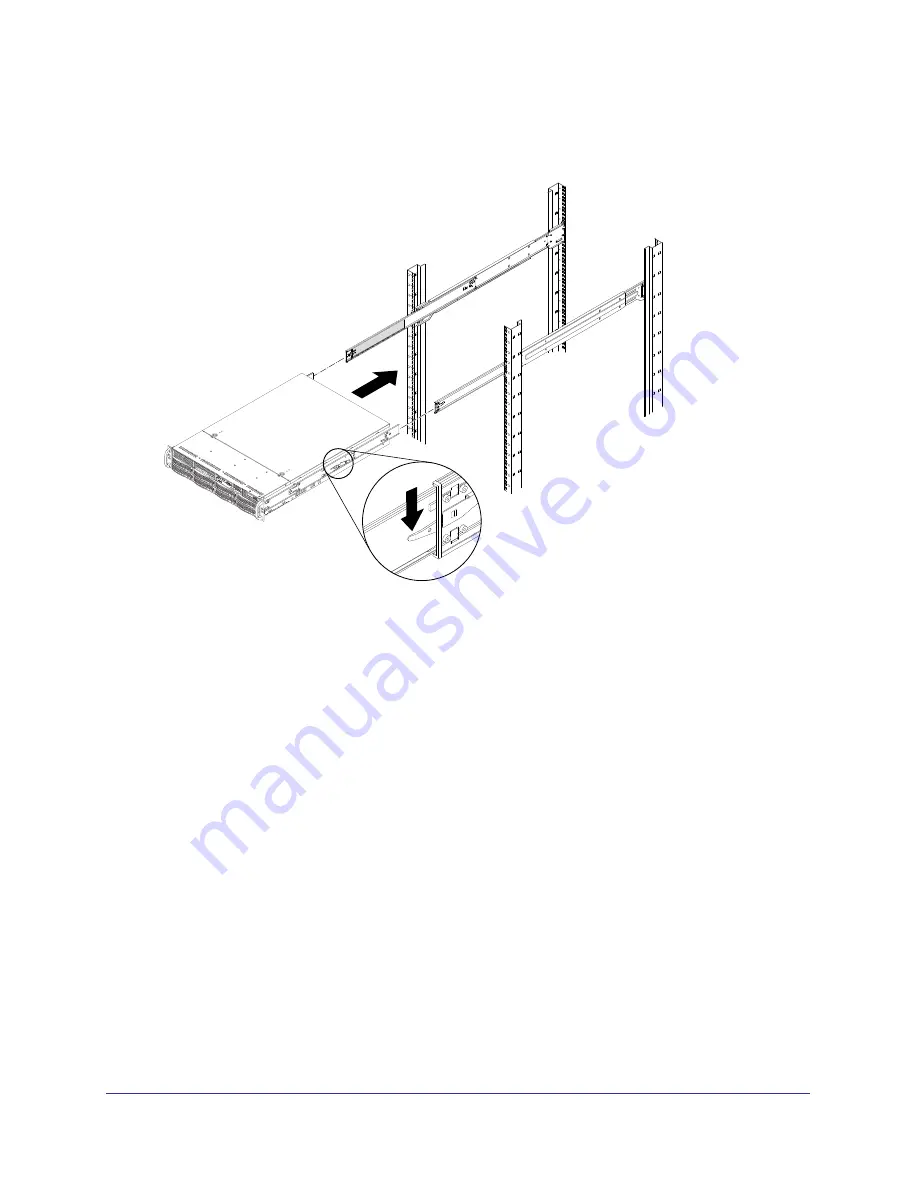
Hold the system chassis in front of the extended rails, aligning the inner rails with the middle 
rails, and push evenly on both sides of the chassis until it clicks into the fully extended 
position.

14. 

Depress the locking tabs on both sides of the chassis at the same time and push the 
chassis all the way to the back of the rack.

15. 

(Optional) Secure with screws.

Содержание ReadyDATA 5200

Страница 1: ...350 East Plumeria Drive San Jose CA 95134 USA May 2012 201 15135 02 ReadyDATA 5200 Installation Guide ...

Страница 2: ...nly 1 888 NETGEAR Phone Other Countries Check the list of phone numbers at http support netgear com app answers detail a_id 984 Statement of Conditions To improve internal design operational function and or reliability NETGEAR reserves the right to make changes to the products described in this document without notice NETGEAR does not assume any liability that may occur due to the use or applicati...

Страница 3: ... Install the System in a Rack Attach Cables Power Up the System Register Your Product For more information about the ReadyDATA 5200 see the following resources ReadyDATA 5200 Hardware Manual and ReadyDATA OS Software Manual Available on the Resource CD that came with your product You can also obtain these manuals by clicking the icon in the 5200 s Dashboard user interface Support web site Visit ww...

Страница 4: ...tall your unit Ambient operating temperature If the unit is installed in a closed or multi unit rack assembly the ambient operating temperature of the rack environment might be greater than the ambient temperature of the room Therefore consideration should be given to installing the equipment in an environment compatible with the maximum rated ambient temperature Reduced airflow Mount the equipmen...

Страница 5: ...ou to open the front door completely and in the back of the rack about 30 inches to allow for sufficient airflow and ease in servicing Install Optional NICs The ReadyDATA 5200 comes with two 1 GbE NICs and one 10 GbE SFP NIC installed on the motherboard so it can connect to your LAN or the Internet without optional additional NICs If you purchased one or more 1 GbE or 10 GbE NICs the ReadyDATA sup...

Страница 6: ... jacks on the bottom of the rack are fully extended to the floor with the full weight of the rack resting on them In single rack installations stabilizers should be attached to the rack In multiple rack installations the racks should be coupled together Always make sure the rack is stable before extending a component from the rack You should extend only one component at a time extending two or mor...

Страница 7: ...uctions in their entirety before you begin To install the system into a rack 1 Using the left rail pull the inner rail out of the outer rail until it is fully extended 2 Press the locking tab down to release the inner rail and separate it from the outer and middle rails PULL ...

Страница 8: ...hassis are straight and aligned with the holes in the inner rail 4 Slide the inner rail forward until it clicks into the locked position 5 Optional Secure the inner rail to the chassis with a screw 6 Repeat Step 1 through Step 5 with the right rail 7 Using the left rail Press the locking tab and push the middle rail back into the outer rail ...

Страница 9: ...adyDATA 5200 8 Hang the hooks on the front of the left rail on the rack holes and if necessary secure with screws 9 Repeat with the back of the left rail extending as necessary 10 Repeat Step 7 through Step 9 with the right rail ...

Страница 10: ...iew 10 ReadyDATA 5200 11 Using the left rail pull the middle rail out of the front of the outer rail ensuring that the ball bearing shuttle is locked at the front of the middle rail 12 Repeat Step 11 with the right rail ...

Страница 11: ...ligning the inner rails with the middle rails and push evenly on both sides of the chassis until it clicks into the fully extended position 14 Depress the locking tabs on both sides of the chassis at the same time and push the chassis all the way to the back of the rack 15 Optional Secure with screws ...

Страница 12: ...urce 3 Attach an Ethernet cable to the appropriate Ethernet port on the back of the unit You must attach at least one Ethernet cable You can attach up to two 1 GbE cables and depending on the model and accessories you purchased you can also attach up to two 10 GbE cables 4 Connect each Ethernet cable to an appropriate port on a network switch If you purchased an optional expansion disk array conne...

Страница 13: ...ch the RAIDar utility RAIDar displays a window that lists the ReadyDATA system or systems on your network and provides details about the status of each system it discovers The volume disk UPS and fan LED icons are not operational for the ReadyDATA 5200 4 Highlight your ReadyDATA 5200 and click the Setup button RAIDar opens your default browser and prompts you to log in to the storage system 5 Log ...

Страница 14: ... the serial number on the product label and use it to register your system at www netgear com register Registration is required before you can use the telephone support service NETGEAR strongly recommends using this website to register your product For product updates and web support visit www netgear com ...

Отзывы: