background image

English

2

c.  

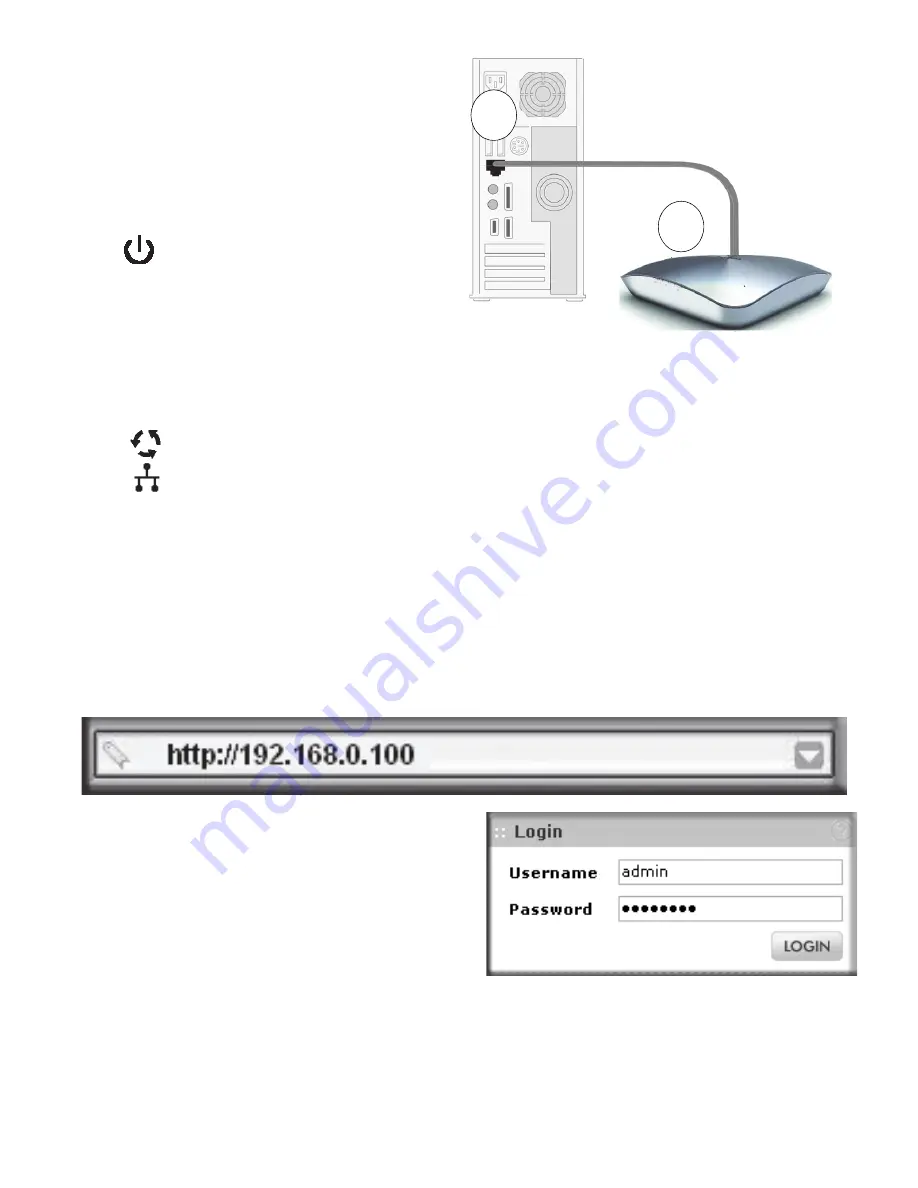
Securely insert the other end of 

the cable into an access point 

Ethernet port (point 

in the 

illustration).

d.  

Connect the power adapter to 

the access point. Verify the 

following:

The Power LED blinks when 

the access point is first turned 
on. After a few seconds it should 
stay on (steady green). If after 
30 seconds the Power LED is off 
or is still blinking, check the connections and check to see if the power 
outlet is controlled by a wall switch that is turned off.

 The ACTIVE LED blinks when there is network traffic.
 The LAN1 and LAN2 LEDs indicate LAN speed for each LAN port; 

green for 1000 Mbps, amber for 100Mbps, and no light for 10Mbps. 
2.4 GHz (WLAN).


This LED indicates 2.4 GHz traffic.

5 GHz (WLAN). This LED indicates 5 GHz traffic.

2.   Configure LAN and wireless access

a.  

From your PC, configure the access point Ethernet port for LAN access. 

Connect to the access point by opening your browser and entering 

http://192.168.0.100

 in the address field. 

b.  

A login window displays. When 

prompted, enter 

admin

 for the 

user name and 

password

 for the 

password, both in lower case 

letters.
The access point user interface 
displays.

c.  

Select 

Configuration > System > Basic > Genera

l from the menu. Fill in 

the 

Access Point Name

 field and select your 

Country/Region

 of 

operation from the drop-down list.

d.  

Select 

Configuration > IP > IP Settings 

from the menu and configure 

the IP settings for your network.

NETGEAR Cable

A

B

WNDAP660

Ethernet

port

Содержание ProSafe Premium WNDAP660

Страница 1: ...NSTALLATION UIDE NETGEAR Inc 350 East Plumeria Drive San Jose CA 95135 version 1 0 English 1 Deutsch 7 Fran ais 13 19 Contents ProSafe 3x3 Dual Radio Dual Band Wireless N Access Point WNDAP660...

Страница 2: ...roceeding with the WNDAP660 installation familiarize yourself with the contents of the Resource CD See the Reference Manual for instructions on advanced configuration options Tip Before mounting the a...

Страница 3: ...for 100Mbps and no light for 10Mbps 2 4 GHz WLAN This LED indicates 2 4 GHz traffic 5 GHz WLAN This LED indicates 5 GHz traffic 2 Configure LAN and wireless access a From your PC configure the access...

Страница 4: ...hed the setup you are ready to deploy the access point in your network If needed you can reconfigure the PC you used in step 1 back to its original TCP IP settings Deploy the Access Point 1 Disconnect...

Страница 5: ...nt the accessory antenna s 2 Attach the antenna s to the connector s on the access point rear panel 3 Log into the access point and configure it to use the external antenna The access point cannot use...

Страница 6: ...P address in the range of the access point The access point default IP address is 192 168 0 100 and the default subnet mask is 255 255 255 0 The access point default setting is for a static IP address...

Страница 7: ...GEAR products After installing your device locate the serial number on the label of your product and use it to register your product at http www netgear com register Registration is required before yo...

Страница 8: ...tion des WNDAP660 fortfahren Anweisungen zu den erweiterten Konfigurationsoptionen finden Sie im Referenzhandbuch Tipp Bevor Sie den Access Point an einer schwer zug nglichen Stelle aufstellen sollten...

Страница 9: ...sie nicht 2 4 GHz WLAN Diese LED zeigt einen Datenverkehr von 2 4 GHz an 5 GHz WLAN Diese LED zeigt einen Datenverkehr von 5 GHz an 2 Konfigurieren Sie das LAN und den drahtlosen Zugang a Konfiguriere...

Страница 10: ...etzwerk Ausf hrliche Anweisungen dazu finden Sie in der Online Hilfe und im Referenzhandbuch 3 berpr fen Sie die drahtlose Verbindung Stellen Sie mit einem Computer der ber einen Wireless Adapter verf...

Страница 11: ...behebung in dieser Anleitung oder ziehen Sie das Referenzhandbuch zurate Bei Verwendung einer externen Antenne Gehen Sie bei der Verwendung einer externen 2 4 GHz Antenne wie folgt vor 1 Bringen Sie d...

Страница 12: ...egment oder ein WINS Server im Netzwerk befinden Wenn der Computer eine feste statische IP Adresse besitzt muss sich die IP Adresse im Nummernbereich des Access Points befinden Die Standard IP Adresse...

Страница 13: ...nwendung der hier beschriebenen Produkte oder Schaltpl ne jegliche Haftung ab Technischer Support Vielen Dank dass Sie sich f r Produkte von NETGEAR entschieden haben Nach der Installation des Ger ts...

Страница 14: ...de proc der l installation du WNDAP660 familiarisez vous avec le contenu du CD Consultez le Manuel de r f rence pour en savoir plus sur les options de configuration avanc e Conseil avant de placer le...

Страница 15: ...4 GHz r seau sans fil Ce voyant indique un trafic de 2 4 GHz 5 GHz r seau sans fil Ce voyant indique un trafic de 5 GHz 2 Configuration des acc s r seau local et sans fil a Depuis votre PC configurez...

Страница 16: ...un adaptateur sans fil v rifiez que vous pouvez tablir une connexion sans fil au point d acc s La configuration de votre point d acc s tant termin e vous pouvez pr sent l utiliser sur votre r seau Si...

Страница 17: ...ecter reportez vous la section D pannage de ce guide ou consultez le Manuel de r f rence Utilisation d une antenne externe Pour utiliser une antenne externe 2 4 GHz 1 Montez la ou les antennes 2 Relie...

Страница 18: ...u Si votre ordinateur utilise une adresse IP fixe statique assurez vous que celle ci est comprise dans la plage du point d acc s L adresse IP par d faut du point d acc s est 192 168 0 100 et l adresse...

Страница 19: ...pr s l installation de votre appareil notez le num ro de s rie inscrit sur l tiquette situ e sous votre produit Il vous sera n cessaire pour enregistrer votre produit l adresse http www netgear fr sup...

Страница 20: ...19 ProSafe 3x3 Wireless N WNDAP660 ProSafe 3x3 Wireless N WNDAP660 Ethernet 5 12 1 5 WNDAP660 1 a Ethernet TCP IP IP 192 168 0 210 255 255 255 0 b Ethernet...

Страница 21: ...20 c Ethernet d 30 ACTIVE LAN1 LAN2 LAN 1000 100 10 2 4 WLAN 2 4 5 WLAN 5 2 LAN a LAN 1 http 192 168 0 100 b admin password NETGEAR WNDAP660 Ethernet...

Страница 22: ...s Point Name Country Region d Configuration IP IP Settings IP IP IP DNS e DHCP IP MAC DHCP f Configuration Wireless Basic Wireless Settings Turn Radio On g Configuration Security Profile Settings Refe...

Страница 23: ...22 Ethernet Power over Ethernet PoE PoE 802 11b g n 2 4 1 2 3 2 4...

Страница 24: ...23 NETGEAR PoE PoE LINK ACT Ethernet 10 10 100 1000 Link Act WLAN WLAN NETGEAR LAN LAN Ethernet NetBIOS WINS IP IP IP 192 168 0 100 255 255 255 0 IP DHCP...

Страница 25: ...IP TCP IP TCP IP Windows IP NETGEAR NETGEAR NETGEAR http www netgear ru page support register 8 800 100 1160 http kbserver netgear com www netgear ru NETGEAR http kb netgear com app answers detail a_i...

Страница 26: ......

Страница 27: ......

Страница 28: ...ce with the laws of your jurisdiction implementing the WEEE Directive NETGEAR the NETGEAR logo and Connect with Innovation are trademarks and or registered trademarks of NETGEAR Inc and or its subsidi...

Отзывы: