background image

Mobile Broadband Wireless-N Router MBRN3000 User Manual

5-15

Advanced Configuration

v1.0, October 2009

Destination IP Address

, and 

IP Subnet Mask

. If the destination is a single host, type a 

subnet value of 

255.255.255.255

Gateway IP Address

. This must be a router on the same LAN segment as the router. 

Metric

. Type a number between 2 and 15. This represents the number of routers between 

your network and the destination. Usually, a setting of 2 or 3 works, but if this is a direct 
connection, set it to 2. 

5.

Click 

Apply

 to either save your changes. If you added a static route, it is added to the Static 

Routes screen. 

Universal Plug and Play (UPnP)

Universal Plug and Play (UPnP) helps devices, such as Internet appliances and computers, access 
the network and connect to other devices as needed. UPnP devices can automatically discover the 
services from other registered UPnP devices on the network.

1.

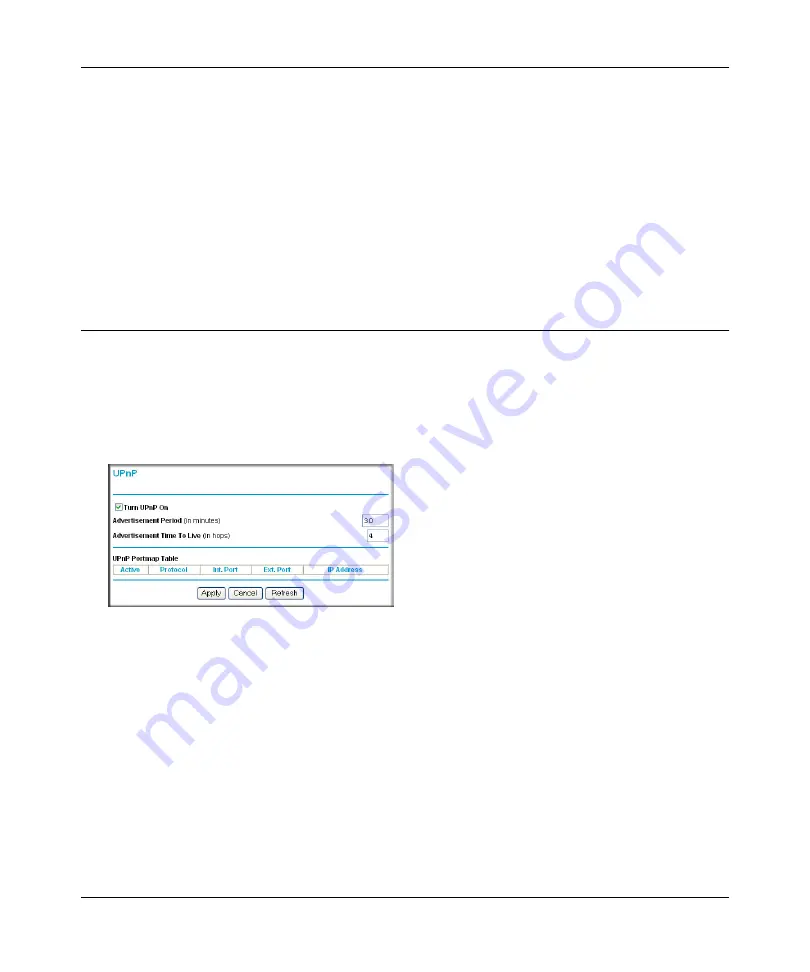
Select UPnP on the main menu to display the UPnP screen:

2.

Fill in the settings on the UPnP screen:

Turn UPnP On

. UPnP can be enabled or disabled for automatic device configuration. The 

default setting for UPnP is enabled. If disabled, the router will not allow any device to 
automatically control the resources, such as port forwarding (mapping), of the router. 

Advertisement Period

. The advertisement period is how often the router advertises 

(broadcasts) its UPnP information. This value can range from 1 to 1440 minutes. The 
default period is for 30 minutes. Shorter durations ensure that control points have current 
device status at the expense of additional network traffic. Longer durations might 
compromise the freshness of the device status but can significantly reduce network traffic.

Figure 5-8

Содержание MBRN3000

Страница 1: ...202 10578 01 October 2009 v1 0 NETGEAR Inc 350 E Plumeria Drive San Jose CA 95134 USA Mobile Broadband Wireless N Router MBRN3000 User Manual ...

Страница 2: ... of the following measures Reorient or relocate the receiving antenna Increase the separation between the equipment and receiver Connect the equipment into an outlet on a circuit different from that to which the receiver is connected Consult the dealer or an experienced radio TV technician for help This device complies with Part 15 of the FCC Rules Operation is subject to the following two conditi...

Страница 3: ...N3000 is in compliance with the essential requirements and other relevant provisions of Directive 1999 5 EC Español Spanish Por medio de la presente NETGEAR Inc declara que el Mobile Broadband Wireless N Router MBRN3000 cumple con los requisitos esenciales y cualesquiera otras disposiciones aplicables o exigibles de la Directiva 1999 5 CE Ελληνική Greek ΜΕ ΤΗΝ ΠΑΡΟΥΣΑ NETGEAR Inc ΔΗΛΩΝΕΙ ΟΤΙ Mobil...

Страница 4: ...nd Wireless N Router MBRN3000 jikkonforma mal tiijiet essenzjali u ma provvedimenti orajn relevanti li hemm fid Dirrettiva 1999 5 EC Magyar Hungarian Alulírott NETGEAR Inc nyilatkozom hogy a Mobile Broadband Wireless N Router MBRN3000 megfelel a vonatkozó alapvetõ követelményeknek és az 1999 5 EC irányelv egyéb elõírásainak Polski Polish Niniejszym NETGEAR Inc oœwiadcza e Mobile Broadband Wireless...

Страница 5: ...ment and Electronic Office Machines aimed at preventing radio interference in such residential areas When used near a radio or TV receiver it may become the cause of radio interference Read instructions for correct handling Customer Support Refer to the Support Information Card that shipped with your Mobile Broadband Wireless N Router MBRN3000 World Wide Web NETGEAR maintains a World Wide Web home...

Страница 6: ...vi v1 0 October 2009 ...

Страница 7: ... the Setup Wizard after Installation 1 6 Manually Configuring Your Internet Settings 1 7 Chapter 2 Wireless Network Configuration Planning Your Wireless Network 2 1 Wireless Placement and Range Guidelines 2 2 Wireless Security Options 2 3 Manually Configuring Your Wireless Settings 2 4 Configuring WEP 2 6 Configuring WPA WPA2 or WPA WPA2 2 8 Using Push N Connect WPS to Configure Your Wireless Netw...

Страница 8: ...rewall Services 3 11 Setting Your Time Zone 3 12 Scheduling Firewall Services 3 13 Chapter 4 Managing Your Network Backing Up Restoring or Erasing Your Settings 4 1 Backing Up the Configuration to a File 4 1 Restoring the Configuration from a File 4 2 Erasing the Configuration 4 2 Upgrading the Router Firmware 4 2 Network Management Information 4 4 Router Status 4 4 Showing Statistics 4 6 Connecti...

Страница 9: ...ess Bridging and Repeating 5 16 Point to Point Bridge Configuration 5 17 Multi Point Bridge Configuration 5 19 Repeater with Wireless Client Association 5 20 Chapter 6 Troubleshooting Basic Functioning 6 1 Troubleshooting Access to the Router Main Menu 6 2 Troubleshooting the ISP Connection 6 4 Obtaining a WAN IP Address 6 4 Troubleshooting PPPoE or PPPoA 6 5 Troubleshooting Internet Browsing 6 5 ...

Страница 10: ...x v1 0 October 2009 Appendix A Technical Specifications and Factory Default Settings Factory Default Settings A 2 Appendix B Related Documents ...

Страница 11: ... following typographical conventions Formats This manual uses the following formats to highlight special messages Scope This manual is written for the Wireless Router according to these specifications Italic Emphasis books CDs file and server names extensions Bold User input IP addresses GUI screen text Italic URL links Note This format is used to highlight information of importance or special int...

Страница 12: ...dobe Acrobat reader installed in order to view and print PDF files The Acrobat reader is available on the Adobe website at http www adobe com Revision History Note Product updates are available on the NETGEAR Inc website at http kbserver netgear com products MBRN3000 asp Tip If your printer supports printing two pages on a single sheet of paper you can save paper and printer ink by selecting this ...

Страница 13: ...uter MBRN3000 Internet connection For help with installation see the Mobile Broadband Wireless N Router MBRN3000 Installation Guide Hardware Features The following sections describe the front panel rear panel and label Router Front Panel The router front panel shown below contains status LEDs Figure 1 Power LAN Ports 1 4 USB Wireless WPS Internet ...

Страница 14: ...d Off No link is detected on this port USB Off No USB device connected Safely Remove Hardware has been activated An error has occurred with the device Solid green USB device is ready to use Blinking green USB device is in use Internet Port Solid green There is an Internet session If the session is dropped due to an idle timeout and an ADSL connection is still present the light will remain green If...

Страница 15: ...On Off button 4 AC power adapter input Wireless On Off Turn the wireless radio in the router on and off The wireless radio is on by default The LED located below this button indicates if the wireless radio is on or off Push N Connect WPS Pushing this button opens a 2 minute window for the router to connect with other WPS enabled devices For more information about using the WPS method to implement ...

Страница 16: ...r security PIN and factory default login information Using the Router Stand For optimal wireless network performance use the stand included in the package to position your router upright 1 Orient your router vertically 2 Insert the tabs of the stand into the slots on the bottom of your router as shown Figure 3 Figure 4 Factory Default Reset Press for 6 seconds to reset the router to its factory de...

Страница 17: ...you can use your Web browser to log into the router to router to view or change its settings Links to Knowledge Base and documentation are also available on the router main menu When you have logged in if you do not click Logout the router waits for 5 minutes after no activity before it automatically logs you out To log in to the router 1 Type http www routerlogin net or http www routerlogin com o...

Страница 18: ...tatus screen The Router Status screen displays if the router has not been configured yet or has been reset to its factory default settings See Viewing Modem Router Status Information on page 4 4 4 You can use different methods to configure your router Select Setup Wizard from the router menu to set up your Internet connection and wireless network configuration See Accessing the Setup Wizard after ...

Страница 19: ...Internet connection and wireless network as described in the Mobile Broadband Wireless N Router MBRN3000 Installation Guide Manually Configuring Your Internet Settings In order to connect to the network and active broadband service account is required Please contact your ISP for username password and the network name To manually configure your Internet settings 1 Log in to the router as described ...

Страница 20: ... where applicable Network name APN ISP network name PDP type Type of packet data protocol Connect automatically at startup If this checkbox is selected the modem automatically connects to the network when powered up This should be selected after login information is provided Reconnect automatically when connection is lost If this check box is selected the modem will attempt to reconnect to the net...

Страница 21: ...onfiguring Your Router to the Internet 1 9 v1 0 October 2009 Click Disconnect when you want to manually disconnect from current network Click Apply when you finish changing the settings Click Cancel to discard changes Click Refresh to update connection status ...

Страница 22: ...ge 2 12 Planning Your Wireless Network For compliance and compatibility between similar products in your area the operating channel and region must be set correctly To configure the wireless network you can either specify the wireless settings or you can use Wi Fi Protected Setup WPS to automatically set the SSID and implement WPA WPA2 security To manually configure the wireless settings you must ...

Страница 23: ...nection can vary significantly based on the physical placement of the router The latency data throughput performance and notebook power consumption of wireless adapters also vary depending on your configuration choices For best results place your router according to the following guidelines Near the center of the area in which your PCs will operate In an elevated location such as a high shelf wher...

Страница 24: ...sly connect to the router Restricting access by MAC address adds an obstacle against unwanted access to your network but the data broadcast over the wireless link is fully exposed Turn Off the Broadcast of the Wireless Network Name SSID If you disable broadcast of the SSID only devices that have the correct SSID can connect This nullifies wireless network discovery feature of some products such as...

Страница 25: ...e current settings first To view or manually configure the wireless settings 1 Log in to the router at its default LAN address of http 192 168 0 1 with its default user name of admin and default password of password or using whatever user name password and LAN address you have chosen for the router 2 Select Wireless Settings from the main menu to display the Wireless Settings screen Note If you us...

Страница 26: ...eld is case sensitive In a setting where there is more than one wireless network different wireless network names provide a means for separating the traffic Any device you want to participate in a wireless network must use the SSID Region The location where the Product Family is used Channel The wireless channel used by the gateway The default is Auto Do not change the wireless channel unless you ...

Страница 27: ...Options section select the WEP Wired Equivalent Privacy radio button SecurityOptions continued WPA2 PSK AES Allow only computers configured with WPA2 to connect to the router See Configuring WPA WPA2 or WPA WPA2 WPA PSK TKIP WPA2 PSK AES Allow computers configured with either WPA PSK or WPA2 PSK security to connect to the router See Configuring WPA WPA2 or WPA WPA2 Note If you use a wireless compu...

Страница 28: ...ally creates the keys Wireless stations must use the passphrase or keys to access the router Key 1 Key4 These values are not case sensitive You can manually enter the four data encryption keys These values must be identical on all computers and access points in your network Enter 10 hexadecimal digits any combination of 0 9 a f or A F 7 Select which of the four keys will be the default Data transm...

Страница 29: ...Settings from the main menu 3 On the Wireless Setting screen select the radio button for the WPA or WPA2 option of your choice 4 The settings displayed on the screen depend on which security option you select 5 For WPA PSK or WPA2 PSK enter the passphrase 6 If prompted enter the settings for the Radius server For WPA 802 1x or WPA2 802 1x these settings are required for communication with the prim...

Страница 30: ...R products that implement Push N Connect If your wireless network will include a combination of WPS capable devices and non WPS capable devices NETGEAR suggests that you set up your wireless network and security settings manually first and use WPS only for adding additional WPS capable devices See Adding Both WPS and Non WPS Clients on page 2 13 A WPS client can be added using the Push Button meth...

Страница 31: ...nfiguration utility Follow the utility s instructions to click a WPS button 5 Go back to the router screen to check for a message The router WPS screen displays a message confirming that the client was added to the wireless network The router generates an SSID and implements WPA WPA2 wireless security The router will keep these wireless settings unless you change them or you clear the Keep Existin...

Страница 32: ...he SSID and WPA WPA2 security settings when it implements WPS After WPS is implemented the router automatically selects this check box so that your SSID and wireless security settings remain the same if other WPS enabled devices are added later To use a PIN to add a WPS client 1 Log in to the router at its default LAN address of http 192 168 0 1 with its default user name of admin and default pass...

Страница 33: ...communication to the ISP Connecting Additional Wireless Client Devices After WPS Setup You can add more WPS clients to your wireless network or you can add a combination of WPS enabled clients and clients without WPS Adding More WPS Clients To add a wireless client device that is WPS enabled 1 Follow the procedures in Using a WPS Button to Add a WPS Client on page 2 9 or Using PIN Entry to Add a W...

Страница 34: ...t the WPA PSK WPA2 PSK radio button on the Wireless Settings screen see Manually Configuring Your Wireless Settings on page 2 4 and click Apply On the WPA PSK WPA2 PSK screen select a passphrase and click Apply Record this information to add additional clients 3 For the non WPS devices that you want to connect open the networking utility and follow the utility s instructions to enter the security ...

Страница 35: ...change the router password and the amount of time for the administrator s login time out NETGEAR recommends that you change this password to a more secure password The ideal password should contain no dictionary words from any language and should be a mixture of both upper and lower case letters numbers and symbols Your password can be up to 30 characters Changing the Built In Password 1 Log in to...

Страница 36: ...activity To change the login time out period 1 In the Set Password screen type a number in the Administrator login times out field The suggested default value is 5 minutes 2 Click Apply to save your changes or click Cancel to keep the current period Configuring Basic Firewall Services Basic firewall services you can configure include access blocking and scheduling of firewall security These topics...

Страница 37: ...ocations or services that you specify as off limits Denial of service DoS protection Detects and thwarts denial of service DoS attacks such as Ping of Death SYN flood LAND attack and IP spoofing Blocking unwanted traffic from the Internet to your LAN The following section explains how to configure your router to perform these functions Blocking Keywords and Sites The router allows you to restrict ...

Страница 38: ... or domain select it from the list click Delete Keyword and then click Apply 6 To specify a trusted user enter that computer s IP address in the Trusted IP Address field and then click Apply You can specify one trusted user which is a computer that will be exempt from blocking and logging Since the trusted user will be identified by an IP address you should configure that computer with a fixed IP ...

Страница 39: ...ional rules that will specify exceptions to the default rules By adding custom rules you can block or allow access based on the service or application source or destination IP addresses and time of day You can also choose to log traffic that matches or does not match the rule you have defined You can change the order of precedence of rules so that the rule that applies most often will take effect ...

Страница 40: ...work Following are two application examples of inbound rules Inbound Rule Example A Local Public Web Server If you host a public Web server on your local network you can define a rule to allow inbound Web HTTP requests from outside IP addresses to the IP address of your Web server at any time of day This rule is shown in the following figure The settings are Service From this list select the appli...

Страница 41: ...lected you must enter the Start and Finish fields Single address Enter the required address in the Start field Log You can select whether the traffic will be logged The choices are Never No log entries will be made for this service Always Any traffic for this service type will be logged Match Traffic of this type that matches the rule will be logged Not match Traffic of this type that does not mat...

Страница 42: ...to access the server using the external WAN IP address will fail Outbound Rules Service Blocking The router allows you to block the use of certain Internet services by computers on your network This is called service blocking or port filtering You can define an outbound rule to block Internet access from a local computer based on the following IP address of the local computer source address IP add...

Страница 43: ...sed on their source LAN IP address Select the desired option Any All IP addresses are covered by this rule Address range If this option is selected you must fill in the Start and Finish fields Single address Enter the required address in the Start field WAN users This setting determines which packets are covered by the rule based on their destination WAN IP address Select the option that you want ...

Страница 44: ... of client computers For example Web servers serve Web pages time servers serve time and date information and game hosts serve data about other players moves When a computer on the Internet sends a request for service to a server computer the requested service is identified by a service or port number This number appears as the destination port number in the transmitted IP packets For example a pa...

Страница 45: ...ces to display this screen To create a new service click Add Custom Service To edit an existing service select its button on the left side of the table and then click Edit Service To delete an existing service select its button on the left side of the table and then click Delete Service 3 Use the screen shown in the following figure to define or edit a service 4 Click Apply to save your changes Se...

Страница 46: ...ne This setting will be used for the blocking schedule according to your local time zone and for time stamping log entries If your time zone is currently in daylight savings time select the Adjust for daylight savings time check box 4 The router has a list of NETGEAR NTP servers If you prefer to use a particular NTP server as the primary server enter its IP address in the Use this NTP Server field...

Страница 47: ... LAN address you have chosen for the router 2 On the main menu select the Schedule The Schedule screen appears 3 To block Internet services based on a schedule select Every Day or select one or more days If you want to limit access completely for the selected days select All Day Otherwise to limit access during certain times for the selected days fill in the Start Blocking and End Blocking fields ...

Страница 48: ...ry default settings The procedures below explain how to do these tasks Backing Up the Configuration to a File 1 Log in to the router at its default LAN address of http 192 168 0 1 with its default user name of admin default password of password or using whatever user name password and LAN address you have chosen for the router 2 Under the Maintenance heading on the main menu select Backup Settings...

Страница 49: ... the Erase feature to erase its configuration settings and restore the router to the factory default settings To erase the configuration 1 Under the Maintenance heading on the main menu select Backup Settings 2 Click Erase 3 The router reboots After an erase the router password is password the LAN IP address is 192 168 0 1 and the router DHCP client is enabled Upgrading the Router Firmware The sof...

Страница 50: ...ts default user name of admin default password of password or using whatever user name password and LAN address you have chosen for the router 3 From the main menu under the Maintenance heading select Router Upgrade to display this screen 4 Click Browse to locate the binary bin or img upgrade file 5 Click Upload Figure 4 2 Warning When uploading firmware to the router do not interrupt the Web brow...

Страница 51: ...on The router provides a variety of status and usage information which is discussed in the following sections Router Status From the main menu below the Maintenance heading select Router Status to view this screen The Router Status screen provides status and usage information This screen shows the following parameters Figure 4 3 ...

Страница 52: ...e protocol for the Internet connection which is PPP Point to Point IP Subnet Mask The IP subnet mask used by the router s USB port Gateway IP Address The IP address used by the router Domain Name Server The DNS server IP addresses used by the router These addresses are usually obtained dynamically from the ISP LAN Port MAC Address The Ethernet MAC address used by the router s LAN port IP Address T...

Страница 53: ...ield Description WAN Internet LAN or WLAN Wireless LAN statistics Status The link status of the port TxPkts The number of packets transmitted on this port since reset or manual clear RxPkts The number of packets received on this port since reset or manual clear Collisions The number of collisions on this port since reset or manual clear Tx B s The average egress line utilization for this port Rx B...

Страница 54: ...ities Noise Margin This is the signal to noise ratio and is a measure of the quality of the signal on the line Poll Interval Specifies the interval at which the statistics are updated in this window Click Stop to freeze the display Figure 4 5 Table 4 3 Connection Status Fields for HSDPA Status Field Description Connection Status The status of the Internet connection Scanning The modem is scanning ...

Страница 55: ...discovers the devices To force the router to look for attached devices click the Refresh button Received Signal Quality in dbm 3G modem radio reception A small negative number indicates good signal quality Bytes Transmitted The number of bytes transmitted in the most recent connection session Bytes Received The number of bytes received in the most recent connection session Tx B s The transmission ...

Страница 56: ...een can show you when someone on your network tries to access a blocked site If you enabled e mail notification you receive these logs in an e mail message If you do not have e mail notification enabled you can view the logs here An example of the logs file is shown in the following figure Log entries are described in the following table Figure 4 7 Table 4 4 Security Log Entry Descriptions Field D...

Страница 57: ...activate this feature select to the Broadcast on LAN radio button or enter the IP address of the server where the syslog file will be written Source IP The IP address of the initiating device for this log entry Source port and interface The service port number of the initiating device and whether it originated from the LAN or WAN Destination The name or IP address of the destination device or webs...

Страница 58: ...ogin screen timed out IP 192 168 0 2 This entry shows a time out of the administrator login Wed 2002 05 22 22 00 19 Log emailed This entry shows when the log was e mailed Dropped Packets Wed 2002 05 22 07 15 15 TCP packet dropped Source 64 12 47 28 4787 WAN Destination 134 177 0 11 21 LAN Inbound Default rule match Sun 2002 05 22 12 50 33 UDP packet dropped Source 64 12 47 28 10714 WAN Destination...

Страница 59: ...nd alerts and logs via email Send To This E mail Address Enter the e mail address where you want to send the alerts and logs Use a full e mail address such as ChrisXY myISP com Outgoing Mail Server Enter the name or IP address of the outgoing SMTP mail server of your ISP such as mail myISP com My Mail Server requires authentication Select this check box if you need to log in to your SMTP server to...

Страница 60: ... mailed to the specified e mail address After the log is sent it is cleared from the router s memory If the router cannot e mail the log file the log buffer might fill up In this case the router overwrites the log and discards its contents Running Diagnostic Utilities and Rebooting the Router The router has a diagnostics feature You can use the Diagnostics screen to perform the following functions...

Страница 61: ...tatus of your router Configuring Remote Management 1 Log in to the router at its default LAN address of http 192 168 0 1 with its default user name of admin default password of password or using whatever user name password and LAN address you have chosen for the router Figure 4 9 Tip Be sure to change the router default password to a very secure password The ideal password should contain no dictio...

Страница 62: ...ingle IP address on the Internet select Only This Computer Enter the IP address that will be allowed access 5 Specify the port number that will be used for accessing the management interface Web browser access normally uses the standard HTTP service port 80 For greater security you can change the remote management Web interface to a custom port by entering that number in the field provided Choose ...

Страница 63: ...Mobile Broadband Wireless N Router MBRN3000 User Manual Managing Your Network 4 16 v1 0 October 2009 http 134 177 0 123 8080 Note In this case you must include http in the address ...

Страница 64: ...age 5 5 LAN IP Settings on page 5 7 Dynamic DNS on page 5 11 Using Static Routes on page 5 13 Universal Plug and Play UPnP on page 5 15 Wireless Bridging and Repeating on page 5 16 To view or change these settings log in to the router at its default LAN address of http 192 168 0 1 with its default user name of admin and default password of password or using whatever password and LAN address you ha...

Страница 65: ... wireless radio can be helpful for configuration network tuning or troubleshooting Allow Broadcast Name SSID Selected by default the router broadcasts its SSID allowing wireless stations that have a null blank SSID to adopt the correct SSID If you disable broadcast of the SSID only devices with the correct SSID can connect This nullifies the wireless network discovery feature of products such as W...

Страница 66: ...r network by not broadcasting the wireless network name SSID To do this clear the Allow Broadcast of Name SSID check box on the Wireless Settings screen and then click Apply Wireless devices will not see your router You must configure your wireless devices to match the wireless network name SSID of the router WPS Settings Router PIN The PIN number used for Push N Connect Disable Router PIN By defa...

Страница 67: ... address of http 192 168 0 1 with its default user name of admin and default password of password or using whatever user name password and LAN address you have chosen for the router 2 From the main menu select Wireless Settings and then click Setup Access List to display the Wireless Station Access List screen The trusted wireless stations listed on this screen are the wireless clients that will h...

Страница 68: ...ally be found on the bottom of the wireless device 4 Click Add and then click Apply to save these settings Now only devices on this list will be allowed to wirelessly connect to the Product Family WAN Setup To view or change the WAN Setup 1 From the main menu select WAN Setup to display the WAN Setup screen 2 Make the changes that you want and then click Apply to save the settings Note If no devic...

Страница 69: ... check box is usually clear so that the firewall protects your LAN against port scans and denial of service DOS attacks This check box should be selected only in special circumstances Default DMZ Server This feature is sometimes helpful when you are using some online games and videoconferencing Be careful when using this feature because it makes the firewall security less effective See Setting Up ...

Страница 70: ...erver The router default LAN IP configuration is LAN IP addresses 192 168 0 1 Subnet mask 255 255 255 0 These addresses are part of the Internet Engineering Task Force IETF designated private address range for use in private networks and should be suitable in most applications If your network has a requirement to use a different IP addressing scheme you can make those changes in this screen To vie...

Страница 71: ...vanced Configuration 5 8 v1 0 October 2009 1 Select LAN IP to display the LAN IP Setup screen 2 Change the settings For more information see Table 5 3 DHCP Settings on page 5 10 or Reserved IP Addresses on page 5 11 3 Click Apply to save the changes Figure 5 4 ...

Страница 72: ...rmat and the broadcasting method of the RIP packets that the router sends It recognizes both formats when receiving By default this is RIP 1 RIP 1 is universally supported It is adequate for most networks unless you have an unusual network setup RIP 2 carries more information Both RIP 2B and RIP 2M send the routing data in RIP 2 format RIP 2B uses subnet broadcasting RIP 2M uses multicasting DHCP ...

Страница 73: ...he LAN IP Setup screen Otherwise leave it selected Specify the pool of IP addresses to be assigned by filling in the Starting IP Address and Ending IP Address fields These addresses should be part of the same IP address subnet as the router s LAN IP address Using the default addressing scheme you should define a range between 192 168 0 2 and 192 168 0 254 although you might want to save part of th...

Страница 74: ...ess you can register a domain name and have that name linked with your IP address by public Domain Name Servers DNS However if your Internet account uses a dynamically assigned IP address you will not know in advance what your IP address will be and the address can change frequently In this case you can use a commercial Dynamic DNS service to register your domain to their IP address and forward tr...

Страница 75: ...select Dynamic DNS to display the Dynamic DNS screen 3 Access the website of one of the Dynamic DNS service providers whose names appear in the Service Provider drop down list and register for an account For example for dyndns org go to www dyndns org 4 Select the Use a Dynamic DNS Service check box 5 Select the name of your dynamic DNS service provider 6 Fill in the Host Name User Name and Passwo...

Страница 76: ... cable modem to an ISP You have an ISDN router on your home network for connecting to the company where you are employed This router s address on your LAN is 192 168 0 100 Your company s network is 134 177 0 0 When you first configured your router two implicit static routes were created A default route was created with your ISP as the router and a second static route was created to your local netw...

Страница 77: ...t its default LAN address of http 192 168 0 1 with its default user name of admin and default password of password or using whatever user name password and LAN address you have chosen for the router 2 From the main menu under the Advanced heading select Static Routes to view the Static Routes screen 3 Click Add or Edit to display the following screen 4 Fill in or change the fields Route Name The r...

Страница 78: ...work and connect to other devices as needed UPnP devices can automatically discover the services from other registered UPnP devices on the network 1 Select UPnP on the main menu to display the UPnP screen 2 Fill in the settings on the UPnP screen Turn UPnP On UPnP can be enabled or disabled for automatic device configuration The default setting for UPnP is enabled If disabled the router will not a...

Страница 79: ... router Click Cancel to disregard any unsaved changes Click Refresh to update the portmap table and to show the active ports that are currently opened by UPnP devices Wireless Bridging and Repeating You can build large bridged wireless networks by using the router to configure a wireless distribution system WDS Some examples of wireless bridged configurations are Point to Point bridge The router c...

Страница 80: ...mode the router communicates as an access point with another bridge mode wireless station The following figure shows an example of Point to Point Bridge mode Figure 5 9 Figure 5 10 FPO Both APs access points are in Point to Point Bridge mode LAN Segment 1 LAN Segment 2 192 168 0 1 AP 1 MBR624GU Router AP 2 Switch or hub PCs PCs wireless PC associated with AP 1 wireless PC associated with AP 2 ...

Страница 81: ...the other access point AP 2 on LAN Segment 2 in Point to Point Bridge mode The MBRN3000 router must have AP 2 s MAC address in its Remote MAC Address field and AP 2 must have the MBRN3000 s MAC address in its Remote MAC Address field 3 Configure and verify the following for both access points Both APs must use the same SSID channel authentication mode if any and security settings if security is in...

Страница 82: ...AC Address Using wireless security to protect this traffic To set up the multi point bridge configuration shown in Figure 5 11 1 Configure the operating mode of the routers Because it is in a central location configure the MBRN3000 router AP 1 on LAN Segment 1 in Point to Multi Point Bridge mode and enter the MAC addresses of AP 2 and AP 3 in the Remote MAC Address 1 and Remote MAC Address 2 field...

Страница 83: ...router in the above diagram in the Remote AP MAC address field 4 Verify connectivity across the LANs A computer on any LAN segment should be able to connect to the Internet or share files and printers with any other PCs or servers connected to any of the three LAN segments Repeater with Wireless Client Association In this mode the Wireless Router sends all traffic to a remote AP For Repeater mode ...

Страница 84: ...Address field 2 Verify the following for both access points The APs must be on the same LAN That is the LAN IP addresses for the APs must be in the same subnet AP devices must use the same SSID channel authentication mode and encryption 3 Disable the DHCP servers on repeaters AP2 and AP3 AP1 will then be the DHCP server 4 Verify connectivity across the LANs A computer on any LAN segment should be ...

Страница 85: ... ISP Connection on page 6 4 I want to clear the configuration and start over again Go to Restoring the Default Configuration and Password on page 6 7 Basic Functioning After you turn on power to the router the following sequence of events should occur 1 When power is first applied verify that the Power LED is on 2 After approximately 10 seconds verify that a The Power LED is still solid green A re...

Страница 86: ...o clear the fault as follows Cycle the power to see if the router recovers Clear the router s configuration to factory defaults This sets the router s IP address to 192 168 0 1 This procedure is explained in Restoring the Default Configuration and Password on page 6 7 If the error persists you might have a hardware problem and should contact technical support Internet LED is red The router cannot ...

Страница 87: ...esh to be sure that the Java applet is loaded Try quitting the browser and launching it again Make sure you are using the correct login information The factory default login name is admin and the password is password Make sure that Caps Lock is off when entering this information If the router does not save changes you have made in the Web configuration interface check the following When entering c...

Страница 88: ...dress from the ISP the problem might be one of the following Your ISP might require a multiplexing method or virtual path identifier or virtual channel identifier parameter Verify with your ISP the multiplexing method and parameter value and update the router s ADSL settings accordingly Your ISP might require a login program Ask your ISP whether they require PPP over Ethernet PPPoE or PPP over ATM...

Страница 89: ...o load any Web pages from the Internet Your computer might not recognize any DNS server addresses A DNS server is a host on the Internet that translates Internet names such as www addresses to numeric IP addresses Typically your ISP provides the addresses of one or two DNS servers for your use If you entered a DNS address during the router s configuration reboot your computer and verify the DNS ad...

Страница 90: ...outer as in this example ping 192 168 0 1 3 Click OK You should see a message like this one Pinging IP address with 32 bytes of data If the path is working you see this message Reply from IP address bytes 32 time NN ms TTL xxx If the path is not working you see this message Request timed out If the path is not working correctly you could have one of the following problems Wrong physical connection...

Страница 91: ...k address of your PC the portion of the IP address specified by the netmask is different from the network address of the remote device Check that your cable or DSL modem is connected and functioning If your ISP assigned a host name to your PC enter that host name as the account name in the Basic Settings screen Your ISP could be rejecting the Ethernet MAC addresses of all but one of your PCs Many ...

Страница 92: ...s on the Internet Each entry in the log is stamped with the date and time of day Problems with the date and time function can include the following Date shown is January 1 2000 Cause The router has not yet successfully reached a network time server Check that your Internet access settings are configured correctly If you have just completed configuring the router wait at least 5 minutes and check t...

Страница 93: ...ut United Kingdom Australia 240V AC 50 Hz input Europe 230V AC 50 Hz input Japan 100V AC 50 60 Hz input All regions output 12 V DC 1 0A output Physical Specifications Dimensions 6 8 x 5 03 x 1 28 173 mm x 128 mm x 33 mm Weight 0 65 lbs without the stand 0 29 kg Environmental Specifications Operating temperature 0 to 40 C 32º to 104º F Operating humidity 90 maximum relative humidity noncondensing E...

Страница 94: ...settings that are shown in the following table Feature Default Behavior Router Login User login URL http www routerlogin net or http www routerlogin com User name case sensitive admin Login password case sensitive password Internet Connection WAN MAC address Use default address WAN MTU size 1492 Port speed AutoSense Local Network LAN LAN IP 192 168 0 1 Subnet mask 255 255 255 0 RIP direction None ...

Страница 95: ...bled Transmission speed Auto Country Region United States in North America otherwise varies by region RF channel 11 until the region is selected Operating mode Up to 300 Mbps Data rate Best Output power Full Access point Enabled Authentication type Open system Wireless card access list All wireless stations allowed Maximum Wireless signal rate derived from IEEE Standard 802 11 specifications Actua...

Страница 96: ...etworking and TCP IP Addressing http documentation netgear com reference enu tcpip index htm Wireless Communications http documentation netgear com reference enu wireless index htm Preparing a Computer for Network Access http documentation netgear com reference enu wsdhcp index htm Virtual Private Networking VPN http documentation netgear com reference enu vpn index htm Glossary http documentation...

Отзывы: