background image

ADSL2+ Modem Router User Guide 

YML14WN

26 

www.netcomm.com.au

Wireless

NOTE: The Wireless option is only available for the NB14WN

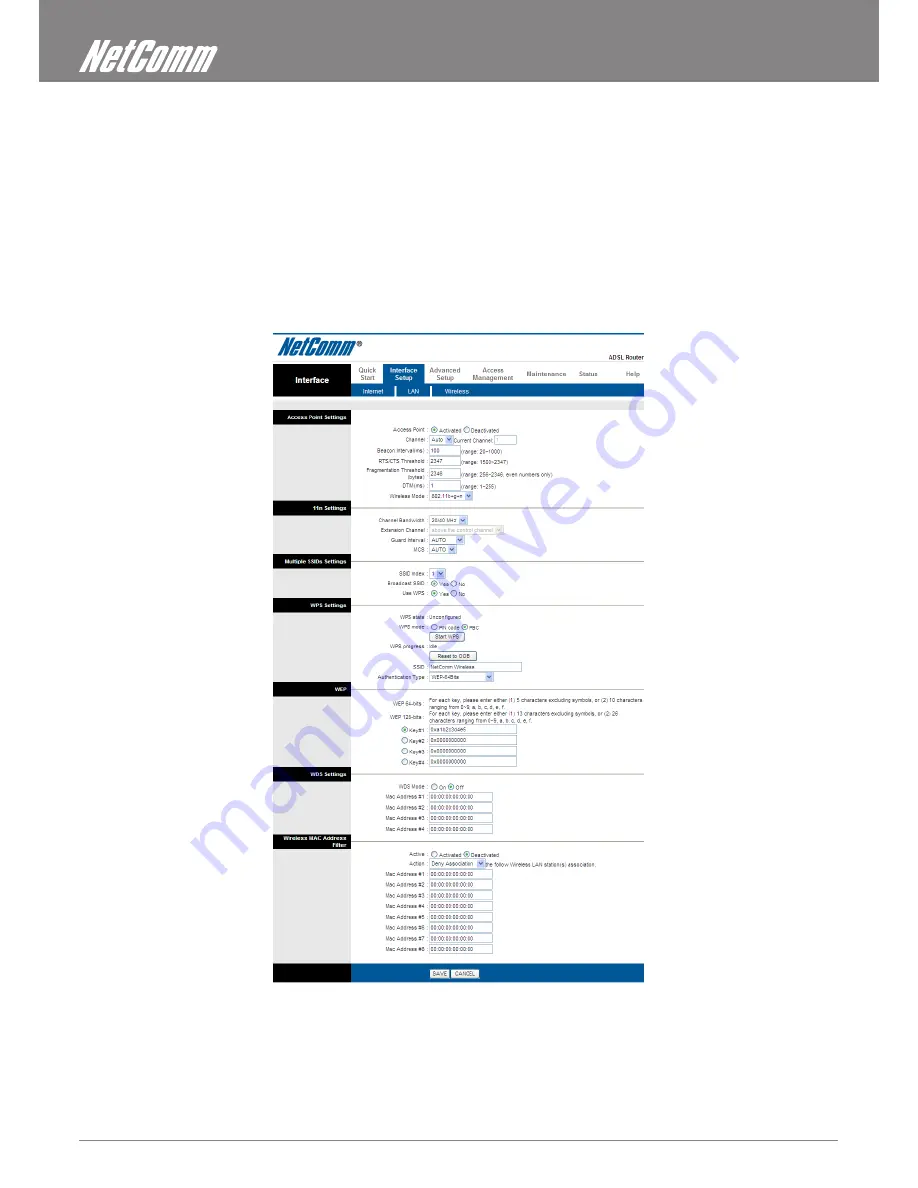
Wireless Settings 

Go to Interface -> Wireless to setup the wireless parameters.

There are a number of options you can change. Two of the more basic and common options you may wish to change are:

SSID

The name of your wireless network. You can change the SSID. Only devices with the same SSID can interconnect.

Channel

The channel number is used for wireless networking. The channel setting of the wireless devices within a network should be the same.

Содержание NetComm Gateway Series

Страница 1: ...NETCOMM GATEWAY SERIES ADSL2 Modem Router USER GUIDE ...

Страница 2: ...dapter that are shipped with this device To safeguard the equipment against overheating make sure that all openings in the unit that offer exposure to air are not blocked Avoid using a telephone other than a cordless type during an electrical storm There may be a remote risk of electric shock from lightening Also do not use the telephone to report a gas leak in the vicinity of the leak Never insta...

Страница 3: ...WPS Settings 27 Advanced Setup 28 Firewall 29 Routing 29 QoS 31 VLAN 32 ADSL 33 Access Management 34 ACL Settings 35 Filtering 35 Universal Plug and Play UPnP 37 DDNS 38 CWMP 38 Maintenance 40 Admin Setting 41 System Time 41 Firmware Update 42 System Reset 42 Diagnostics 42 Status 43 Device Info 44 System Log 44 Statistics 45 Appendix A Installing UPnP in Windows Example 46 Installing UPnP in Wind...

Страница 4: ...Introduction ...

Страница 5: ... comes with a built in 4 port Ethernet switch allowing for other devices to access the Internet over a wired connection Shared Features Fully featured ADSL2 modem router Easy configuration wizrd for quick and simple setup Easy to use web based configuration for advanced settings Unique Features NB14 NB14WN 1 LAN port Wireless N access point for speeds of up to 150Mbps 4 LAN ports for multiple wire...

Страница 6: ...een Ready Waiting for device ready Power Off Green Connect to DSLAM Disconnect to DSLAM N A Green The device has a WAN IP address from ISP Transmit Receive Data N A Green WLAN Ready Transmit Receive Data WLAN Off Green N A Start WPS peer within 2 minutes WPS Idle Green Ethernet Connected Transmit Receive Data Ethernet Disconnected Back Panel Connectors The below table shows the function of each co...

Страница 7: ...0 DHCP DHCP Server Enable Hardware Requirements To use the ADSL2 Modem Router please have following hardware accessories ready A PC with a pre installed Ethernet Adapter Required 12VAC power adaptor Included in the package RJ 45 Ethernet cable Included in the package RJ 11cable Included in the package System Requirements 1 Pentium 200MHZ processor or above 2 Windows 98SE Windows Me Windows 2000 Wi...

Страница 8: ...Installation and Setup ...

Страница 9: ... cable from one of the LAN ports on the back of the router to your computer 3 Connect the supplied power adapter to your router and press the on off button to power the router on NOTE The model shown is the NB14WN Computer Phone port Power Point Power Adapter Configuration Procedures Before beginning the configuration please kindly configure your PC as below to enable automatic IP address DNS Serv...

Страница 10: ... on Internet Protocol TCP IP 4 Check Obtain an IP address automatically and Obtain DNS server address automatically then click on OK to continue 5 Click Show icon in notification area when connected see screen image in 3 above then click on OK to complete the setup procedures ...

Страница 11: ...s Vista 32 64 1 Click on Start Control Panel Network and Sharing Center 2 In the Manage network connections click on Manage network connections to continue 3 Single RIGHT click on Local Area connection then click Properties 4 The screen will display the information User Account Control click Continue to continue ...

Страница 12: ...uter User Guide YML14WN 12 www netcomm com au 5 Double click on Internet Protocol Version 4 TCP IPv4 6 Check Obtain an IP address automatically and Obtain DNS server address automatically then click on OK to continue ...

Страница 13: ...ateway Series ADSL2 Modem Router For Windows 7 32 64 1 Click on Start Control Panel in Category View View network status and tasks 2 In the Control Panel Home click on Change adapter settings to continue 3 Single RIGHT click on Local Area Connection then click Properties ...

Страница 14: ...uter User Guide YML14WN 14 www netcomm com au 4 Double click on Internet Protocol Version 4 TCP IPv4 5 Check Obtain an IP address automatically and Obtain DNS server address automatically then click on OK to continue ...

Страница 15: ...YML14WN ADSL2 Modem Router User Guide www netcomm com au 15 NetComm Gateway Series ADSL2 Modem Router ADSL2 Modem Router Configuration ...

Страница 16: ...Protocol Mode from the drop down box according to your current location The default ADSL settings are different in Australia and New Zealand Then enter the Username and Password as supplied by your ISP Internet Service Provider Then press Next NOTE Steps 5 7 are only applicable to the NB14WN setup procedure 5 Please enter the ESSID and Wireless Default Channel if you want to change from the defaul...

Страница 17: ...ase click the Setup button once you have entered all of your desired settings Allow a short time for your device to apply these settings 8 A window will pop up informing you of the status 9 Another window will open informing you that the easy configuration is complete Click on Exit to complete the procedure ...

Страница 18: ...Placement Web User Interface ...

Страница 19: ...s Microsoft Internet Explorer or Netscape Navigator Accessing the ADSL2 Modem Router Web User Interface Step 1 Make sure your ADSL2 Modem Router is properly connected Step 2 Prepare your computer computer network to connect to the Router Step 3 Launch your web browser Step 4 Type 192 168 1 1 Step 5 An Enter Network Password window displays Enter the user name and password admin is the default for ...

Страница 20: ...Quick Start ...

Страница 21: ...m au 21 Quick Start You can use Quick Start to setup the router s ADSL connection with ease Click Quick Start to get into the quick setup procedures Click RUN WIZARD to start up this procedure Step 1 Please click Next to start entering information Step 2 Enter a new admin password and click Next ...

Страница 22: ... conenction type is leave it as the default Step 5 Enter the connection information provided by your ISP and click Next NOTE Users in Australia should be able to keep the defaults For users in New Zealand change the Protocol Mode to PPPoA VC Mux and the VPI VCI values to 0 100 Step 6 Please click NEXT to confirm your changes Step 7 Please click CLOSE to exit the Quick Start Wizard ...

Страница 23: ...Interface Setup ...

Страница 24: ...ervice provider gives a static IP address to access Internet services PPPoE PPP over Ethernet is a common connection method used for ADSL PPPoA PPP over ATM is a common connection method used for ADSL Bridge Bridge mode is a common connection method used for ADSL modems Dynamic Routing The dynamic routing feature of the router can be used to allow the router to automatically adjust to physical cha...

Страница 25: ...convenience Since your Service Provider may connect to the Internet with dynamic IP settings it is likely that the DNS server IP addresses are also provided dynamically However if there is a DNS server that you would rather use you need to specify the IP address below LAN Configuration The LAN Settings option enables you to configure the LAN port If DHCP Relay is selected the DHCP requests from lo...

Страница 26: ... wireless parameters There are a number of options you can change Two of the more basic and common options you may wish to change are SSID The name of your wireless network You can change the SSID Only devices with the same SSID can interconnect Channel The channel number is used for wireless networking The channel setting of the wireless devices within a network should be the same ...

Страница 27: ...broadband router with simple push button type configuration or Pin Code type configuration Here are descriptions of every setup items Item Name Description Use WPS Check this box to enable WPS function uncheck it to disable WPS WPS mode Select your WPS mode to PIN Code or PBC PIN Personal Information Number PBC Push Button Configuration AP self PIN code This is the WPS PIN code of this wireless ro...

Страница 28: ...Advanced Setup ...

Страница 29: ...g to see the Routing Table The Routing table allows you to see how many routings on your routing table and interface information Static Routing Click on ADD ROUTE to setup static route features The static routing function determines the path that the router follows over your network before and after it passes through your router You can use static routing to allow different IP domain users to acce...

Страница 30: ...ver known as Port Mapping You can configure the router as a virtual server so that remote users accessing services such as the Web or FTP at your local site via public IP addresses can be automatically redirected to local servers configured with private IP addresses In other words depending on the requested service TCP UDP port numbers the router redirects the external service request to the appro...

Страница 31: ...ameters If you have a local client PC that cannot run an Internet application properly from behind the NAT firewall you can open the client up to unrestricted two way Internet access by defining a virtual DMZ Host QoS Go to Advanced Setup QoS to setup QoS features This option will provide better service of selected network traffic over various technologies ...

Страница 32: ...LAN segments Because VLANs are based on logical instead of physical connections it is very flexible for user host management bandwidth allocation and resource optimization VLAN PVID Go to VLAN PVID for each interface to setup VLAN PVID features Each physical port has a default VID called PVID Go to VLAN PVID for each interface to setup VLAN PVID features Each physical port has a default VID called...

Страница 33: ...outer User Guide www netcomm com au 33 NetComm Gateway Series ADSL2 Modem Router VLAN Group Go to Define VLAN Group to setup VLAN group features ADSL Go to Advanced Setup ADSL to define and set your ADSL mode and ADSL Type ...

Страница 34: ...Access Management ...

Страница 35: ...th the default IP 0 0 0 0 any client would be allowed to remotely access the ADSL2 Modem Router Filtering IP Filtering Go to Access Management IP Filtering to block some packets from the WAN The router provides extensive firewall protection by restricting connection parameters to limit the risk of intrusion and defence against a wide array of common hacker attacks The user can set different IP fil...

Страница 36: ...from the drop down box to deny service to any URL that you specify SNMP Go to Access Management SNMP to setup the SNMP feature Simple Network Management Protocol is used for exchanging information between network devices Get Community Select to set the password for the incoming Get and GetNext requests from the management station Set Community Select to set the password for incoming Set requests f...

Страница 37: ...ee the Network Address Translation NAT chapter for further information about NAT Cautions with UPnP The automated nature of NAT traversal applications in establishing their own services may present network security issues Network information and configuration may also be obtained and modified by users in some network environments All UPnP enabled devices may communicate freely with each other with...

Страница 38: ...TTPS URL An HTTPS URL indicates that the ACS supports SSL The host portion of this URL is used by the CPE for validating the certificate from the ACS when using certificate based authentication User Name Username used to authenticate the CPE when making a connection to the ACS using the CPE WAN Management Protocol This username is used only for HTTP based authentication of the CPE Password Passwor...

Страница 39: ...the DSL device will send an Inform RPC to the ACS server at the system startup and will continue to send it periodically at an interval defined in Periodic Inform Interval field Deactivated When this field is disabled the DSL device will only send Inform RPC to the ACS server once at the system startup Interval Time interval in seconds to send Inform RPC ...

Страница 40: ...Maintenance ...

Страница 41: ...to restrict management access to the router The default is admin Username and admin Password System Time Go to Maintenance Time Zone and select system time as you wish Connecting to a Simple Network Time Protocol SNTP server allows the router to synchronize the system clock to the global Internet The synchronized clock in the router is used to record the security log and control client filtering ...

Страница 42: ...e router stops responding correctly or in some way stops functioning you can perform a reset Your settings will not be changed To perform the reset select Current Setting and click on the RESTART button below The router will reboot with current setting Select Factory Default Setting and click on the RESTART button the router will reboot with factory default setting Diagnostics The Diagnostics menu...

Страница 43: ...How to configure WEP WPA PSK WPA2 PSK Wireless Security Status ...

Страница 44: ...e router s information The System Status page shows the WAN LAN and the router s firmware version The ADSL Line Status enables you to check the status of your ADSL connection including how fast data is being transferred System Log Go to Status System Log and you can see the system log file Click Save Log to save system log file ...

Страница 45: ...lect Ethernet interface You can see the traffic Statistics of Ethernet activity ADSL Go to Status Statistics and select ADSL interface You can see the traffic Statistics of ADSL interface WLAN NOTE The WLAN option is only available for the NB14WN Go to Status Statistics and select WLAN interface You can see the traffic Statistics of Wireless interface ...

Страница 46: ...Appendix ...

Страница 47: ...s below to install the UPnP in Windows Me Step 1 Click Start and Control Panel Double click Add Remove Programs Step 2 Click on the Windows Setup tab and select Communication in the Components selection box Click Details Step 3 In the Communications window select the Universal Plug and Play check box in the Components selection box Step 4 Click OK to go back to the Add Remove Programs Properties w...

Страница 48: ...the Network Connections window click Advanced in the main menu and select Optional Networking Components The Windows Optional Networking Components Wizard window displays Step 4 Select Networking Service in the Components selection box and click Details Step 5 In the Networking Services window select the UPnP User Interface check box Step 6 Click OK to go back to the Windows Optional Networking Co...

Страница 49: ...nP activated on the NB14WN Make sure the computer is connected to a LAN port of the NB14WN Turn on your computer and the NB14WN Auto discover Your UPnP enabled Network Device Step 1 Click start and Control Panel Double click Network Connections An icon displays under Internet Gateway Step 2 Right click the icon and select Properties Step 3 In the Internet Connection Properties window click Setting...

Страница 50: ... edit or delete the port mappings or click Add to manually add port mappings Step 5 Select Show icon in notification area when connected option and click OK An icon displays in the system tray Step 6 Double click on the icon to display your current Internet connection status ...

Страница 51: ...his comes helpful if you do not know the IP address of the device Follow the steps below to access the web configuration Step 1 Click Start and then Control Panel Step 2 Double click Network Connections Step 3 Select My Network Places under Other Places Step 4 An icon with the description for each UPnP enabled device displays under Local Network Step 5 Right click on the icon for your modem router...

Страница 52: ...DSL2 Modem Router User Guide YML14WN 52 www netcomm com au Step 6 Right click on the icon for your modem router and select Properties A properties window displays with basic information about the device ...

Страница 53: ...a hardware problem In this case you should contact your vendor LAN LED The LAN LED on the front panel does not light up STEPS CORRECTIVE ACTION 1 Check the Ethernet cable connections between your modem router and the computer or hub 2 Check for faulty Ethernet cables 3 Make sure your computer s Ethernet card is working properly 4 If these steps fail to correct the problem contact your local distri...

Страница 54: ...the Wan or all 5 Your computer s and the modem router s IP addresses must be on the same subnet for LAN access 6 If you changed the devices LAN IP address then enter the new one as the URL 7 Remove any filters in LAN or WAN that block web service The web configuration does not display properly STEPS CORRECTIVE ACTION 1 Delete the temporary web files and log in again In Internet Explorer click Tool...

Страница 55: ...s with the telephone company and ISP I cannot get a WAN IP address from the ISP STEPS CORRECTIVE ACTION 1 The ISP provides the WAN IP address after authenticating you Authentication may be through the user name and password the MAC address or the host name 2 The username and password apply to PPPoE and PPoA encapsulation only Make sure that you have entered the correct Service Type User Name and P...

Страница 56: ...transmission speeds Bridge A device that connects two or more physical networks and forwards packets between them Bridges can usually be made to filter packets that is to forward only certain traffic Related devices are repeaters which simply forward electrical signals from one cable to the other and full fledged routers which make routing decisions based on several criteria CPE Customer Premises ...

Страница 57: ... The document series begun in 1969 which describes the Internet suite of protocols and related experiments Not all RFCs describe Internet standards but all Internet standards are written up as RFCs RFC 1483 Multi protocol encapsulation over AAL 5 Two encapsulation methods for carrying network interconnect traffic over ATM AAL 5 The first method allows multiplexing of multiple protocols over a sing...

Страница 58: ... a cell will travel The VCI of a cell can be changed as it moves between switches via Signaling VPI Virtual Path Identifier Part of the ATM cell header a VPI is a pipe for a number of Virtual Circuits WAN Wide area network A data communications network that spans any distance and is usually provided by a public carrier such as a telephone company or service provider ...

Страница 59: ...ith the Standards for C Tick and or A Tick as set by the ACA These standards are designed to provide reasonable protection against harmful interference in a residential installation This equipment generates uses and can radiate radio noise and if not installed and used in accordance with the instructions detailed within this manual may cause interference to radio communications However there is no...

Страница 60: ...transporting product to and from NetComm s nominated premises is your responsibility and 5 NetComm does not have any liability or responsibility under this warranty where any cost loss injury or damage of any kind whether direct indirect consequential incidental or otherwise arises out of events beyond NetComm s reasonable control This includes but is not limited to acts of God war riot embargoes ...

Страница 61: ...r attempted to be repaired or modified other than by a qualified person at a service centre authorised by NetComm and 6 The serial number has been defaced or altered in any way or if the serial number plate has been removed Limitations of Warranty The Trade Practices Act 1974 and corresponding State and Territory Fair Trading Acts or legalisation of another Government the relevant acts in certain ...

Страница 62: ...s outlined in the Quick Start Guide For further information regarding the advanced features of this product please refer to the configuring sections in the User Guide or contact a Network Specialist DYNALINK NZ 12c Tea Kea Place Albany Auckland New Zealand P 09 448 5548 F 09 448 5549 E sales dynalink co nz W www dynalink co nz Trademarks and registered trademarks are the property of NetComm Limite...

Отзывы: