NB12WD
– Quick Install Guide
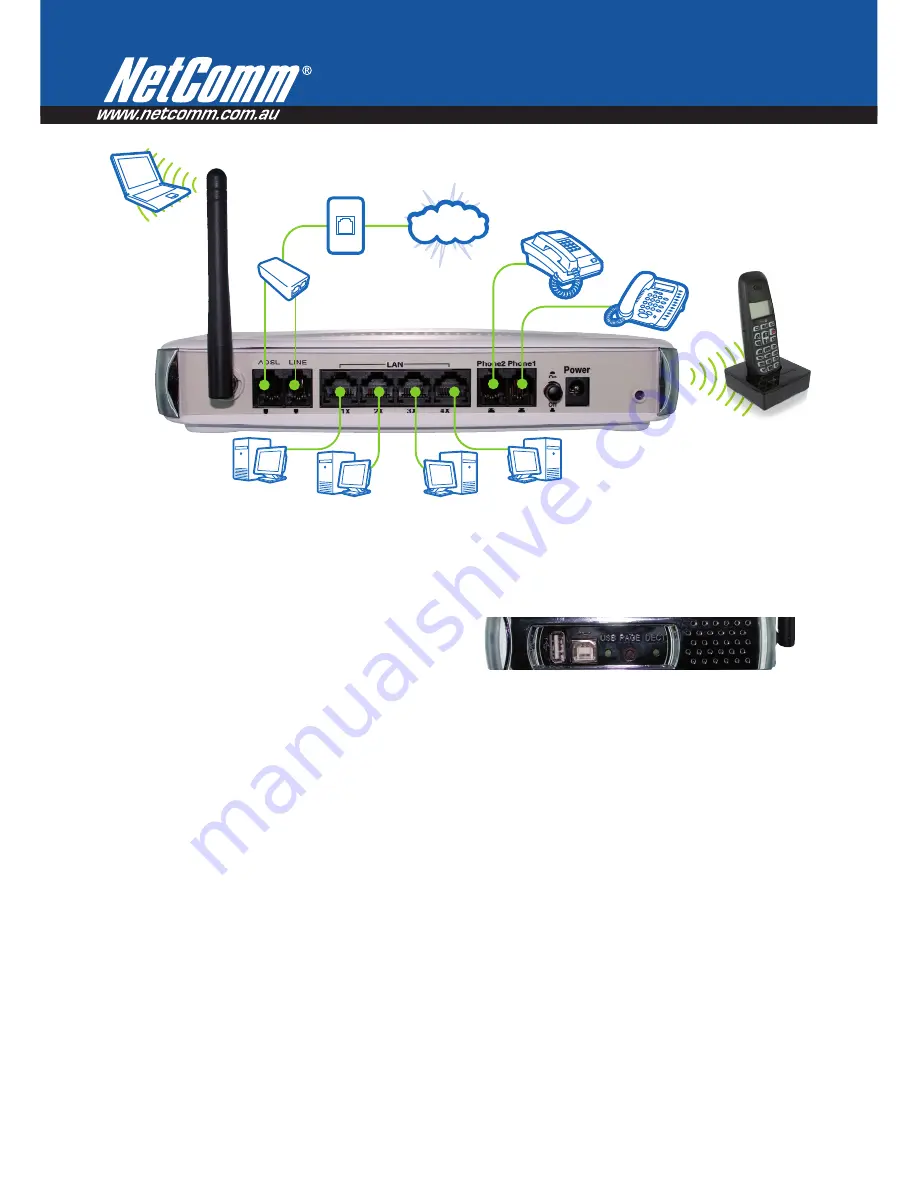
PC or MAC
PC or MAC
PC or MAC
PC or MAC
Telephone
Wall Socket
Telephone 1
Telephone 2
Splitter/Filter
PC or MAC
Printer
2.4GHz 11g
1.8GHz
Compatible
DECT
Laptop
Internet
Connecting your device
1.
With the supplied Ethernet cable, connect your computer
to any LAN port on your NB12WD.
2.
Connect your telephone wall socket to an ADSL Splitter/
Filter (not supplied).
3.
With one of the supplied telephone cables, connect the
socket labelled
ADSL
on your NB12WD to the socket
labelled
ADSL
on your ADSL Splitter/Filter (not supplied).
4.
If you wish to use Lifeline backup function (in case of an issue
with your VoIP service), please ensure that:
a.
the
Line
port of the NB12WD is connected to the
socket labelled
phoNe
on the ADSL Splitter/Filter
AND
b.
Please also ensure that your telephone handset
is connected to one of the ports on your NB12WD
labeled
phone1
or
phone2
.
5.
Connect the supplied Power Adapter to the wall power
outlet and to the socket labeled
power
on the NB12WD.
6.
Switch on your NB12WD at the power outlet and press
the on/off button to the
oN
position and wait 1 minute for
it to power up.
7.
Open a web-browser on your computer and browse to
192.168.1.1
.
8.
When asked for a username and password, enter the
default of
admin
into both fields.
9.
Select
Quick Setup
from the menu on the left, and follow
the instructions to establish your Internet connection.
Using DECT
To use a DECT handset you must first have a VoIP account
configured (see below) or have your phone line plugged into
the
LINe
port on your NB12WD (as in above diagram).
To register a DECT Handset with the NB12WD, hold down the
pAGe
button on the side panel of the NB12WD until the green
LED labeled
DeCT
lights up. Next go to the
Register
menu of
your DECT Handset and enter in the PIN -
1590
.
Detailed instructions on setting up the supplied DECT handset
can be found in the separate DECT User Guide (on CD).
Using VoIP
To configure VoIP on your NB12WD, please refer to page 93 of
the User Guide –
7.7 About SIp and VoIp
.
Establishing a Wireless Connection
You can connect multiple wireless devices, including laptops,
desktops and PDAs by following these 2 basic steps
1.
Using your device, scan for wireless networks in your
area, select the network called
NetComm
Wireless
and
click
connect
2.
Enter the following default security key:
a1b2c3d4e5
Note: To ensure wireless security, we recommend you change the default
settings in the User Interface. For more detail, see your User Guide.


