background image


Gottlieb 

Nestle

 GmbH | Freudenstädter Str. 37-43 | 72280 Dornstetten 

| www.g-nestle.de


38 

8.4.7.


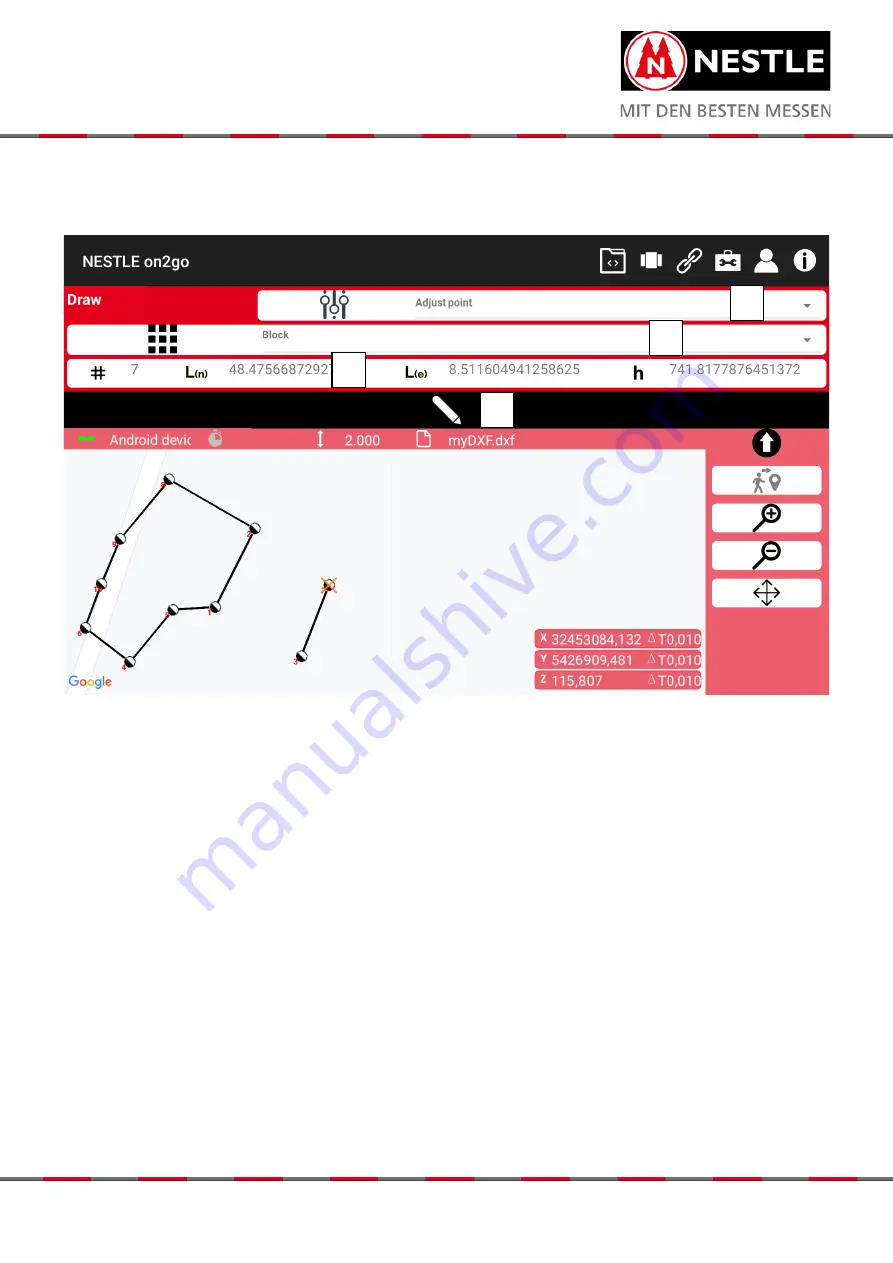
Draw method Adjust Point 

 
With this method you can set a point with regard to block, comment, measurement point. 


1.


Method selection (here Adjust Point). 

2.


Select what the point should be (survey point, comment, symbol or block). 

3.


Data of the selected point. 

4.


Key to change the point. 


Содержание 26032001

Страница 1: ... 43 72280 Dornstetten www g nestle de In order to use the System well please read this instruction manual carefully and keep it cautiously for consulting in the future User Manual Part A NESTLE Satellite Positioning System Model no 26032001 EN ...

Страница 2: ...on of the system 12 10 System elevation and location reference 12 11 General measurement preparations GNPS 42 13 12 Software App NESTLE on2go 16 13 Basic setting for correction data service 17 14 Basic setting of the coordinate system 18 15 Basic setting formats and displays 18 16 NESTLE on2go learn with the guide 18 17 Measure in the field 19 18 GIS Module 26 19 Check the settings and positions 2...

Страница 3: ...rt A a step by step guide on setting up and working with the system Part B Description of the different on2go screen shots 1 2 Scope of delivery Helix antenna 2 part pole with internal cable routing and spirit level Controller with Li Ion battery charger pen outdoor cover GNPS sensor box with connection cable Support bracket for field computers and GNPS sensor box H2C pole holder for support beams...

Страница 4: ...e Use of accessories from other manufacturers that are not expressly approved by Gottlieb Nestle GmbH Inadequate protective measures on site Control of machines moving objects etc in surveillance applications or similar without additional monitoring and security devices The product must not be disposed of with household waste Dispose of the product properly Follow the national country specific dis...

Страница 5: ...bile phone card and Battery The compartment for the SIM card is on the side of the controller Pull out the holding frame and insert the SIM card nano as shown Push the holding frame back into the compartment Insert the battery close the back cover careful place the controller in the outdoor cover ...

Страница 6: ...over on the back plug in the charging cable Plug the USB cable into the power adapter and the power adapter into the socket the charging process starts automatically 5 Switch on the controller Press and hold the Power button for 5 seconds Controller starts this screen appears as soon as the start process is complete swipe the screen to start ...

Страница 7: ... controller Open the notification bar completely by swiping down twice from the top of the display tap on the power off symbol yellow arrow To switch off double tap on the Power off symbol Note The power off menu can also be assigned to the power button See Settings Extended functions Function key ...

Страница 8: ...settings for the screen brightness Swipe once upward on the Android Main screen tap on the icon tap on Display and choose the given settings see arrows 7 2 Set up APN manually Internet access is usually set up automatically when you start up your Android device If the setup of your Android device was not successful you can set up Internet access manually Insert the mobile phone card see chapter 3 ...

Страница 9: ...of the internet access point is finished Tap the home button to return to the home screen 7 3 Activate Mobile Data Open quick settings by swiping down at the top of the screen Activate mobile data by taping on the Symbol until it is not grey anymore Note 7 2 if necessary 7 4 Language settings of the on2go app On2go always uses Android s language settings The scope of delivery is current German Eng...

Страница 10: ...earch field choose tap on install and wait until the installation is complete When the installation is complete press the home button 8 2 Register A connection to the Internet is required for registration please establish such a connection Tap on to start the App follow the app s prompts to register the app o During the registration process only enter a valid email address to which you have access...

Страница 11: ... coupon select you will be transferred to the Web shop o In the Days field select the number of days for your next license You can purchase a license for 365 730 1095 days o Then tap on ADD TO CART o Your order will be displayed again If you agree with your selection tap Procced to check out o Now enter your contact details and select your payment method below o Check your entered data again and c...

Страница 12: ...uld be transported and stored dry 10 System elevation and location reference The system s height and location reference point lies in the center of the antenna 15 mm below the top edge of the antenna When using the original antenna pole is the height and position reference point exactly 2 00 m above from the tip of the pole The antenna height is when using the original antenna pole 2 00 m Enter th...

Страница 13: ... antenna and an internal cable The two pole parts can be connected in the middle using a pin coupling 11 2 GNPS Senor box The GNPS sensor box is attached to the computer holder with 4 screws 11 3 Mount the antenna Screw the helix antenna on the top of the top pole segment hand tight USB Connector to Controller GPS Connector to antenna LED Power lights up red when connected to the controller LED Po...

Страница 14: ...er Str 37 43 72280 Dornstetten www g nestle de 11 4 Holder and Controller Connect the base holder to the pole and fix with the screw green arrow Put in the Controller holder in the base holder and fix with the second screw green arrow ...

Страница 15: ...e Connect the antenna cable to the GNPS sensor box yellow arrow Connect the GNPS sensor cable to the box green arrow Push the controller into the holder yellow arrows until it sits securely in the holder Insert the GNPS sensor cable on the controller into the USB port green arrow ...

Страница 16: ...rogram bar with icons of the main menu 2 Status bar display depending on your choice 3 Work bar display depending on your choice 4 Multifunction bar 5 map field the cross symbolizes the current position 6 coordinate field with current accuracy 7 Information bar 12 3 Icons of the main menu Project management data retrieval other settings Task selection inclusion stakeout calculation drawing calcula...

Страница 17: ... your correction data service provider Start on2go app Select the icon from the main menu and then click Connect 1 Select USB when connect to GNPS Sensor box 2 Choose Android device at NTRIP 3 Click this box for entries and changes 4 IP address or URL of the correction data service 5 Port number of correction data service 6 Username of correction data service 7 Password of correction data service ...

Страница 18: ...ticularly simple and intuitive In addition to these instructions for use the Nestle on2go app offers a learning guide Call up this learning guide and let the app show you important controls tap icon then tap icon and follow the hints of the guide Choose country of site Choose Ellipsoid Choose coordinate system Choose unit of length Enter Antenna height Confirm entries Discard changes Display forma...

Страница 19: ... menu and then click Connect Check the settings according to chapter 13 Click on Wait until you see this mark in the information bar Only then will your position be sufficiently accurate and you can start measuring Note For your own safety always measure at least two known points in your measurement area in order to check the transformation parameters and settings 17 2 Layer Manager With the help ...

Страница 20: ... layer set in the layer manager when they are recorded The acquisition recording is controlled by the icons from the work bar Tapping on will open hidden icons of the recording Tap on a required icon to add it to the work bar The following icons are available for acquisition recording Stores the position of a point Stores a line made up of two points Tap for the first point of the line tap for the...

Страница 21: ...ap on Position the system on point H2 tap on again A field opens for entering the distance from H2 to P3 Enter the value in meter Point P is saved H1 and H2 are not saved Creates a symbol block The position is saved by tapping on A field for selecting a symbol block opens Select a symbol block from the pull down list and if required enter a scaling factor in the second field Note Symbols blocks ca...

Страница 22: ... are determined in order to record volumes When recording choose positions that represent the terrain well When calculating in the field the volume can be determined in relation to a reference height input or in relation to a measured reference surface In addition a polyline area enclosing the terrain is always required for the calculation The terrain within the ring can consist of single points b...

Страница 23: ...ct Volume from the pulldown box choose the type of calculation o From Level to calculate from reference height o From ground surface to calculate from reference surface tap the desired area ring so that it becomes active tap the result is displayed in cubic meters For a short video scan the following QR code and select the corresponding video ...

Страница 24: ...ngs Activate positioning if necessary refer to 17 1 Choose from the main menu and then tap on Stake out Choose a point which you want to stake out by tapping on the map 1 Current position 2 Selected point 3 Height difference to the selected point in meters 4 Distance to the selected point in meters 5 Direction to the selected point Move the system in the shown direction The selected point has been...

Страница 25: ... 1 Enter the project name 2 Select the file type This screen changes depending on the selected file type see also Part B 3 Select the file path in which the file is to be saved 4 Click on this box a dialog for sending the data via e mail or cloud storage opens 5 Select the format sequence View depending on the selected file type under 2 Create a empty project enter name at Save menu Open a list wi...

Страница 26: ...decimal text or date o Enter the maximum number of letters digits for text and decimal numbers o In the case of decimal numbers also indicate the number of places after the decimal point o Confirm the entries with o Layers without GIS properties can also be created simply leave the properties empty and do not make any entries Survey of elements with defined GIS properties and attributes When recor...

Страница 27: ...netic radiation and electrostatic discharge without causing electromagnetic interference in other devices Therefore please note Electromagnetic radiation can cause interference in other devices Although the products meet the strict requirements of the relevant guidelines and standards the manufacturer cannot completely rule out the possibility of interference with other devices Using the product w...

Страница 28: ...from moisture Blow out soiled plugs of the connecting cables The product can be damaged by violent vibrations or a fall Transport and store the system dry We recommend a storage temperature of 0 C to 30 C do not leave it in vehicles Avoid strong vibrations and impacts during transportation Do not expose the device to extreme temperature fluctuations 40 C ...

Страница 29: ...ections as well as their quality Positional accuracy applies to positional accuracy The height deviation is normally less than twice the position error The performance data apply to at least five satellites and use according to the manual In areas with high signal multipath effects high satellite geometries PDOP values and at times of difficult atmospheric conditions performance can deteriorate 25...

Страница 30: ...denstädter Str 37 43 72280 Dornstetten www g nestle de User Manual Part B NESTLE Software App In order to use the System well please read this instruction manual carefully and keep it cautiously for consulting in the future EN ...

Страница 31: ...ons 10 7 2 Open screen 11 7 2 1 Open a file in CSV format 12 7 2 2 Open a file in user defined format 13 7 2 3 Open a file in DXF format 14 7 3 Save screen 15 7 3 1 Save in CSV format 15 7 3 2 Save in PDF format 16 7 3 3 Save in DXF format 17 7 3 4 Save other formats 18 7 4 Import screen 18 7 5 Other settings screen 19 7 5 1 Quick button screen 20 8 Task Menu 21 8 1 Task Menu options 21 8 2 Record...

Страница 32: ...end 40 8 4 10 Draw method Offset 41 8 5 Task Calculate 42 8 5 1 Calculate XYZ Value 42 8 5 2 Calculate Count 43 8 5 3 Calculate method Distance 44 8 5 4 Calculate method Height difference 45 8 5 5 Calculate method Length 46 8 5 6 Calculation method Area 47 8 5 7 Calculate method Volume 48 9 Connection Menu 49 9 1 Connection screen 50 10 Toolbox menu 51 10 1 Add Photo screen 52 10 2 Auto land surve...

Страница 33: ...mbH Freudenstädter Str 37 43 72280 Dornstetten www g nestle de 4 1 Introduction 1 1 About the document This document describes the full range of functions of the NESTLE on2go software app 1 2 Actual Version Version 2 12 ...

Страница 34: ...ge Use of accessories from other manufacturers that are not expressly approved by Gottlieb Nestle GmbH Inadequate protective measures on site Control of machines moving objects etc in surveillance applications or similar without additional monitoring and security devices The product must not be disposed of with household waste Dispose of the product properly Follow the national country specific di...

Страница 35: ...a check of the settings and position data can alternatively also be approximately checked by comparing coordinates of a web provider So you have a simple check with regard to your data at least with regard to the coordinate system zone etc The comparison provides an approximation of a few decimeters 4 App starting App closing To start App on2go click once on this symbol As usual with the Android o...

Страница 36: ...he first time the login screen is displayed 1 Enter the e mail address with which you registered for on2go Wizard 2 Enter the password you have for on2go here 3 Click this button to log on to on2go 4 Click this text to go to the Get Password screen 5 This button takes you to the register screen when you first log in if you do not have a password 1 2 3 4 5 ...

Страница 37: ...k on this text a page with the general conditions of on2go will open in your web browser 4 Button for registering your email address for on2go You will receive an email with your password 5 Click this text to return to the login screen 5 3 Get password screen 1 Enter the e mail address with which you are registered for on2go 2 If you click this button an email with the password will be sent to the...

Страница 38: ...enstädter Str 37 43 72280 Dornstetten www g nestle de 9 6 Main screen On this screen in the upper right corner you will find the main menu 1 File Menu 2 Task Menu 3 Connection Menu 4 Toolbox 5 Profil Menu 6 Info Menu 1 2 3 4 5 6 ...

Страница 39: ...1 Creates an empty project Name assignment for Save 2 Opens a list of existing projects see Open screen 3 Saves the current data in a project see Save screen 4 Data import for special format see import screen 5 Data recovery in the event of a power failure software interruption 6 See Other Settings Screen 6 5 4 3 2 1 ...

Страница 40: ...utton to go back one level 3 Field for selecting the file path Tap the field to set the path 4 Selection field of the files in the selected path After selecting the file depending on the file type a dialog appears with further settings corresponding to the selected file type The following dialog differs depending on the file type 1 2 3 4 ...

Страница 41: ...t 1 OK button to open the file 2 Cancel button to go back one level 3 Filename 4 Selection field countries 5 Ellipsoid selection field 6 Coordinate system selection field 7 Multiplication factor 8 Selection field for column order in the file see also User defined 9 Preview the columns in the file 1 2 8 7 9 3 4 5 6 ...

Страница 42: ...rmat 1 OK button to open the file 2 Cancel button to go back one level 3 Filename 4 Country selection as in Other settings 5 Ellipsoid as in Other Settings 6 Coordinate system as in Other settings 7 Multiplication factor 8 Decimal separator 9 Point number column selection 10 X coordinate column selection 11 Y coordinate column selection 12 Z coordinate column selection 13 Layer name column selecti...

Страница 43: ...e 2 Cancel button to go back one level 3 Filename 4 Multiplication factor 5 Select this check box to overwrite current symbol files used for DXF files 6 Checkbox for overwriting the line types 7 Checkbox to overwrite the text style 8 Country selection field 9 Ellipsoid selection field 10 Selection field coordinate system 1 2 3 4 5 6 7 8 9 10 ...

Страница 44: ...button to open the file 2 Cancel button to go back one level 3 Country selection as in Other settings 4 Ellipsoid as in Other Settings 5 Coordinate system as in Other settings 6 Unit of length as in Other Settings 7 File path 8 Filename 9 File format 10 Check box to send the file immediately after saving via email or to save it in the cloud depending on the apps installed on the device 11 Selectio...

Страница 45: ...open the file 2 Cancel button to go back one level 3 File path 4 Filename 5 File format 6 Check box to send the file immediately after saving it via email or to save it in the cloud depending on the apps installed on the device 7 Selection field for selecting the map content 8 Selection field for sheet size 1 2 3 4 5 6 7 8 ...

Страница 46: ...ate system as in Other settings 6 Unit of length as in Other Settings 7 File path 8 Filename 9 File format 10 Check box to send the file immediately after saving via email or to save it in the cloud depending on the apps installed on the device 11 Selection field Storage in 2D or in 3D 12 Selection field for length unit 13 Checkbox for the visibility of point numbers 14 Checkbox for visibility of ...

Страница 47: ...r own localization KML standard format from the Open Geospatial Consortium and is the file format for Google Earth and Google Maps XML hierarchically structured data in the format of a text file XYZ text file with the content X coordinate Y coordinate and Z coordinate 7 4 Import screen 1 OK button to open the file 2 Cancel button to go back one level 3 Type selection of the data to be imported 4 F...

Страница 48: ...ection 5 Ellipsoid selection depending on the country selection 6 Coordinate system depending on the country selection 7 Unit of length 8 Enter antenna height 9 Option to display the coordinates 10 Select whether the map needs to be centered at your position See also multifunction bar 11 Background card layout selection 12 Select here to switch GIS data on or off 13 Option to choose whether you ca...

Страница 49: ...OK button to accept the settings 2 Cancel button to go back one level 3 Set the visibility of the quick buttons 4 Number of quick buttons there is a total of 10 quick buttons 5 Method selection for quick button measurement line arc polyline polygon comment block 6 Layer for the specific quick button 2 3 4 5 1 6 ...

Страница 50: ...tr 37 43 72280 Dornstetten www g nestle de 21 8 Task Menu 8 1 Task Menu options 1 Button to open the recording module 2 Button to open the stakeout module 3 Button to open the drawing module 4 Button to open the calculation module 1 2 3 4 ...

Страница 51: ...or executing the function selected with 10 10 Click here to see the drop down list of additional features A function can then be selected for adoption according to 9 to leave a text comment comment screen to place a symbol block symbol or block screen to create a vertical line on an activated line for capturing inaccessible points via auxiliary points distance 11 Indicator of the accuracy of your ...

Страница 52: ...r Str 37 43 72280 Dornstetten www g nestle de 23 8 2 1 Comment screen 1 Confirmation button 2 Cancel button 3 Place where you can add your comment 4 Selection of the font for the output in DXF 5 Font size for the output in DXF 2 3 4 1 5 ...

Страница 53: ...Str 37 43 72280 Dornstetten www g nestle de 24 8 2 2 Symbol or block screen 1 Confirmation button 2 Cancel button 3 Pull down menu for selecting existing symbols blocks Further fields depend on the selected symbol 4 Scaling factor 2 1 3 4 ...

Страница 54: ... 4 Column with layer name 5 Column with the colour of the layer 6 Column line weight 7 Line type column 8 Visibility of the Layer 9 Button to go to the Add Layer screen 10 Menu item for deleting the selected Layer 11 Button to go to the Export Layers screen to export layers 12 Button for importing layers brings you to the Import Layers screen 1 2 3 4 5 6 7 8 9 10 11 12 ...

Страница 55: ...ter Str 37 43 72280 Dornstetten www g nestle de 26 8 2 4 Add Layer screen 1 Confirmation button 2 Cancel button 3 Location to add the layer name 4 Colour selection for this layer 5 Line type selector 6 Line weight selector 1 2 3 4 5 6 ...

Страница 56: ... screen 1 Confirmation button 2 Cancel button 3 Select the file path 4 File name of the exported layer file 8 2 6 Layer import After selecting in the layer manager on2go shows the file manager Select the path to your layer file with ending LYL here and tap on the file The layer file is imported 2 1 3 4 ...

Страница 57: ...ical staking only important for the signal tone when close to the point 3 Coordinates of the stakeout point 4 Horizontal direction to the point to be staked out works if your Android device has a compass sensor 5 Horizontal distance to the stakeout point 6 Vertical distance to the stakeout point 7 Confirmation button that this point has been staked out A square is added around the point 8 Create s...

Страница 58: ...wing screen different drawing methods can be selected from the pulldown selection in the first line 8 4 1 Drawing method Enter Point Enter point screen 1 Method selection here Enter Point 2 Layer selection 3 Button to go to the Layer Manager screen 4 Draw button that takes you to the Input point screen 1 2 4 3 ...

Страница 59: ...w g nestle de 30 Input point screen 1 Confirmation button 2 Cancel button 3 These first four line fields are for information only cannot be changed here 4 Input field for the X coordinate 5 Entry field for Y coordinate 6 Input field for Z coordinate height 1 3 4 5 6 2 ...

Страница 60: ...aw method Point with Distance and Angle 1 Method selection here Point with Distance and Angle 2 Display of data of the selected reference point 3 Distance from the reference point to the new point 4 Angle East 0 counter clockwise angle unit decimal degrees 5 Button to draw the point 1 2 3 4 5 ...

Страница 61: ...nestle de 32 8 4 3 Draw method Line 1 Method selection here Line 2 Layer selection 3 Button to go to the Layer Manager screen 4 Type of point to choose start point of the line or end point of the line 5 Start point data 6 Endpoint data 7 Key to draw the line 3 5 6 2 7 1 4 ...

Страница 62: ... Arc 1 Method selection here Arc 2 Layer selection 3 Button to go to the Layer Manager screen 4 Type of item to choose from Activate starting point middle point end point and then select in the graphic 5 Start point data 6 Middle point data 7 Endpoint data 8 Button for drawing the arc 3 6 8 5 7 2 1 4 ...

Страница 63: ...ne can be created from existing points 1 Method selection here Polyline 2 Button to go to the Layer Manager screen 3 Layer selection 4 Select the Connect points function 5 Display of the snap points as they were selected one after the other on the map 6 Button to delete the snap points in 5 7 Button for creating the polyline from the snap points in 5 1 3 5 6 4 2 7 ...

Страница 64: ...ed to an existing polyline 8 Select the Add point function 9 The choice before which snap point the point should be added to the active polyline 10 Data of the point selected in the map see arrow to be added to the polyline 11 Button to add the snap point 10 to the selected polyline Make sure a polyline is selected 10 9 before after 8 11 ...

Страница 65: ...ea can be created from existing points 1 Method selection here Area 2 Button to go to the Layer Manager screen 3 Layer selection 4 Select the Connect points function 5 Display of the snap points as they were selected one after the other on the map 6 Button to delete the snap points in 5 7 Button for creating the area from the snap points in 5 1 3 5 6 4 2 7 ...

Страница 66: ...an be added to an existing area 8 Select the Add point function 9 The choice before which snap point the point should be added to the active area 10 Data of the point selected in the map see arrow to be added to the area 11 Button to add the snap point 10 to the selected area Make sure an area is selected 9 10 before after 8 11 ...

Страница 67: ...8 4 7 Draw method Adjust Point With this method you can set a point with regard to block comment measurement point 1 Method selection here Adjust Point 2 Select what the point should be survey point comment symbol or block 3 Data of the selected point 4 Key to change the point 4 2 3 1 ...

Страница 68: ...od Adjust Height You can use this method to change the height of individual points by entering them 1 Method selection here Adjust Height 2 Draw button to change the height of the selected point The fill value screen will be displayed Enter the new height and confirm with the confirmation button 2 1 ...

Страница 69: ...a polyline 1 Method selection here Extend 2 Enter the distance by which the element should be expanded 3 Select the part from which the element should be expanded Begin or End 4 Draw button to expand the selected line element The element is extended to the new end point the previous end point becomes a point that is independent of the element 1 2 4 3 ...

Страница 70: ...is method you can draw parallels to lines 1 Method selection here Offset 2 Button to go to the Layer Manager screen 3 Layer selection 4 Enter the distance by which the element is to be moved 5 Select the side to which the element should be moved left or right 6 Button for moving the selected line element 1 3 6 5 4 2 ...

Страница 71: ...lculation type from the pulldown selection in the first line 8 5 1 Calculate XYZ Value In this calculate option no calculation takes place in the conventional sense By selecting this menu item you can query coordinates of a point and get them displayed 1 Selection of the calculation method 2 Select point in the graphic 3 Calculation button for displaying the X Y and Z coordinates of the selected p...

Страница 72: ... calculation shows you the number of elements on a selected layer 1 Selection of the calculation method 2 Layer selection 3 Button to go to the Layer Manager screen 4 Selection of the type of elements to be counted points line arcs polylines areas or all 5 Calculation button for counting the elements Result 1 2 5 4 3 ...

Страница 73: ...alculation method you can calculate the distance between a starting point choice in the graphic and an end point choice in the graphic 1 Selection of the calculation method 2 Type of point to select start or end point 3 Start point data see arrow a 4 Endpoint data see arrow b 5 Button to calculate distance Result 3 4 5 1 a b 2 ...

Страница 74: ...on method you can calculate the height difference between a starting point choice in the graphic and an end point choice in the graphic 1 Selection of the calculation method 2 Type of point to choose start or end point 3 Start point data see arrow a 4 Endpoint data see arrow b 5 Button for calculating the height difference Result 1 3 4 5 a b 2 ...

Страница 75: ...stle de 46 8 5 5 Calculate method Length You can use this calculation method to calculate the length of a line or a polyline 1 Selection of the calculation method 2 Select the element in the graphic 3 Button for calculating the length of a selected line element Result 1 2 3 ...

Страница 76: ... g nestle de 47 8 5 6 Calculation method Area You can use this calculation method to calculate the area of a closed polyline 1 Selection of the calculation method 2 Select the area in the graphic 3 Button for calculating the area of a selected area element Result 1 2 3 ...

Страница 77: ...hod you can calculate the volume within a closed ring 1 Selection of the calculation method 2 Selection of the method for volume calculation 3 If From height is selected in 2 a field for entering the reference height appears here 4 Activate the area in the graphic 5 Button for calculating the volume of a selected polygon Result 1 5 3 4 2 ...

Страница 78: ...Gottlieb Nestle GmbH Freudenstädter Str 37 43 72280 Dornstetten www g nestle de 49 9 Connection Menu 1 Menu item that leads you to the connection screen 2 Disconnect button with a GNSS receiver 1 2 ...

Страница 79: ... you select Wi Fi a field appears for the Wi Fi IP address and the Wi Fi port 4 Selection from where the correction data are transmitted 5 Checkbox to unlock filling in the NTRIP data 6 Place where the IP address should be entered This entry is only an example 7 Field for filling in the port number This entry is only an example 8 Field for filling in the user name This entry is only an example 9 P...

Страница 80: ...d element Clicking on it will take you to the Add Photo screen 3 Option for automatic recording measurement Clicking on it will take you to the Auto landsurvey screen 4 Button for removing a in the graphic selected element 5 Option for more precise measurement This option can be used during recording and stakeout All recorded measurements are averaged for 20 seconds 1 2 3 4 5 ...

Страница 81: ...Gottlieb Nestle GmbH Freudenstädter Str 37 43 72280 Dornstetten www g nestle de 52 10 1 Add Photo screen 1 Confirmation button 2 Cancellation button 3 Menu item to take a photo of the item 1 3 2 ...

Страница 82: ...n button 2 Cancellation button 3 Selection of options for the desired element as a result of the automatic recording 4 Selection of the unit for storage by meter or by seconds 5 Select the distance according to the unit under 4 if 4 m then the storage distance in meters if 4 s then the storage distance is in seconds 1 2 4 5 3 ...

Страница 83: ... license data 2 Option to change your password You will be taken to the Change Password screen 3 Button to log out of on2go 11 1 Extend license screen 1 Confirmation button 2 Cancellation button 3 Place where you can enter your voucher number 4 Button that takes you to our webshop where you can buy the license 3 2 1 4 3 2 1 ...

Страница 84: ... 11 2 Change password 1 Place where you can enter your old password 2 Here you can enter your new password 3 Second place where you have to enter your new password This must be the same as what you entered in number 2 4 Button for changing your password 5 Option to go back 5 4 3 2 1 ...

Страница 85: ... 1 appears You have to register again You do not have to log out to exit on2go This function must be selected if you want to transfer your license to another tablet 12 Info Menu 1 Option to access the on2go manual You need an internet connection 2 Menu item to start the tutorial Walk though guide 3 Button to open the About screen 4 Option to open the Release Note file You need an internet connecti...

Страница 86: ...72280 Dornstetten www g nestle de 57 12 1 Walk through guide 1 Confirmation button 2 Cancel button 3 Selection of the step by step learning unit 4 The step by step guide for learning and understanding the on2go app 5 Guide closing button 1 2 3 4 5 ...

Страница 87: ...tten www g nestle de 58 12 2 About screen This screen shows information about your on2go version 1 OK button to go back 2 Name of the software package 3 Version number 4 Android ID of your device 5 Service of the Google Play Store 6 Copyright claim 1 2 3 4 5 6 ...

Страница 88: ...FOR A PARTICULAR PURPOSE OR PATENT INFRINGEMENT Gottlieb Nestle GmbH SHALL NOT BE LIABLE FOR ANY DIRECT INCIDENTAL OR CONSEQUENTIAL DAMAGES OF ANY KIND OR LOSSES OR EXPENSES RESULTING FROM THE USE OF THIS MATERIAL Note These design figures and specifications are subject to change without notice We shall not be held liable for damages resulting from errors in this instruction manual The right to ma...

Отзывы: