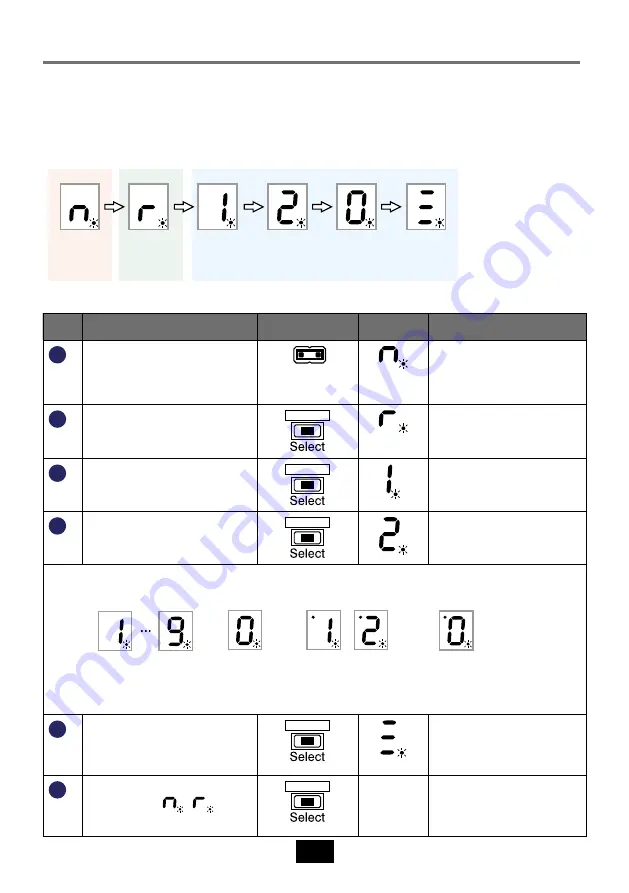
Ness 106-304 Скачать руководство пользователя страница 8

8

avaIlaBle oPtIons

steP-By-steP

uPPeR level menu

STEP DESCRIPTION

ACTION

DISPLAY NOTE

1


To enter program mode place 
the link on the Program pins.

Program

When 'n' is displayed press 
and hold SELECT to enter 
the device enrolment 
mode, see step E1.

2


Press SELECT once.

PRESS

Relay Settings menu, see 
step R1, also see the Menu 
Navigator, page 7.

3


Press SELECT once.

PRESS

The currently enrolled 
device numbers are 
shown.

4

Press SELECT once.

PRESS

The currently enrolled 
device numbers are 
shown.

Repeatedly pressing SELECT will cycle through all the enrolled devices ~ up to 20

5


Once all the enrolled devices 
have been shown, the 'E' 
Erase All option is shown.

PRESS

To Delete All device see 
page 11.

6


Press SELECT repeatedly to 
cycle back to 

 , 

 etc

PRESS

Remove the Program Link 
to exit program mode

Enrol 


Devices 


Menu

RELAY


MENU

Device 1 


is enrolled

Device 2 


is enrolled

Up to 

Device 20

Erase all 

devices

11

12

etc

Device numbers 1 to 9 

are displayed as 1-9

Number 10 is 

displayed as 0

Numbers 11 to 19 

are displayed as 1-9 

with the top dot on

Number 20 is 

displayed as 0

The upper level programming menu gives access to:
• Enrolling new devices
• viewing and deleting enrolled devices
• Access to the relay menu

Содержание 106-304

Страница 1: ... Batt signals from all Ness TWR devices Two Way signals provide positive feedback of the relay state Supports up to 20 Ness TWR devices Easy programming and operation 1 x Relay output with selectable Pulse Toggle Latch modes 4 x Open Collector outputs for Panic Tamper On Alarm Aux Low Battery Installation and setup notes Rev 1 ...

Страница 2: ...er Aux or Low Batt signals The SCR TWR supports up to twenty individual Ness TWR devices Relay Output Events The relay output can be programmed to operate as one of these output types On Off Alarm output Low battery Aux Panic Tamper Relay Operation The relay output can be programmed to operate in one of these modes Pulse In Pulse mode the relay activates for 2 seconds Recommended mode for PIRs Als...

Страница 3: ...the state of the control panel Suitable for arming disarming control panels such as older Ness panels which a Require a Pulse momentary activation to arm and disarm b Have an output which is low when the panel is armed The Inhibit Input is only active when the relay is set for Pulse mode for On Off signals The input should be pulled below 0 5V to be Low and above 1V to be High The input is high wh...

Страница 4: ...ce see below Flashing with a digit displayed ON In Operating mode Signal strength of the last received transmission on a scale of 1 lowest to 9 best signal e g Device 1 with signal strength of 6 See Signal Strength Mode page 5 ON steady OFF In Operating mode Signal Strength HOLD MODE See Signal Strength Hold Mode page 5 12V 0V Input AUX NO NC C RELAY LOW BATT PANIC TAMP ON ALARM Program Select Pig...

Страница 5: ...e until either a new device signal is received or you cancel Hold Mode by a short press of the Select button Hold Mode will time out after 30 minutes Restart by press and hold of the SELECT button Program Operating Mode Step By Step Display shows upper left dot Send a signal from a programmed device The display will show the device number followed by the signal strength repeating Device Number Sig...

Страница 6: ... on one pin to prevent losing it The relay and the soft outputs are disabled during program mode to prevent unwanted activation Automatic Exit If the program link is left ON the device automatically returns to normal operating mode after 5 minutes of no activity of the SELECT button A brief press of the SELECT button will restart program mode Program Program PROGRAM MODE Operating MODE ...

Страница 7: ...d send a learn signal from a compatible device See page 9 Enrolling Devices Device 2 is enrolled Program the relay View currently enrolled devices Delete individual devices or delete all devices Enrol new devices Up to Device 20 Erase all devices On Alarm Low battery AUX Panic Tamper Exit PRESS Single Press LONG PRESS Press and Hold Select Select Exit Latch Toggle Pulse Every action is performed e...

Страница 8: ...y pressing SELECT will cycle through all the enrolled devices up to 20 5 Once all the enrolled devices have been shown the E Erase All option is shown PRESS To Delete All device see page 11 6 Press SELECT repeatedly to cycle back to etc PRESS Remove the Program Link to exit program mode Enrol Devices Menu Relay Menu Device 1 is enrolled Device 2 is enrolled Up to Device 20 Erase all devices 11 12 ...

Страница 9: ...to PRESS n is displayed E6 Repeat from step E2 LONG PRESS Flashing dash indicates that the next empty slot is ready to enrol a new device E Enrolling Devices Program up to 20 TWR Radio Keys Radio PIRs Radio Reed Switches Radio Smoke Detectors PRODUCT NOTES 106 267 TWR Reed Switch operation with this receiver The TWR Reed Switch has 2 x hardwired inputs as well as a reed switch onboard When used wi...

Страница 10: ...required option then press and hold SELECT to save LONG PRESS The saved option will flash twice then the display returns to the Relay Menu Program the RELAY OUTPUT CONTROL R3 When is displayed press and hold SELECT LONG PRESS The first item in the Relay Menu is displayed being RELAY TYPE R4 Press SELECT until is displayed PRESS Relay OUTPUT CONTROL Menu R5 When is displayed press and hold SELECT L...

Страница 11: ...s in turn Select Select etc D4 For example to delete device 3 press SELECT until is displayed PRESS D5 Then press and hold SELECT to display LONG PRESS D6 Then press and hold SELECT to delete the device LONG PRESS Back to the upper level menu DELETING All Devices D7 Press SELECT to display PRESS To abort deleting all devices just press SELECT once at this stage or just remove the program Link D8 T...

Страница 12: ...electrical appliances such as wireless routers cordless phones computers TVs and other electronic devices may reduce the range performance While such occurrences are unusual they are possible In this case it may be necessary to either increase the physical separation between the Ness receiver and other devices or if possible change the radio frequency or channel of the other devices 2 Unauthorised...

Отзывы: