NERIS ALU-2 Скачать руководство пользователя страница 11

Storage and maintenance of the kayak.

www.neris.ua

When done paddling ensure that Cross Ribs
and Skin are dried out. If used on sea waters,
all parts of the kayak must be rinsed off with
fresh water.

It is recommended to store the kayak inside in
dry and warm conditions.

This is a

requirement for Cross Ribs mainly. The skin
and other aluminum parts can be stored
either on balcony or in garage and/or locker.

It is not desirable to move the skin while
storing it at low temperatures.

For longer life the Cross Ribs can be varnished
with a marine grade varnish at the end of the
kayaking season. Follow instructions of
varnish manufacturer.

Skin repair instructions can be found on line

in FAQ.

Manufacturer's Warrantee.

NERIS LTd.

the manufacturer guarantees

suitability and kayak material quality under
condition that the assembly instructions have
been followed. The manufacturing company
will repair free within 36 months of use from
the date of purchase should there be
manufacturer's defects. You also can address
any repair issues as a result of hitting rocks or
wrong assembly during warrantee periods and
later.

However, kayak owner will bear the

repair costs.

Contact us

Contact NERIS Ltd. for any suggestions and
questions not revealed in this instructions
manual.

Kayak Serial Number:

Date manufactured:

President of NERIS Ltd

Konstantin Abramov

10

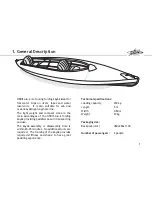
4. Additional Information.

Содержание ALU-2

Страница 1: ...Instructions Manual Folding Kayak NERIS ALU 2 tandem...

Страница 2: ...lu 2 folding kayak providing paddlers ease in transporting and use The kayak assembly or disassembly time is within 20 25 minutes No additional tools are required The framing of the kayak provides req...

Страница 3: ...Cross Ribs 4 pcs 2 Bow and Stern Assembly 3 Bow Stern A Shape and Middle Keel Bars 3 pcs 4 Set of Gunwales a Long gunwales 12 psc b Short gunwales 12 pcs 5 Set of Washboards 6 pcs 6 Skin 7 Backpack 8...

Страница 4: ...assembly and disassembly in future The main parts of the kayak are marked with numbers and pointing arrows for ease of assembly The Keel Bars are marked showing points where the Cross Ribs are to be i...

Страница 5: ...6 long gunwales to SternAssembly The bow and stern sections are ready to be inserted in to a skin 4 Step 3 Unroll the skin Insert bow and stern assembly sections in to the skin NERIS logo is marked on...

Страница 6: ...procedure is important to ensure the proper secured Keel Bar structure and stretch the skin lengthwise 3 Install Cross Rib 2 and Cross Rib 3 Insert one of the lower cross rib caps in to cross cut slo...

Страница 7: ...short gunwales one by one starting from the lower gunwales The upper gunwales are to be locked last In order to connect gunwales lift them a little and insert male latch connector with female gunwale...

Страница 8: ...board from the bow and rear section from the stern according to number marks Meet the washboard holes with the U bolts of Cross Ribs Secure the washboard sections by wing nuts Make sure the first and...

Страница 9: ...The kayak is ready to go 8 3 Assembly Instructions Step 7 The front seat is to be strapped between Cross Ribs 1 and 2 The rear seat is strapped between Cross Ribs and 3 4...

Страница 10: ...free of the frame remove dirt grit and other objects Spread the skin and dry out Follow the steps on the diagram below to pack the skin and Cross Ribs Include the seats repair kit and other accessori...

Страница 11: ...eason Follow instructions of varnish manufacturer Skin repair instructions can be found on line in FAQ Manufacturer s Warrantee NERIS LTd the manufacturer guarantees suitability and kayak material qua...

Страница 12: ...NERIS Ltd 2 Bukaevitsa Street Starye Pertovtsy Vyshgorod District Kiev Rigion Ukraine el 380 44 228 0 228 ebsite www neris mail info t w kayaks com e Village neris kayaks com...

Отзывы: