background image

Nuvo-7531 Series 

58 

3.3 

Installing the System Enclosure 

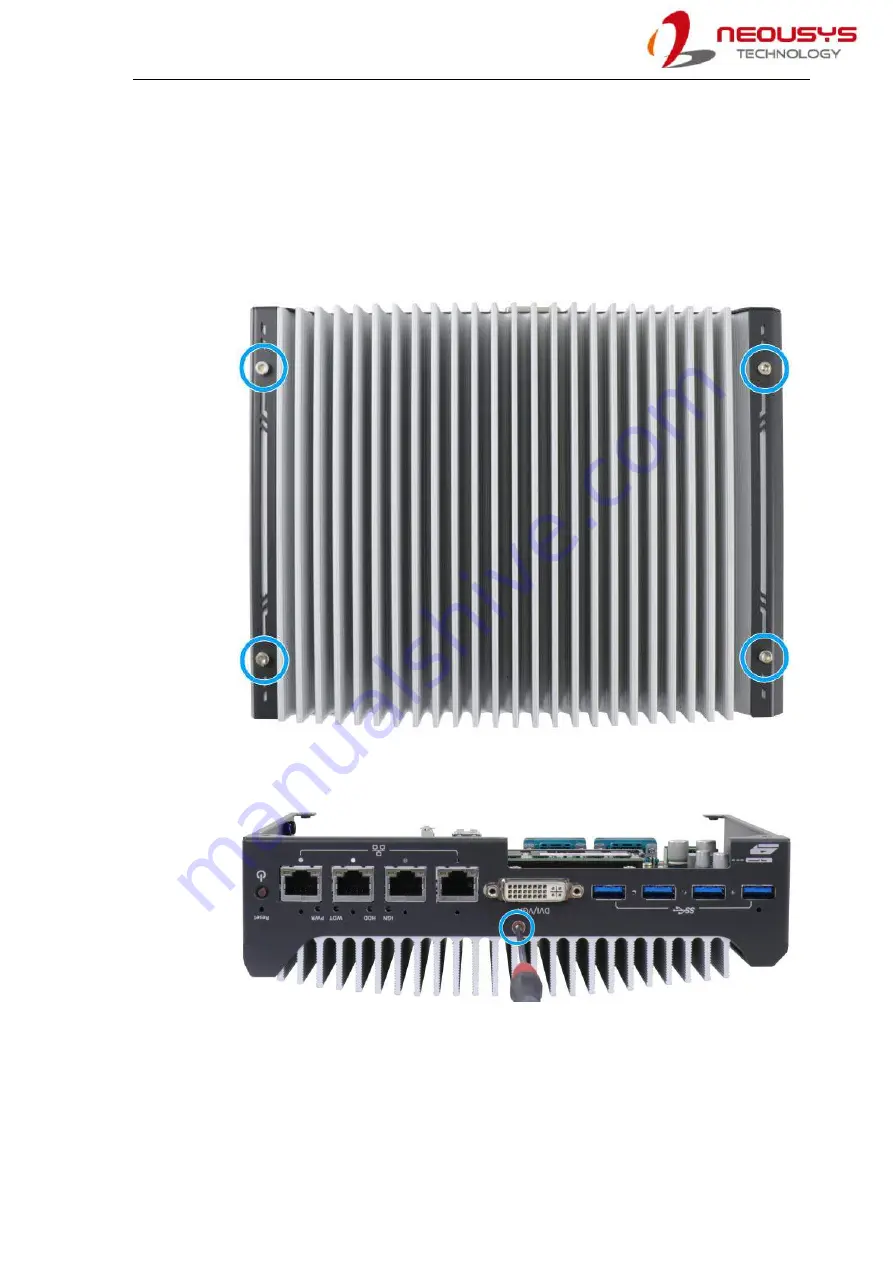
To reinstall the system enclosure, please follow the steps below: 

1. 

Slide the motherboard and heatsink back into the U-shaped enclosure and secure it 

with four screws on top of the heatsink. 


2. 

Secure the screw on the front I/O panel to the heatsink. 


Содержание Nuvo-7531 Series

Страница 1: ...Neousys Technology Inc Nuvo 7531 Series User Manual Revision 1 0...

Страница 2: ...3 3 Back View with Fan Kit 16 1 3 4 Side View with Fan Kit 16 2 System Overview 2 1 Nuvo 7531 Series Packing List 17 2 2 Front Panel I O 18 2 2 1 Power Button 19 2 2 2 Reset Button 19 2 2 3 System St...

Страница 3: ...tem 71 3 7 5 Operation Modes of Ignition Power Control 72 4 System Configuration 4 1 BIOS Settings 74 4 1 1 COM1 COM2 Configuration 75 4 1 2 COM Port Slew Rate 76 4 1 3 COM Port High Speed Mode 77 4 1...

Страница 4: ...in advance with Neousys Technology Inc Customer is solely responsible for ensuring the compatibility and interoperability of the third party s products Customer is further solely responsible for ensur...

Страница 5: ...pursuant to part 15 of the FCC Rules These limits are designed to provide reasonable protection against harmful interference when the equipment is operated in a commercial environment This equipment g...

Страница 6: ...epresent commitment from Neousys Technology Inc Neousys Technology Inc shall not be liable for any direct indirect special incidental or consequential damages arising from the use of the product or do...

Страница 7: ...soon as possible to minimize down time By means of a power cord connected to a socket outlet with earthing connection This product is intended to be supplied by a Listed Power Adapter or DC power sou...

Страница 8: ...Use a grounded wrist strap and an anti static work pad to discharge static electricity when installing or maintaining the system Avoid dust debris carpets plastic vinyl and styrofoam in your work are...

Страница 9: ...Nuvo 7531 series systems They are compact fanless embedded controllers with Intel 9 th 8 th Gen Core TM i7 i5 i3 processor The guide also demonstrates the system s basic installation procedures Revis...

Страница 10: ...Nuvo 7531 has abundant I O functions It features four GbE ports and four USB3 1 ports for multiple GbE and USB cameras There is a hot swappable HDD tray for you to hot swap the storage drive without t...

Страница 11: ...ion 1x DisplayPort connector supporting 4096 x 2304 resolution Serial Port 2x software programmable RS 232 422 485 ports COM1 COM2 Audio 1x 3 5 mm jack for mic in and speaker out Isolated DIO 4 CH iso...

Страница 12: ...densing Vibration Operating MIL STD 810G Method 514 6 Category 4 Shock Operating MIL STD 810G Method 516 6 Procedure I Table 516 6 II EMC CE FCC Class A according to EN 55032 EN 55024 For sub zero ope...

Страница 13: ...Nuvo 7531 Series 13 1 2 Dimension NOTE All measurements are in millimeters mm 1 2 1 Top View of Nuvo 7531 Series 1 2 2 Front View of Nuvo 7531 Series...

Страница 14: ...Nuvo 7531 Series 14 1 2 3 Back View of Nuvo 7531 Series 1 2 4 Side View of Nuvo 7531 Series...

Страница 15: ...Nuvo 7531 Series 15 1 3 Dimension with Fan Kit The fan kit is available for users when a 65W CPU is installed into the system NOTE All measurements are in millimeters mm 1 3 1 Top View with Fan Kit...

Страница 16: ...Nuvo 7531 Series 16 1 3 2 Front View with Fan Kit 1 3 3 Back View with Fan Kit 1 3 4 Side View with Fan Kit...

Страница 17: ...f any item s are missing or damaged please contact your local dealer or Neousys Technology 2 1 Nuvo 7531 Series Packing List System Pack Nuvo 7531 Qty 1 Nuvo 7531 If you ordered CPU RAM HDD please ver...

Страница 18: ...t the system 3 System status LEDs Four system LEDs power PWR watchdog timer WDT hard disk drive HDD and ignition IGN 4 Ethernet port The Ethernet ports support 10 100 1000Mbps network connections 5 DV...

Страница 19: ...nd hold the power button for 5 seconds to force shutdown the system Please note that there is a 5 seconds interval between two on off operations i e once turning off the system you will need to wait f...

Страница 20: ...riptions of these LEDs are listed in the following table Indicator Color Description PWR Green Power indicator lighted up when system is on WDT Yellow Watchdog timer LED flashing when watchdog timer i...

Страница 21: ...hed the LED indicators on the RJ45 connector represents the following connection statuses Active Link LED LED Color Status Description Yellow Off Ethernet port is disconnected On Ethernet port is conn...

Страница 22: ...essory shipped with the system This adapter supports VGA DDC signals and thus eliminates compatibility issues with VGA monitors Or you can use a DVI I to VGA DVI D Y cable to support two independent d...

Страница 23: ...rew lock mechanism is limited to the three ports on the right indicated in blue and due to the width of the USB connector with screw lock only two of them from right to left 1 st and 3 rd USB port may...

Страница 24: ...em halt or malfunction To avoid unexpected operation it is purposely placed behind the panel To reset please use the tip of a pen press and hold for at least 5 seconds to reset the BIOS NOTE Depending...

Страница 25: ...terminal block is also used for ignition signal input 2 COM ports There are 2 COM ports for communicating with external devices 3 On off control status output Allows for external switch extension when...

Страница 26: ...via a 3 pin pluggable terminal block which is fit for field usage where DC power is usually provided The screw clamping mechanism on the terminal block offers connection reliability when wiring DC pow...

Страница 27: ...to 115200 bps baud rate COM1 and COM2 are software configurable RS 232 422 485 ports The operation mode of COM1 and COM2 can be set in BIOS setup utility The following table describes the pin definiti...

Страница 28: ...external switch to turn on off the system polarity is negligible 2 Ctrl 3 Power Output System power indicator on if system is turned on off if system is turned off 4 Power 5 HDD Output Hard drive indi...

Страница 29: ...B 2 0 ports They are implemented by native xHCI eXtensible Host Controller Interface controller in H310 chipset and are compatible with USB 2 0 USB 1 1 and USB 1 0 devices Legacy USB support is also p...

Страница 30: ...m is designed to support passive DP adapter cable You can connect to other display devices using DP to HDMI cable or DP to DVI cable DP to HDMI DP to DVI The system supports dual independent display o...

Страница 31: ...ophone in Speaker out Jack There is a female 4 pole audio jack for headphone speaker output and microphone input To utilize the audio function in Windows you need to install corresponding drivers Plea...

Страница 32: ...ic High 5 to 24V Logic Low 0 to 1 5V Isolated Voltage 2500 Vrms Input Resistance 1k Operation Mode Polling Isolated Digital Output No of Channel 4 CH Isolated Digital Output Channels Sink Current per...

Страница 33: ...board expansion slots In this section we ll illustrate these internal I O functions 2 4 1 M 2 2280 SATA Signal Only Slot for SSD The system has an M 2 2280 slot SATA signal only for you to install an...

Страница 34: ...GND 10 DAS DSS_N 11 12 3V3 13 14 3V3 15 GND 16 3V3 17 18 3V3 19 20 21 GND 22 23 24 25 26 27 GND 28 29 30 31 32 33 GND 34 35 36 37 38 39 GND 40 41 SATA B 42 43 SATA B 44 45 GND 46 47 SATA A 48 49 SATA...

Страница 35: ...Nuvo 7531 Series 35 2 4 2 Single DRAM SO DIMM Slot The system motherboard supports one 260 pin SODIMM socket for installing one DDR4 2666 2400 memory module up to 32GB capacity...

Страница 36: ...are plenty of off the shelf mini PCIe modules with versatile capabilities By installing a mini PCIe module your system can have expanded features such as WIFI GPS CAN bus analog frame grabber etc For...

Страница 37: ...T 15 GND 16 UIM VPP Mechanical Key 17 Reserved UIM C8 18 GND 19 Reserved UIM C4 20 W DISABLE 21 GND 22 PERST 23 PERn0 24 3 3Vaux 25 PERp0 26 GND 27 GND 28 1 5V 29 GND 30 SMB CLK 31 PETn0 32 SMB DATA 3...

Страница 38: ...ries 38 2 4 4 Ignition Rotary Switch Nuvo 7531 IGN Only The ignition power control switch features multiple modes for pre and post ignition settings Please refer to the section Ignition Power Control...

Страница 39: ...e SATA port which support Gen3 6 Gb s SATA signals The SATA port is composed of a 7 pin SATA connector indicated in blue and a 4 pin power connector indicated in red This SATA and power connector shou...

Страница 40: ...and service this product to avoid injury or damage to the system Please observe all ESD procedures at all times to avoid damaging the equipment Before disassembling your system please make sure the s...

Страница 41: ...internal components the system needs to be disassembled To disassemble the system enclosure please refer to the procedures below 1 Turn the system upside down on a steady surface Remove the screws in...

Страница 42: ...s 42 2 Remove the screw indicated on the rear I O panel 3 Remove the screws indicated on the front I O panel 4 Remove the screws from the top of the heatsink and separate the motherboard heatsink from...

Страница 43: ...Nuvo 7531 Series 43 5 Turn the motherboard heatsink around to gain access to internal components and expansions...

Страница 44: ...th the enclosure panels removed to access the CPU socket please do the following i If you are installing a CPU for the first time remove the four 4 screws indicated in blue ii If you see the seven 7 s...

Страница 45: ...ARNING With the protective cover removed please be careful when handling the motherboard DO NOT touch the pins in the LGA socket 4 Remove the CPU from its container tray Match the two notches on the s...

Страница 46: ...the motherboard around and secure the bracket by tightening two M3 P head screws Hold CPU bracket firmly and turn the motherboard around Secure two M3 P head screws 7 Remove the CPU s thermal pad prot...

Страница 47: ...ndicated in blue and from the accessory box five 5 M3 spring screws indicated in red Gradually tighten the five screws in the following order for even pressure Securing the motherboard Secure five CPU...

Страница 48: ...pports up to 32GB DDR4 2666 2400 Please follow the procedures below to replace or install the memory modules 1 Please refer to the section Disassembling the System you may not need to completely disma...

Страница 49: ...e memory module insert gold fingers of the module into the slot at 45 degree angle push down on the edge of the module and the clips on the side should clip the module into position 4 Push the memory...

Страница 50: ...ule for the first time please remove the thermal pad protective film attached to the bottom of the hot swappable tray enclosure 6 Reinstall the system enclosure and panel when done If you need to inst...

Страница 51: ...2 2280 slot for you to install an M 2 2280 SATA SSD For installation please refer to the following instructions 1 The M 2 slot can be accessed via the trapdoor located at the bottom of the enclosure b...

Страница 52: ...System to gain access to the M 2 slot 3 Insert the module on a 45 degree angle 4 Gently press down and secure the module with an M3 P head screw 5 Reinstall the system enclosure or the trapdoor when...

Страница 53: ...PCIe slots To install a mini PCIe module please refer to the following instructions 1 The mini PCIe slots can be accessed via the trapdoor located at the bottom of the enclosure by removing the screws...

Страница 54: ...ert the corresponding SIM card before you install the mini PCIe module Slide and lift SIM card holder Insert SIM card with pins facing up Secure the SIM card by sliding the holder SIM cards installed...

Страница 55: ...a to the side panel Please refer to the module s manual for clip on connection 6 Secure antenna to side panel Secure on side panel Antenna installation 7 Reinstall the system enclosure panel and exter...

Страница 56: ...ers only need to install the 2 5 SATA HDDs SSDs to the front hot swappable tray If you previously disconnected the SATA and power cables please reconnect them before continuing this procedure 1 Please...

Страница 57: ...5 HDD SSD into the slot first You may feel resistance when the SATA connectors meet push it in firmly until the 2 5 HDD SSD is fully inserted into the slot Attach PORON on corners on label side Inser...

Страница 58: ...sure To reinstall the system enclosure please follow the steps below 1 Slide the motherboard and heatsink back into the U shaped enclosure and secure it with four screws on top of the heatsink 2 Secur...

Страница 59: ...Nuvo 7531 Series 59 3 Secure the three screws on the read I O panel to the heatsink 4 Secure the six screws at the bottom to complete enclosure installation process...

Страница 60: ...the system 1 Place the fan on top of the system s heatsink and secure it with the hex bolt screws indicated in blue and beware of the orientation of the fan as the fan s power cable must be within rea...

Страница 61: ...around the corner of USB ports locate the fan power connector s cover plate use a small Phllips screwdriver gently insert it into the gap and bend it outwards to remove it 3 Connect the 4 pin fan s po...

Страница 62: ...s 62 4 Once the power cable is connected place the supplied cable cover in the accessory box over the cable and secure it with the screws indicated to complete the installation Here s an exploded view...

Страница 63: ...rail To mount your Nuvo 7531 controller please refer to the instructions listed below 3 5 1 Wall mounting Nuvo 7531 Series Nuvo 7531 systems have built in wall mounting brackets as the standard mounti...

Страница 64: ...IN rail mounting clip in red You should fix the clip to the bracket using four M4 flat head screws first in green and then fix the bracket assembly to the Nuvo 7531 controller with another four M4 scr...

Страница 65: ...he simplest way to turn on your system The power button is a non latched switch and behaves as the ATX mode on off control With DC power connected pushing the power button will turn on the system and...

Страница 66: ...able WOL function please set up WOL settings in the BIOS and in the operating system by follow the steps described below 1 When the system boots up press F2 to enter BIOS setup utility 2 Go to the Pow...

Страница 67: ...ss is 78h D0h 04h 0Ah 0Bh 0Ch DESTINATION SOURCE MISC FF FF FF FF FF FF 78 D0 04 0A 0B 0C 78 D0 04 0A 0B 0C 78 D0 04 0A 0B 0C 78 D0 04 0A 0B 0C 78 D0 04 0A 0B 0C 78 D0 04 0A 0B 0C 78 D0 04 0A 0B 0C 78...

Страница 68: ...starts to periodically detect ignition signal Note that only MCU is working at this moment and the overall power consumption is less than 2 mW 2 Ignition signal is active both 12VDC and 24VDC ignitio...

Страница 69: ...module will cancel the power off delay process and keep the system running 3 System hard off In some cases system may fail to shutdown via a soft off operation due to system application halts The ign...

Страница 70: ...al block shared with DC power input Below is the typical wiring configuration for in vehicle applications 1 Connect car Battery line 12V for sedan 24V for bus truck to V 2 Connect car Batter GND line...

Страница 71: ...ng the power button By default Windows 7 8 10 goes to sleep S3 mode when power button is pressed As sleep S3 is not a complete shutdown behavior the ignition control function does not recognize the fi...

Страница 72: ...se the power button on the front panel to turn on or turn off the system Mode Power on Delay Power off Delay Hard off Timeout 0 N A N A N A Mode 1 Mode 1 is AT mode without power on and power off dela...

Страница 73: ...minutes 9 3 minutes 1 minute 10 minutes 10 A 3 minutes 10 minutes 10 minutes 11 B 3 minutes 30 minutes 10 minutes 12 C 10 minutes 30 minutes 10 minutes Mode 13 D Mode 14 E Mode 13 and Mode 14 are ign...

Страница 74: ...ou may need to modify Please always make sure you understand the effect of change before you proceed with any modification If you are unsure of the function you are changing it is recommended to chang...

Страница 75: ...x and RS 485 half duplex mode You can set the COM1 operating mode via BIOS settings To set COM port operating mode 1 Press F2when the system boots up to enter the BIOS setup utility 2 Go to Advanced P...

Страница 76: ...ication the RS 422 485 Termination option determines whether to enable disable internal termination of RS 422 485 transceiver according to your wiring configuration e g with or without external termin...

Страница 77: ...following instructions on how to enable the high speed mode for your COM port COM1 used as an example To set COM port high speed mode 1 Press F2 when the system boots up to enter the BIOS setup utili...

Страница 78: ...5 Power Off System is kept in off state when DC power is supplied To set Power On after Power Failure option 1 When system boots up press F2 to enter BIOS setup utility 2 Go to Power Power On after Po...

Страница 79: ...with CPUs of 35W TDP you can install a 65W CPU with the fan kit installed Alternatively you can install a 65W CPU and limit its SKU power to 35W to obtain more computing power This feature gives you...

Страница 80: ...u have to enable this option first in BIOS settings Please refer to Powering On Using Wake on LAN to set up the system To enable disable Wake on LAN option 1 When system boots up press F2 to enter BIO...

Страница 81: ...oot Menu The Boot menu in BIOS allows you to specify the system s boot characteristics by setting bootable device components boot media and method Or you may press F12 upon system start up and select...

Страница 82: ...initialization the UEFI boot mode uses GPT partition which supports greater than 2TB partition size and GOP driver for faster video initialization It is recommended that If you need greater than 2TB d...

Страница 83: ...ve The setting allows you to set the newly added device to boot first or as the last device on the list To set Add Boot Options 1 When system boots up press F2 to enter BIOS setup utility 2 Go to Boot...

Страница 84: ...Test OK When Manually after Entering OS is selected it s user s liability to stop the watchdog timer when entering OS This guarantees the system can always boot into OS otherwise another booting proc...

Страница 85: ...hen system boots up press F2 to enter BIOS setup utility 2 Go to Boot UEFI Boot Device 3 Highlight the device you wish to make boot order changes to and press F5 F6 or to change device boot order To s...

Страница 86: ...to manually compile and install the driver for Intel graphics or I210 GbE controller if the driver is not embedded in kernel You can visit Intel website for further information For distributions grap...

Страница 87: ...drivers for you system with a single click To install drivers automatically please refer to the following procedures 1 Insert the Drivers Utilities DVD into a USB DVD drive connect to your system A s...

Страница 88: ...below Windows 10 x64 The recommended driver installation sequence is 1 Chipset driver x Driver_Pool Chipset_CFL Win_10_64 SetupChipset exe 2 Graphics driver x Driver_Pool Graphics_CFL_SKL_APL Win_10_...

Страница 89: ...Setup exe in prior to use these functions Please note that you must install WDT_DIO_Setup_v2 3 0 0 or later versions Windows 10 x64 Please execute the driver setup program in the following directory x...

Страница 90: ...ports Windows 7 8 1 10 32 bit and 64 bit versions For other OS support please contact Neousys Technology for further information Installing WDT_DIO Library The WDT_DIO function library is delivered in...

Страница 91: ...allation To setup WDT DIO Library please follow instructions below 1 Execute WDT_DIO_Setup 2 3 0 xexe and the following dialog appears 2 Click Next and specify the directory of installing related file...

Страница 92: ...e system The WDT DIO library will take effect after the system has rebooted 4 When programming your WDT or DIO program the related files are located in Header File Include Library File Lib Function Re...

Страница 93: ...etWDT WORD tick BYTE unit Description Set timeout value and unit for watchdog timer When InitWDT is invoked a default timeout value of 255 seconds is assigned Parameter tick WORD value 1 65535 to indi...

Страница 94: ...unction returns TRUE otherwise FALSE Usage BOOL bRet StartWDT ResetWDT Syntax BOOL ResetWDT void Description Reset the timeout value to the value given by SetWDT If ResetWDT or StopWDT is not invoked...

Страница 95: ...ne BYTE ch Description Read a single channel of isolated digital input Parameter ch BYTE value specifies the DI channel to be read Ch should be a value of 0 7 Return Value The status TRUE or FALSE of...

Страница 96: ...es the status of DO channel Return Value None Usage BYTE ch 3 DI channel 3 BOOL DOChValue TRUE DOWriteLine ch DOChValue write DO channel 3 as TRUE DOWritePort Syntax void DOWritePort WORD value Descri...

Отзывы: