40
2.2.7
Ethernet Port/ PoE+
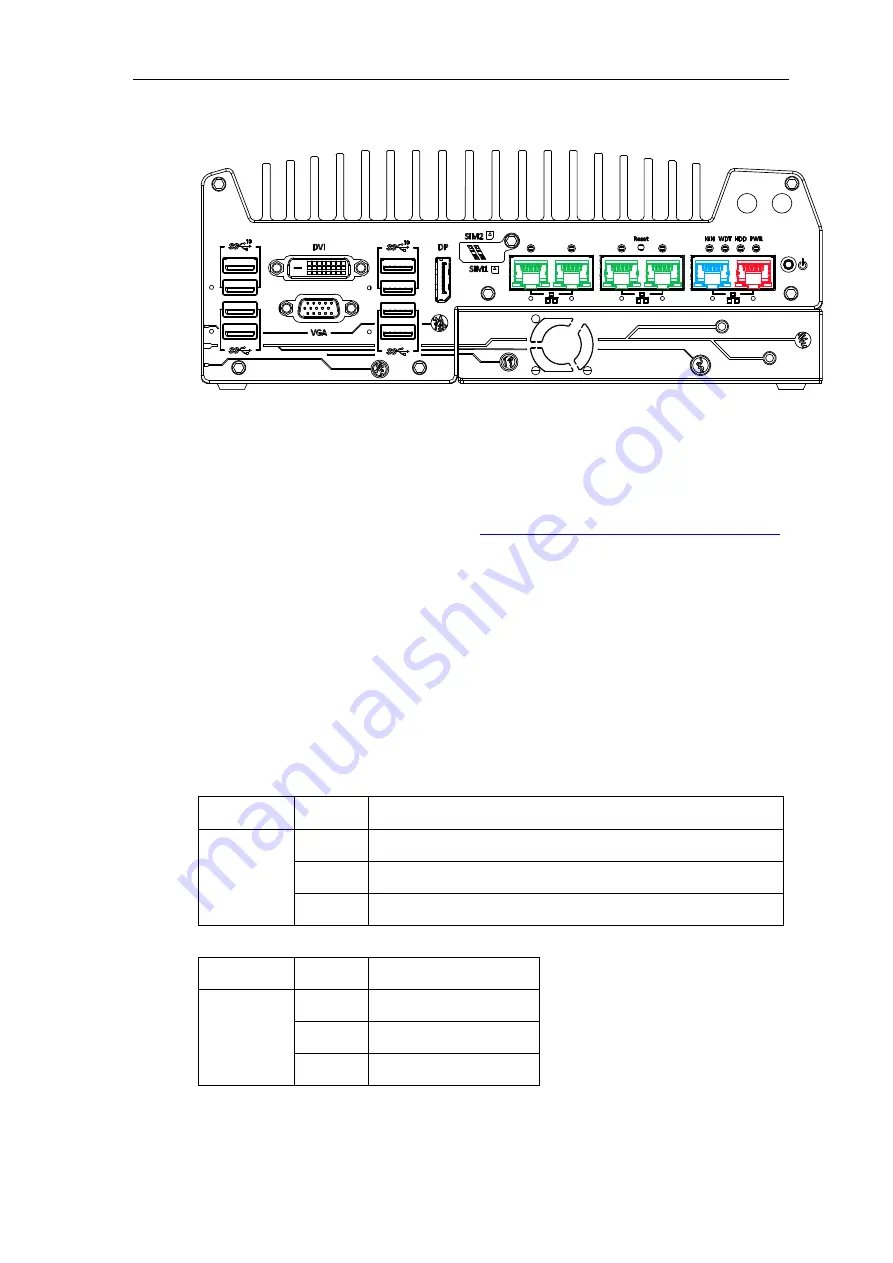
All Nuvo-7000 series systems offer two GbE ports (in
red
and
blue
) while Nuvo-7006E/
P/ DE systems have four additional PoE (Power over Ethernet) ports marked in
green
on
the front panel. All Ethernet ports feature panel screw fix holes for a firm connection. The
port marked in
blue
is implemented using Intel
®
I219-LM controller that supports
Wake-on-LAN and is also compatible with
AMT (Active Management Technology)
to support advanced features such as remote SOL desktop and remote on/ off control.
Power over Ethernet (PoE) supplies electrical power and data on a standard
CAT-5/CAT-6 Ethernet cable. Acting as a PoE PSE (Power Sourcing Equipment),
compliant with IEEE 802.3at, each PoE port delivers up to 25W to a Powered Device
(PD). PoE can automatically detect and determine if the connected device requires
power or not, so it is compatible with standard Ethernet devices as well.
Each port has one dedicated PCI Express link for maximum network performance.
Please refer to the table below for LED connection statuses.
Active/Link LED (Right)
LED Color
Status
Description
Yellow
Off
Ethernet port is disconnected
On
Ethernet port is connected and no data transmission
Flashing Ethernet port is connected and data is transmitting/receiving
Speed LED (Left)
LED Color
Status
Description
Green or
Orange
Off
10 Mbps
Green
100 Mbps
Orange
1000 Mbps
To utilize the GbE port in Windows, you need to install corresponding driver for Intel
®
I210-IT/ I219-LM GbE controller.
Содержание Nuvo-7000 Series
Страница 1: ...Neousys Technology Inc Nuvo 7000 Series User Manual Revision 1 3...
Страница 15: ...15 For sub zero operating temperature a wide temperature HDD or Solid State Disk SSD is required...
Страница 23: ...23 1 2 3 Nuvo 7000E P Top View...
Страница 24: ...24 1 2 4 Nuvo 7000E P Bottom View...
Страница 26: ...26 1 3 3 Nuvo 7000DE Top View...
Страница 27: ...27 1 3 4 Nuvo 7000DE Bottom View...
Страница 29: ...29 1 4 3 Nuvo 7000LP Top View...
Страница 30: ...30 1 4 4 Nuvo 7000LP Bottom View...
Страница 65: ...65 3 On the front I O panel remove the hexa screws indicated below Nuvo 7000E P DE systems Nuvo 7000LP systems...
Страница 66: ...66 4 Remove the front I O panel Nuvo 7000E P DE systems Nuvo 7000LP systems...
Страница 67: ...67 5 On the rear I O panel remove the hexa screws indicated below Nuvo 7000E P DE systems Nuvo 7000LP systems...
Страница 68: ...68 6 Remove the rear I O panel Nuvo 7000E P DE systems Nuvo 7000LP systems...
Страница 70: ...70 8 Once the bottom panel has been removed you should have access to the system s internal I O interfaces...
Страница 86: ...86 2 The MezIO TM module is secured by the three stand mounts indicated in the illustration below...
Страница 102: ...102 2 Install the front panel and secure screws indicated in blue Nuvo 7000E P DE systems Nuvo 7000LP systems...
Страница 103: ...103 3 Install the rear panel and secure screws indicated in blue Nuvo 7000E P DE systems Nuvo 7000LP systems...
Страница 104: ...104 4 Install the Cassette module and secure screws indicated in blue NOTE Not applicable to Nuvo 7000LP systems...
Страница 106: ...106 3 when wall mounting place the heatsink fins perpendicular to the ground for better heat dissipation efficiency...
Страница 139: ...139 8 The Name option allows you to name your RAID volume Press ENTER when ready to go to the next option...
Страница 153: ...153 7 Follow the 6 step setup procedure as instructed...
Страница 154: ...154 8 Check the I accept the terms in the License Agreement box and click on Next to continue the installation process...
Страница 155: ...155 9 When done click on Finish and restart the system...


