background image

8

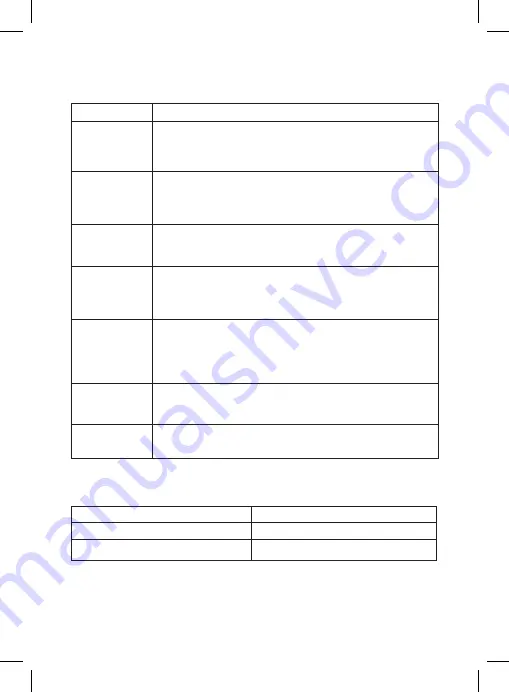
Button description

Description of the indicator

Status

Button

ON/OFF

M

OK

UP

DOWN

HOT-KEY

RESET

Press to turn the device on. Press and hold to turn the 

device off. When the device is on, press to turn the 

backlight off.

In standby mode (no recording), press to enter/ exit the 

Menu. Press and hold to switch between VIDEO-PHOTO 

PLAYBACK.

Press to start/stop recording. When in the menu, use to 

confirm the selected menu item.

Press to move up the menu. In the VIDEO and PHOTO 

mode, press and hold to zoom in; in Playback mode, use to 

select a file.

Press to move down the menu. In the VIDEO and PHOTO 

mode, press and hold to delete the image (if you used 

zoom + before); in the Playback mode, press to select a file.

Press to block video recording. Press and hold to activate 

an additional feature (for example, Parking Mode).

Press to reboot, if no other button responds.

Value

Description

Flashing red
Flaring red

Recording

Software update in progress

Содержание G-TECH X72

Страница 1: ...NEOLINE G TECH X72 CAR DIGITAL VIDEO RECORDER User s Manual...

Страница 2: ...d all through to ensure proper use and longer service life of the device Keep the user manual to consult it when necessary Content 1 Operation Conditions 3 2 Specifications 5 3 Equipment 6 4 Descripti...

Страница 3: ...e the product to fire moisture or chemicals gasoline solvent reagents etc Do not disassemble or modify the product Neoline is not responsible for any data loss and or direct or indirect damage caused...

Страница 4: ...in supercapacitor helps you finish your recording correctly Normal operation of the device requires an external power source Do not manipulate the device while driving to be sure you are driving safe...

Страница 5: ...in microphone speaker WDR function G sensor Parking mode Night mode Loop recording 1 2 3 5 min Continuous recording Auto Power On Date time stamp State number stamp 8GB to 128GB MicroSD Class 10 Stor...

Страница 6: ...6 3 Equipment Neoline G Tech X72 car digital video recorder DVR Magnet holder on scotch tape Anti glare CPL filter Car charger 2 USB connectors User manual Warranty card...

Страница 7: ...on button OK 4 Display 5 DOWN button 6 UP button 7 Memory card slot 8 Hot key button 9 Power cable connector microUSB 10 Contact area 11 ON OFF button 12 RESET button 13 Microphone 14 Lens with a remo...

Страница 8: ...hen in the menu use to confirm the selected menu item Press to move up the menu In the VIDEO and PHOTO mode press and hold to zoom in in Playback mode use to select a file Press to move down the menu...

Страница 9: ...tion and warm it up to ensure strong adhesion Install the magnet holder into the device and turn the DVR on When evaluating the display image make sure that the horizontal is kept and the lens capture...

Страница 10: ...the camera cap tures the image in proportion of 30 sky 70 road Power connection To power the device and charge the battery use only the power adapter included Connect the power cable to the mount or...

Страница 11: ...creen is minimal At night it is recommended to remove the CPL filter to achieve the best recording result After adjusting the position of the CPL filter remember the position of the guide line on the...

Страница 12: ...neces sary use a needle to push the card Turning the device on off When the car engine starts the device turns on automatically To turn the device on manually press the power button To turn the devic...

Страница 13: ...id erasing during loop recording The files protected from overwriting are stored on the memory card in the Locked folder ATTENTION Files in the Locked folder can occupy no more than 30 of the memo ry...

Страница 14: ...resolution and XXfps is the frame rate of recording in the parking mode G sensor sensitivity 1 to 10 where 10 is the maximum and 1 is 1 means the minimum levels of sensitivity of the shock sensor Park...

Страница 15: ...he UP DOWN buttons to select Delete and press the OK button Select the option to delete all files one file then confirm your choice by fol lowing the instructions on the display ATTENTION Locked files...

Страница 16: ...n is selected the display shows a list of Parking mode settings See Parking mode WDR On off It is not recommended to turn off this setting since WDR provides quick expo sure setting when the recording...

Страница 17: ...efore formatting save the necessary files to your computer Reset use to reset the device to factory settings Software version use to view the software version PHOTO mode Resolution 3M 2M 1 3M VGA Whit...

Страница 18: ...ory card with the DVR menu ATTENTION If the memory card is not formatted after the update the update process will be started again the next time it is turned on ATTENTION Do not turn off the DVR power...

Страница 19: ...recommended to use special care products for the optics in order not to damage the surface of the lens Darkened image when photographing the sky or water Too much contrast in the scene may affect the...

Страница 20: ...uania Made in PRC Official site www neoline com Techical support support neoline com Warranty 12 months Service life 36 months 5VDC 1 5A Operating temperature 10 C to 60 C Importer and authorized serv...

Отзывы: