


System Map: Right View 1 - 13
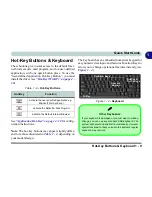
Quick Start Guide
1
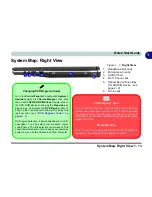
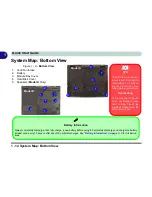
System Map: Right View
1
Changing DVD Regional Codes
Go to the
Control Panel
and double-click
System >
Hardware
(tab), click
Device Manager
, then click
the
+
next to
DVD/CD-ROM drives
. Double-click on
the DVD-ROM device to bring up the
Properties
di-
alogue box, and select the
DVD Region
(tab) to
bring up the control panel to allow you to adjust the
regional code (see
“DVD Regional Codes” on
page 2 - 5
).
DVD region detection is device dependent, not OS-
dependent. You can select your module’s region
code
5
times. The fifth selection is permanent. This
cannot be altered even if you change your operating
system or you use the module in another computer.
CD Emergency Eject
If you need to manually eject a CD/DVD (e.g. due to an unex-
pected power interruption) you may push the end of a straight-
ened paper clip into the emergency eject hole. Do not use a
sharpened pencil or similar object that may break and become
lodged in the hole.
Media Warning
Don’t try to remove a floppy disk/CD/DVD while the system is
accessing it. This may cause the system to “crash”.
4
5
6
3
2
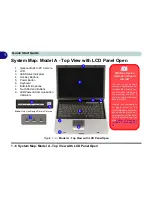
Figure 1 - 7 - Right View
1.
Headphone-Out Jack
2.
Microphone-In Jack
3.
USB 2.0 Port
4.
RJ-11 Phone Jack
5.
Optical Device Drive Bay
(for CD/DVD Device - see
page
2 - 3
)
6.
DC-In Jack
Содержание M54N
Страница 1: ......
Страница 2: ......
Страница 20: ...XVIII Preface...
Страница 40: ...Quick Start Guide 1 20 1...
Страница 68: ...Power Management 3 14 3...
Страница 80: ...Drivers Utilities 4 12 4...
Страница 94: ...BIOS Utilities 5 14 5...
Страница 113: ...Modules Options PC Camera 7 7 7 Figure 7 2 Audio Setup Windows XP...
Страница 140: ...Interface Ports Jacks A 6 A...
Страница 152: ...Intel Video Driver Controls B 12 B...
Страница 158: ...Specifications C 6 C...