15301 Betmakers SST_BNA Wall Mount Quick Start Guide_ECN 5930
Page 14 of 14
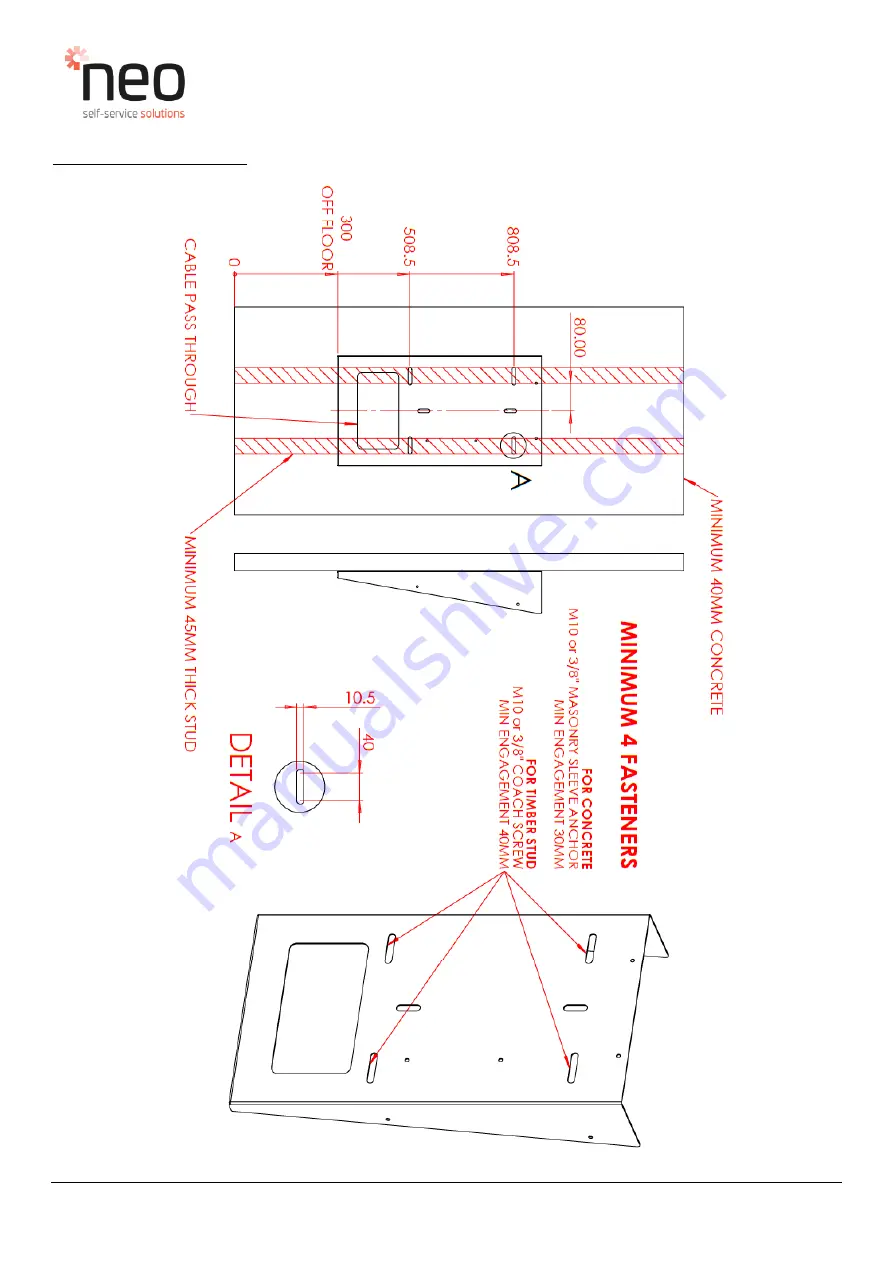
SST Wall Mount Instructions:
QUICK START GUIDE
CAUTION: Servicing of this product or unit is to be performed by trained service personnel only.
Страница 1: ...Quick Start Guide_ECN 5930 Page 1 of 14 SST BNA Wall Mount Quick Start Guide Part 15301 GA0xx NeoProducts Pty Ltd ACN 007 152 374 ABN 76 007 152 374 62 66 Pacific Drive Keysborough Vic 3173 Telephone 03 9701 1511 www neoproductsgroup com ...
Страница 2: ... BNA Wall Mount Component descriptions NeoProducts Pty Ltd ACN 007 152 374 ABN 76 007 152 374 62 66 Pacific Drive Keysborough Vic 3173 Telephone 03 9701 1511 www neoproductsgroup com LCD Screen BNA Enclosure Swipe Card Reader Time of Flight NFC Betslip Reader BNA Scanner Printer ...
Страница 3: ...m Remove 2x M8 Coach Bolts and Packaging Plate securing the BNA Wall Mount to the Pallet using a 13mm Open End Spanner Discard the M8 Coach Bolts Packaging Plate Carefully remove the BNA Wall Mount from the Pallet BNA Wall Mount requires a two person lift Prepare for the installation of the BNA Wall Mount to the final location Open the Front Door by unlocking the Lock on the Left hand side of the ...
Страница 4: ... the screws holding the BNA Mount Bracket Assy to the Wall Mount rear face side bracket using a 2 Phillips Head Screwdriver Remove and retain the BNA Mount Bracket by pulling out towards the installer Ensure that the BNA Looms are protected during the removal This will allow access to the rear of the Wall Mount for the installation to the wall QUICK START GUIDE CAUTION Servicing of this product or...
Страница 5: ...ls After installation onto the wall prepare to fasten the Front Door Fascia onto the Front Door For the BNA Wall Mount with or without a BNA Remove Front Door Fascia from packaging and position onto the front face of the BNA Wall Mount Using 4x Screws provided fasten from the inside of the BNA Wall Mount door with a 2 Phillips Head Screwdriver Discard packaging For a BNA Wall Mount with a BNA Rein...
Страница 6: ... The strapping is under tension and can flick when cut Carefully lift the carton off the Pallet Remove the documentation from the foam packaging and retain for future reference Remove tape fold back foam packaging to reveal the Kiosk in the Carton Base QUICK START GUIDE CAUTION Servicing of this product or unit is to be performed by trained service personnel only ...
Страница 7: ...ition lower the Kiosk down onto the 2x SST Bench Mount Studs While one person supports the front of the Kiosk unlock and open the LCD Screen Door and Lower Door by unlocking the Lock at the Right hand side of the Kiosk using the key provided The LCD Screen Door is heavy failure to support the Kiosk from the front will result in the Kiosk tipping over Slide out the Peripheral Drawer 15 QUICK START ...
Страница 8: ... Kit With the second person standing at the rear of the Kiosk instal 2x M6 Black Clamping Knobs onto Studs and firmly hand tighten Note Peripheral Drawer assembly removed for clarity Slide Peripheral Drawer back into position Close Lower Door LCD Screen Door QUICK START GUIDE CAUTION Servicing of this product or unit is to be performed by trained service personnel only ...
Страница 9: ...an upwards direction and plug into the BNA Harness Bracket located in the inner RH Side of the Kiosk Note Image of plugs into the BNA Harness Bracket After is for reference only Actual Looms will be routed from the bottom of the Kiosk Connection is the same Push Switch Push Button into the 1 port on the D Link Hub 7 Port as shown QUICK START GUIDE CAUTION Servicing of this product or unit is to be...
Страница 10: ... open the LCD Screen Door and Lower Door by unlocking the Lock at the Right hand side of the Kiosk using the key provided To route the Power and Network cables pull out the green tray towards the operator Open the Door of the BNA Wall Mount Enclosure and feed the Power and Network cables up into the left hand side access hole The Kiosk is connected to power using an earthed IEC cable provided Plug...
Страница 11: ... cable upwards into the NUC Power Assembly Plug into position shown Retain the Network cable into the Cable Twist Ties Switch unit from O I Slide Peripheral Drawer back into position Close Lower Door LCD Screen Door QUICK START GUIDE CAUTION Servicing of this product or unit is to be performed by trained service personnel only ...
Страница 12: ...wards the operator Remove the paper spindle from the Packaging Kit Slide the paper roll onto the paper spindle and install into roller supports Paper feeds into Printer from top of roll Ensure paper roll coated surface is fed into the printer face up Stage 1 Push in green tray and close Lower Door Stage 2 Close lock the LCD Screen Door via the Lock at the Right hand side of the Kiosk using the key...
Страница 13: ... and open the LCD Screen Door by unlocking the Lock at the Right hand side of the Kiosk using the key provided The Modem is in the Main Frame against the rear wall Insert SIM Card into Modem from the rear in the orientation shown Modem QUICK START GUIDE CAUTION Servicing of this product or unit is to be performed by trained service personnel only ...
Страница 14: ...etmakers SST_BNA Wall Mount Quick Start Guide_ECN 5930 Page 14 of 14 SST Wall Mount Instructions QUICK START GUIDE CAUTION Servicing of this product or unit is to be performed by trained service personnel only ...