


9
22.
Do not extend the attached toys in any way, and do not hang toys other than those included.
23.
Do not leave the product in full sunlight or close to heat sources.
24.
Check regularly the condition of seams, material joints, structures and screws. If wear is detected, discontinue use immediately and replace the item
with a new one.
RISK OF FALLING AND SUFFOCATION:
The infants suffered neck and head injuries falling from the rocker and suffocating in the straps.
ALWAYS use seat belts. Fit them so that they fit tightly.
STOP using the product when the infant tries to get out of the product (around 6 months).
Stay nearby and watch the infant while using the product. This product is not safe for unsupervised use or unattended sleeping.
02. CONTENTS OF THE KIT
1.
Rocker base
2.
Seat frame
3.
Seat cover
4.
Charger
5.
Canopy with mosquito net
6.
Pillow
7.
2 toys
8.
Pilot
03.
UNFOLDING OF THE SEAT FRAME
1.
Press the left and right buttons, meanwhile lifting the top tube.
SEE FIG. A. 1.
2.
Press the left and right buttons, meanwhile lifting the lower tube.
SEE FIG. A. 2.
04. PRODUCT INSTALLATION
1.
Place both parts of the base on a flat surface. Align the joints on both sides as shown in the picture. And also align the power cables.
SEE FIG. B. 1
2.
Connect the power cables together.
SEE FIG. B. 2.
3.
Reconnect the other side of the base.
SEE FIG. B. 3.
4.
Fit and join the two sides of the base, then carefully turn the bottom upwards.
SEE FIG. B. 4.
5.
Place and carefully tighten the screws in position as shown in the picture.
SEE FIG. B. 5.
6.
Remove the 2 plastic locking clamps from the base.
SEE FIG. B. 6.
7.
Place the seat frame into the base aligning the rectangular piece.
SEE FIG. B. 7.
05.
FITTING/REMOVING THE SEAT COVER AND CUSHION
1.
To remove the cover, unfasten the 3 snaps on the bottom of the rocker and then slide it off the frame.
2.
To fit the cover, place it over the frame, taking into account where the top is. And then carefully fasten the 3 snaps. Make sure they are fastened
securely.
3.
To remove the cushion, unfasten the Velcro and pull the retaining strap through the handle attached to the seat cover.
4.
To put the cushion on, put the attachment strap through the handle and then fasten the Velcro on the strap.
5.
If you wish to remove or fit the seat padding follow steps 3 and 4.
06.
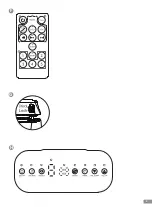
SEAT ADJUSTMENT
SEE FIG. C
1.
Press and hold the button numbered 1 in the picture at the same time on the left and right side to adjust the angle of the backrest. There are 3
possible levels.
SEE FIG. C. 1.
2.
Press and hold the button numbered 2 in the image at the same time on the left and right to adjust the horizontal position. There are 2 possible
positions.
SEE FIG. C. 2.
07. CANOPY WITH TOYS
1.
Attach the toys to the canopy by putting the attachment strap from the toy through the attachment bracket, which is located near the connection
between the fabric and the mesh. Once you have put the strap through, fasten the Velcro. Proceed in this way for both toys.
2.
Attach the side mount to the rocker at the location as shown in the picture, then push the mount into the rocker so that the tube from the rocker
fits into the space in the canopy mount. Then fasten the 2 Velcro fasteners on the underside near the cushion.
SEE FIG. D.
08. SEAT BELTS
1.
Place the child in the rocker and position so that the wide centre strap is between the child’s legs.
SEE FIG. E. 1.
2.
Then place the top straps over the child’s shoulders and put the left side through the hole on the left and the right side through the hole on the
right, respectively, through the holes in the middle strap.
SEE FIG. E. 2.
3.
Clip the side straps into the holes in the top straps.
SEE FIG. E. 3.
4.
Clip the connected straps on both sides into the middle strap.
SEE FIG. E. 4.
5.
Make sure the straps fit your child properly and that all attachments are securely clipped in.
6.
Fasten with Velcro to secure the straps. This is essential to prevent your child from accessing the fastener.
SEE FIG. E. 5.
7.
To unbuckle the straps press the button on the safety catch once the safety catch is unfastened. Pull the top straps out of the holes.
SEE FIG. E. 6.
09. PILOT
SEE FIG. F
1.
On/off
2.
Music - a group of buttons designed to control music
3.
Time switch- 8/15/30 minutes
4.
Built-in song mode/ USB/ Bluetooth
5.
Volume „+”
6.
Volume „-”
7.
Pause/play
Содержание Nube
Страница 1: ...Nube...
Страница 3: ...3 A B 1 1 2 2 3 4 5 6 7 C 1 2...
Страница 4: ...4 E 1 2 3 4 5 6 D...
Страница 5: ...5 G F H 1 2 3 4 5 6 7 8 9 10 12 11 1 2 3 4 5 6 8 7 9...
Страница 33: ...PL DE CZ EN...
Страница 34: ...HU LT SK LV...
Страница 35: ...RO ET BG...
Страница 36: ...Producent Manufacturer KGK Trade sp z o o sp k Ujastek 5b 31 752 Cracow Poland Made in PRC...


