background image

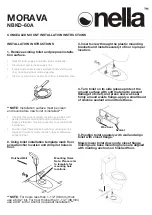
INSTALLATION INSTRUCTIONS 

1. Remove existing toilet and prepare installa-

tion surface.

•  Shut off toilet supply and flush tank completely.
•  Disconnect and remove supply line.
•  If replacing a toilet remove old toilet and existing wax 

ring. Cover/plug floor waste opening.

•  Clean any old wax or debris from from installation area. 


•  Confirm that current supply location coincides with 

desired toilet location and rough-in dimensions.  

Supply relocation may be necessary for proper toilet 

installation.

•  Position toilet template on finish floor making sure it 

aligns with current waste location; tape template se-

curely to floor.  

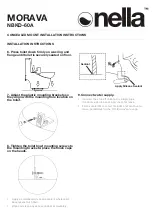
2. Using toilet installation template mark floor 

screw/anchor location and drill pilot holes in 

floor.


3. Insert screw through the plastic mounting 

brackets and install securely to floor in proper 

location.


4. Turn toilet on its side (please protect the 

ground surface with soft material to prevent 

damage to toilet), and press new wax seal 

firmly around waste flange. apply a small bead 

of silicone sealant around toilet base.


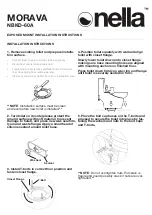
5. Position toilet squarely with wall and align 

toilet with closet flange. 


Slowly lower toilet down onto closet flange 

making sure base mounting holes are aligned 

with munting anchors on finished floor.

CONCEALED MOUNT INSTALLATION INSTRUCTIONS

Finished Wall

Wax Seal

Sealant

Mounting Holes 

Note: Please refer 

to template for 

mounting hole 

locations.

**NOTE

: Installation surface must be clean  

and level before new toilet is installed.

**

**NOTE

: For floors less than 1-1/2” (38 mm) thick 

use a 5/32” bit. For floor thicker than 1-1/2” (38 mm) 

use a 3/8” bit for anchor (required) installation.

**

MORAVA

NBKD-60A

Содержание MORAVA NBKD-60A

Страница 1: ...FEATURES Vitreous china Seamless one piece design 2 fully glazed trapway 12 305mm rough In Siphonic Jet Dual Flush Technology GeberitTM Inside available 1 28 GPF 4 8 L Dual Flush HET INCLUDED COMPONEN...

Страница 2: ...vel Pipe Wrench Channel Locks Scroll Saw Adjustable Wrench Pipe Clamp Pipe Cutter Hacksaw Plumber s Putty or Caulking Putty Knife Drill Philips Screwdriver Flathead Screwdriver USA Canada www nellabat...

Страница 3: ...oor 3 Insert screw through the plastic mounting brackets and install securely to floor in proper location 4 Turn toilet on its side please protect the ground surface with soft material to prevent dama...

Страница 4: ...brackets place the finish caps on the heads Apply a small bead of silicone sealant where toilet base meets finish floor Wipe and clean any excess sealant immediately 9 Connect water supply Connect the...

Страница 5: ...ct floor position and fasten closet flange EXPOSED MOUNT INSTALLATION INSTRUCTIONS Wax Seal Sealant T Bolt Closet Flange NOTE Installation surface must be clean and level before new toilet is installe...

Страница 6: ...re toilet base meets finish floor Wipe and clean any excess sealant immedi ately 7 Connect water supply Connect the shut off valve to the supply pipe Gradually open the valve and check for leaks Flush...

Страница 7: ...e curely to floor 2 Turn toilet on its side please protect the ground surface with soft material to prevent damage to toilet and press new wax seal firm ly around waste flange Apply a small bead of si...

Страница 8: ...ONS Sealant Apply Silicone Sealant 8 Apply a small bead of silicone sealant where toilet base meets finish floor Wipe and clean any excess sealant immedi ately 9 Connect water supply Connect the shut...

Страница 9: ...ate around the screw maximum hinge adjustment is achievable Please refer to the diagram above Adjustment A Additional adjustment and fine tuning of the pin position can accomplished by sliding the wit...

Страница 10: ...s to learn how to unfasten the seat Be sure to unfas ten the seat gently so the integrated anchors and pin positions don t move Once toilet seat has been removed proceed to firmly tighten screws and f...

Отзывы: