Nektar 270566 Скачать руководство пользователя страница 26

26    Nektar Aura Owner‘s Manual                                                                               www.nektartech.com

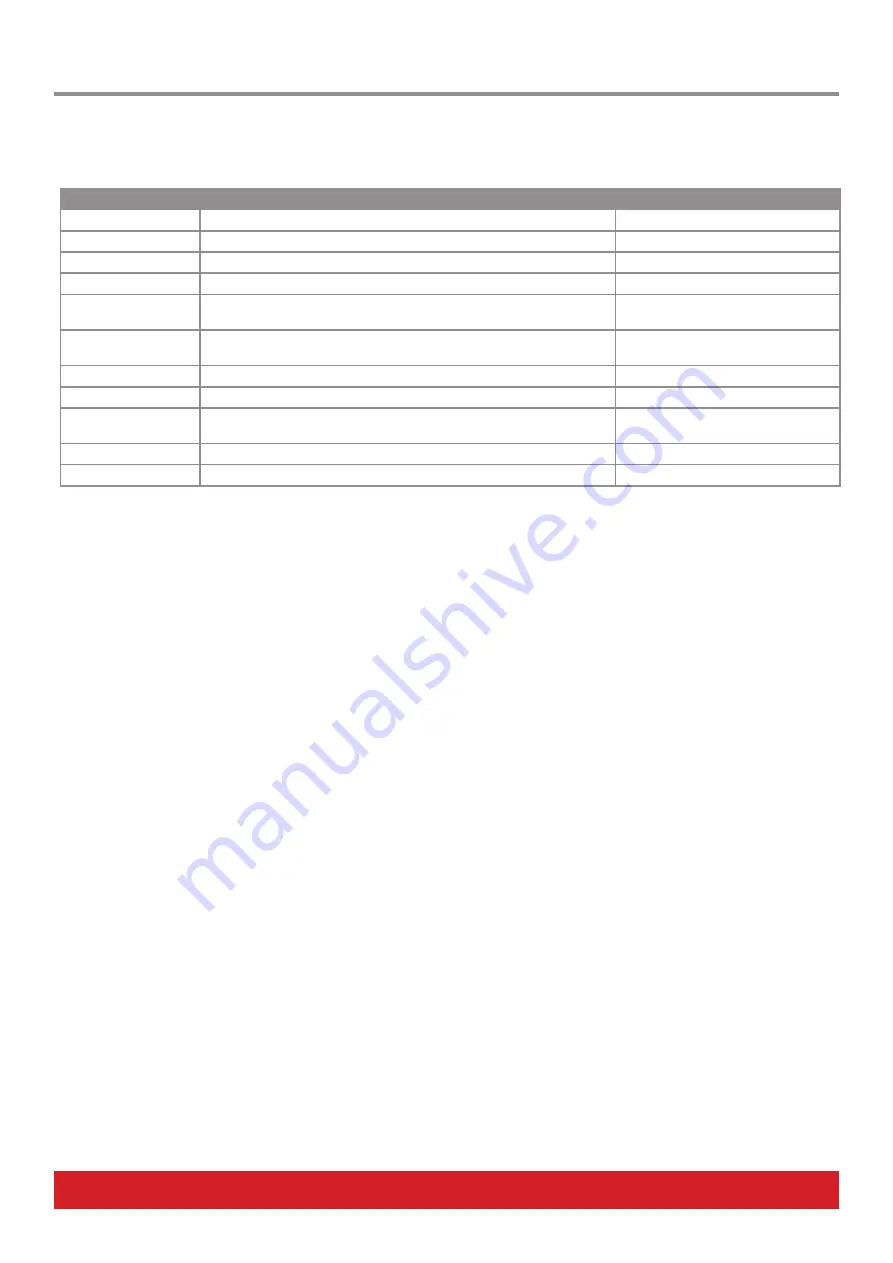
Sequencer Key Combination Table

When [Perform] is Inactive

[Perform] is active

[Pad 1-16]

Select Patterns 1-16

Play Patterns 1-16

[Shift]+[Pads 1-16]

Play Patterns 1-16

Select Patterns 1-16

[Arrow buttons 1-4]

Select Parts 1-4

Play Parts 1-4

[Shift]+[Parts 1-4]

Play Parts 1-4

Select Parts 1-4

[S1-16]

Activate/deactivate Steps 1-16 in current Part in Sequencer mode.

In any other mode [S1-16] trigger Patterns 1-16.

Same

[Shift]+[S1-16]

Select Steps 1-16 in current Part. Keep holding [Shift] to select multiple 

Steps

Same

[S1-16] + [S1-16]

Ties a note to span the Step range selected

Same

[SEQ]

Navigate back to previous page. Press twice to go to Collection level

Same

[Menu]

Hold to access the setup settings for Tempo, MIDI Clock & Time  

Signature

Clock Source & MIDI Clock Explained

Aura’s Repeat and Sequencer features always stay in sync with each other because they share both tempo and clock source settings. 
Changing the tempo for Repeat will therefore also change the tempo for the Sequencer and vice versa. 

There are 3 Clock Source options:

Internal:  


Aura runs from it’s internal clock. Tempo can be adjusted and will affect both Repeat and Sequencer.

MIDI Clock: 


Aura is sync’ed to a master MIDI Clock sent by a DAW or hardware MIDI device. Tempo is set by the


master MIDI Clock. Aura receives MIDI Clock via USB on the ‘AURA’ or ‘AURA Internal’ MIDI port.

Auto:    


Clock automatically switches between Internal and MIDI Clock. When MIDI Clock is received Aura switch 


to MIDI Clock and when MIDI Clock is not received, Aura switch to Internal clock. This is the default setting.

Repeat will immediately sync to MIDI Clock when it’s received. The Step Sequencer however needs to be instructed to respond to MIDI 
clock because you may not always want it to play when MIDI clock is received. Here is how you get Aura to play when MIDI clock is re-
ceived:
• 

Activate Run. While Run is active, Patterns will play when MIDI Clock Start and Continue commands are received by the master clock 
source.

• 

Activate one or more Pattern’s for playback. Playback will continue when MIDI Clock Start and Continue commands are received by 
the master clock source.

Sequencer Key Combinations and MIDI Clock

Содержание 270566

Страница 1: ...www nektartech com www nektartech com Owner s Manual ...

Страница 2: ...epeat Settings 16 Trigger Sync Beat sync vs Key Sync 17 Step Sequencer 18 Programming Patterns The Quick Start Guide 18 Diving Deeper Collection Settings 18 Collection Patterns Parts and Steps Explained 19 Programming Pattern Parameters 19 Programming Parts Parameters 19 Activating Parts for Playback 20 Programing Step Parameters 20 Programming Steps 20 Tying Steps Together 20 Programming Accents ...

Страница 3: ...ment generates uses and can radiate radio fre quency energy and if not installed and used in accordance with the instructions may cause harmful interference to radio communications However there is no guarantee that interference will not occur in a Particular installation If this equipment does cause harmful interference to radio or television reception which can be determined by turning the equip...

Страница 4: ...l A standard USB cable Note Aura is fully powered via USB so any additional power supply is optional and not included If any of the items above are missing please let us know via email stuffmissing nektartech com Aura Main Features 16 velocity and pressure sensitive RGB illuminated pads TFT color display 8 rotary 360 pots 16 RGB LED illuminated buttons 27 dual color LED illuminated buttons 4 displ...

Страница 5: ...beled FOOT SWITCH on the back of Aura Aura will automatically detect the polarity of the footswitch Using a Y splitter not included or insert cables you can connect 2 foot switches to the same socket Set the power switch on the back of the unit to it s On position Your computer will now spend a few moments identifying Aura and subsequently you will be able to set it up with your DAW Downloading Ne...

Страница 6: ...y operate as Part 1 4 buttons and at other times they are used as Arrow buttons 4 Pad 1 16 Sixteen velocity and pressure sensitive pads All pads are illuminated by an RGB LED with 16 color choices 5 Repeat On Activates deactivates the Repeat function The button can be switched to either momentary or latch in the Repeat menu 6 Nektarine Mode Buttons Select Nektarine modes Mixer Pad Setup Plugin FX1...

Страница 7: ... buttons Four contextural buttons operate as indicated by the display labels above 11 TFT Color Display 12 Power On Off 13 Power Supply Socket 9V 600mA center positive 2 1mm barrel connector PSU optional and not included 14 USB Connector Connect to USB host computer Aura is powered via USB 15 Footswitch sockets 1 2 A TRS 1 4 jack socket allows connection of up to 2 external footswitch pedals 16 MI...

Страница 8: ...ks in your DAW that do not host Nektarine The pads will reconfigure to the current Preset settings when you press the display button MIDI Assign When Nektarine is used with Aura the sections of this manual that are directly relevant are Global LED Dim settings page 14 Global Pad Velocity Settings page 14 15 Repeat page 16 17 Step Sequencer page 18 26 The separate PDF guide that covers how Aura and...

Страница 9: ...the Preset number you want to load Save a Preset Once modifications have been made to a Preset covered on page 11 it can be saved to any of the 16 Preset locations Press and hold the display button Save Move the R1 pot while continuing to hold Save to scroll through the 16 Presets Locate the Preset location you want to save to and release Save Press Rename to change the name of the Preset before s...

Страница 10: ...e Hard Kick Amber Snare Roll Ghost Orange Snare Light Green Hi Hat Green HiHat Open Purple Toms Teal Crash 5 I map Ext KD SD This Preset is for I map layouts with extended Kick and Snare drum options Blue2 Soft Kick Blue Hard Kick Orange Snare Amber Snare articulations Light Green Hi Hat Green HiHat Open 6 Chromatic 1 Chromatic scale programmed from C3 Eb3 Red pad C root 7 Chromatic 2 Chromatic sc...

Страница 11: ...enu then shows the following parameters Range C 2 G8 Global 1 16 None Trigger Toggle Decimal Hex Note Channel Note Message Data Entry See table1 See table1 See table1 See table1 Pressure Data 1 Data 2 Data 3 The 8 pots R1 8 change the parameters displayed Use the first 3 pots to change the MIDI note assigned to the selected pad Set R3 Note Message to either Trigger or Toggle Trigger Plays the note...

Страница 12: ...in 0 127 Channel AT AfterTouch n a Max 0 127 Min 0 127 NRPNc Coarse Value 0 127 MSB 0 127 LSB 0 127 NRPNf Fine Value 0 127 MSB 0 127 LSB 0 127 ToggleC NRPN Coarse Toggle Value 0 127 MSB 0 127 LSB 0 127 ToggleF NRPN Fine Toggle Value 0 127 MSB 0 127 LSB 0 127 StepC NRPN Coarse Step Value 0 127 MSB 0 127 LSB 0 127 StepF NRPN Fine Step Value 0 127 MSB 0 127 LSB 0 127 Fixed Velocity n a Max 0 127 Min ...

Страница 13: ... Select while moving any of R 1 8 This will select the pot for editing The display updates with parameters as illustrated below When R1 is moved the message type changes which in turn also updates the parameters for R6 8 Table 2 lists the message type options and their associated parameters Range see table 1 Global 1 16 Decimal Hex Message Type Channel n a Data Entry See table1 See table1 See tabl...

Страница 14: ...t to the MIDI out jack on the rear Merge Both internal and USB MIDI messages are sent to the MIDI out jack on the rear By default the MIDI Out jack is set to Internal To change the setting do the following Press the Internal button The LED button is illuminated blue to indicate setup is active Press the display button labelled Global Move R2 MIDI Out and select either Internal USB or Merge LED Dim...

Страница 15: ...oint Curve Bias Max Pressure Bias sets the slant of the curve At 100 the curve is linear Values above 100 create an exponential curve and values below result in a logarithmic curve See graph below Step Number of Steps Max Pressure Creates a tiered velocity response Select the number of Steps you want using R6 The parameter Max Pressure defines how early maximum velocity value is reached Lowering M...

Страница 16: ...y for the duration of 1 8 Set to 99 if you want the length to match the Repeat Rate Accent Offset 50 to 50 Offsets the velocity of accent notes by the value selected To hear an accent when notes are repeated the Accent Offset parameter needs to be set to a value other than 0 An accent will play up to 50 velocity values higher than the originally played velocity value if positive and up to 50 value...

Страница 17: ...e thing but now Repeat notes are synchronized to every 1 16 note value which gives more options for offsetting the triggering of the second pad or more pads for that matter in relation to the first pad but therefore also greater margin for error If T is active Beat sync is set to Beat 12 Key 1 2 Beat sync is great when you just want to strike pads and let Repeat do the job of repeating notes If yo...

Страница 18: ... playing The LED of a non playing Pattern is off 6 Press Run Stop to stop playback at any time If the Sequencer is running but no sound is heard press Internal and play the pads to check that they are triggering sound in a plugin or external MIDI hardware If the pads don t trigger sound go back to read about how to set up your pads or check your sound source Diving Deeper Collection Settings Using...

Страница 19: ...Step and will therefore override any higher level settings The below chart shows which parameters can be programmed at every level Parameter Range Collection Pattern Part Step Play Rate 1 4 1 6 1 8 1 12 1 16 1 24 1 32 1 48 1 64 1 80 1 96 x x x x Velocity 1 127 x x x x Gate Length 1 99 x x x x Last Step 1 16 x x x Accent Offset 100 0 100 x x x Swing 49 0 49 x x x Play Mode Loop Reverse Loop Ping po...

Страница 20: ... Steps select another Step Part or Pattern Programming Steps S1 16 update as the currently selected Part changes If a Pattern is selected with multiple Parts active for playback the Step buttons simply update as Parts are playing To program Steps in a specific Part select it by pressing the Part buttons Steps can be programmed regardless of whether their parent Part is actively playing or not Tyin...

Страница 21: ...Steps in One Move The relative relationship between Parts or Steps can be maintained when editing any of their settings Here is a simple example using velocity but it applies to any of the settings First check that Part 1 and Part 2 are set to different velocity values such as 10 and 20 Press Part 1 and hold it while pressing Part 2 Both Parts are now selected and the velocity value is displayed a...

Страница 22: ...ty Release Shift when the option Use Collection is selected Part 1 s velocity setting is now set at the Collection level and the Pattern s velocity value does not affect it To revert Part 1 s velocity setting to that of the Pattern follow the same Steps listed above but select Use Pattern in point 3 Example Reset both Part and Pattern to Collection Setting The Reset function reverts every level be...

Страница 23: ...l always match the first Step of every Pattern If the time signature is changed to 3 4 start in the above scenario will match the first beat and following every 4th bar s 1st Step down beat Setting the time signature correctly becomes important when Patterns are triggered in realtime You ll get more predictable results if Aura s time signature matches that of a DAW or device supplying MIDI Clock T...

Страница 24: ... Then press the display button Back to return to the Save menu Complete the last Step as described in the Save a Collection section to preserve the Collection name change Load a Collection Once stored any of the sixteen Collections can be loaded Press and hold the display button Load Move the R1 pot while still holding Load to scroll through all of the 16 Collections Locate the Collection you are ...

Страница 25: ...lt 5 UNDO Undo last action 6 REDO Redo last undone action 7 GOTO START Collection level all Patterns go to start of first active Part at point of press regardless of their current trigger mode setting Pattern level Current Pattern goes to start of first active Part at point of press regardless of its current trigger mode setting 8 GOTO NEXT Shift playback to next Step 9 NUDGE Nudge play position o...

Страница 26: ...po for the Sequencer and vice versa There are 3 Clock Source options Internal Aura runs from it s internal clock Tempo can be adjusted and will affect both Repeat and Sequencer MIDI Clock Aura is sync ed to a master MIDI Clock sent by a DAW or hardware MIDI device Tempo is set by the master MIDI Clock Aura receives MIDI Clock via USB on the AURA or AURA Internal MIDI port Auto Clock automatically ...

Страница 27: ...w show the About page which lists the current firmware version If the firmware version doesn t match the version on our website go ahead and download the new package Make sure to follow the PDF instructions carefully when you update the firmware Factory Restore If you need to bring Aura back to its factory default settings follow these Steps Make sure Aura is switched off Press the Shift Click but...

Страница 28: ...www nektartech com Designed by Nektar Technology Inc Made in China ...

Отзывы: