background image

Armless/Right Arm

Components

Assembly Instructions

Contact

2 9

Fasten large base to 

right arm

Using the Allen wrench, fasten the large base to both 
legs of the right arm component with four hex bolts.

2

2x

Содержание The 6-Piece U-Shaped Sectional

Страница 1: ...ly Guide B O X E S N E E D E D 1 1 3 1 1 1 3 1 Left Arm Module Cushions Right Arm Module Cushions Armless Module Cushions Corner Module Cushions Left Arm Module Frame Right Arm Module Frame Armless Module Frame Corner Module Frame ...

Страница 2: ...e Frame Box Corner Module Frame Box 1X Corner Block Leg Corner Module Frame Box 1X Left Arm Module Back Support Left Arm Module Frame Box 1X Right Arm Module Back Support Right Arm Module Frame Box 3X Armless Module Back Support Armless Module Frame Box 1X Corner Module Back Support Corner Module Frame Box 1X Right Arm Right Arm Module Frame Box 3X Small Leg Right Arm Module Frame Box Armless Modu...

Страница 3: ...orner Module Cushion Box 1X Large Corner Back Cushion Corner Module Cushion Box 1X Small Corner Back Cushion Corner Module Cushion Box 2X Arm Cushion Left Arm Module Cushion Box Right Arm Module Cushion Box 5X Back Cushion Left Arm Module Cushion Box 1 Right Arm Module Cushion Box 1 Armless Module Cushion Box 3 ...

Страница 4: ...lt All Frame Boxes 4X Long Hex Bolt Corner Module Frame Box 2X L Bracket Left Arm Module Frame Box Right Arm Module Frame Box 8X Screw Left Arm Module Frame Box Right Arm Module Frame Box Tools 1X Allen Wrench All Frame Boxes Phillips Head Screwdriver Not included ...

Страница 5: ...xtended periods of time this can be common Covering your furniture for extended periods of time especially if enduring consistent inclement weather will greatly prolong the lifespan of the wood Caring for cushion cover fabric One of the best ways to keep your Sunbrella fabric looking good is to brush off dirt before it becomes embedded in the fabrics and wipe up spills or clean soon after a stain ...

Страница 6: ...ng assembly instructions demonstrate how to build each module by borrowing the Left Arm Facing layout as a basis However all configurations follow the same assembly method To build yours assemble in sections of two starting at the Corner Module p 07 and work outward toward the armed modules Armless Armless p 38 Left Arm Armless p 16 Armless Corner p 07 Armless Right Arm p 27 Step 1 Step 2 Step 3 ...

Страница 7: ...Components Assembly Instructions Contact 07 Armless Corner ...

Страница 8: ...ess Corner Fasten legs to corner base Using the Allen wrench fasten two large legs and the assembled corner block leg onto the corner base with hex bolts Use two long hex bolts when fastening corner base to corner leg 2X Long Hex Bolt Corner Block 1 ...

Страница 9: ...en legs to left side of short base With the Allen wrench thread two hex bolts through the holes in the front left side of the short base Fasten to the short leg Repeat this with the large leg on the back left corner of the small base Armless Corner 2 ...

Страница 10: ...ess Corner Connect small base with corner base Gently slide small base into the grooves located on the large leg and corner block of the corner base Align the holes located on the small base with the corresponding threaded holes on the corner base 3 ...

Страница 11: ...ontact 11 Armless Corner Fasten small base to corner base Secure the two bases by inserting four bolts through the holes on the small base With the Allen wrench gently fasten them to the four threaded holes located on the corner base 4 ...

Страница 12: ...nts Assembly Instructions Contact 12 Drain hole faced down Armless Corner Secure roped backs to bases Insert the lower brackets of the small roped back components into the slots of the short and corner base 5 ...

Страница 13: ...t 13 Armless Corner Attach back supports to roped backs Insert armless module back support and corner module back support onto the top brackets located on roped backs by inserting them into corresponding slots underneath the back supports 6 ...

Страница 14: ...er Fasten backs to large legs With your Allen wrench gently fasten armless back support and corner module back support onto the threaded holes on the top of the large legs with hex bolts Use two long hex bolts in the back in the far corner of the corner module back support 7 ...

Страница 15: ...ctions Contact 15 Add base and back cushions After successfully assembling the Armless to Corner Module and fastening them to other modules you can finally add your cushions zipper facing backward Time to relax 8 Armless Corner ...

Страница 16: ...Components Assembly Instructions Contact 16 Left Arm Armless ...

Страница 17: ...ct 17 Connect large base to left arm Place the left arm component on a soft surface verifying that the two screw holes inside the arm are facing upward Gently insert the long base into the arm s inner slots located on the inside of the two leg components 1 ...

Страница 18: ...Left Arm Armless Components Assembly Instructions Contact 18 2x Fasten large base to left arm Using the Allen wrench fasten the large base to both leg components with four hex bolts 2 ...

Страница 19: ...ts Assembly Instructions Contact 19 Fasten small leg to large base Using the Allen wrench fasten the small leg to the large base with two hex bolts Be sure to leave two threaded holes on the small leg exposed as demonstrated 3 ...

Страница 20: ...tions Contact 20 Fasten large leg to large base Stand the base upright on its legs Then with the Allen wrench fasten the large leg to the large base with two hex bolts Be sure to leave two threaded holes on the large leg exposed as demonstrated 4 ...

Страница 21: ...ly Instructions Contact 21 Connect large and small bases Gently slide small base into the slotted sections on the Left Arm Module s large and small legs Slide base until its pre drilled holes align with the threaded holes on the legs 5 ...

Страница 22: ...ts Assembly Instructions Contact 22 Fasten large and small bases After holes on the bases are aligned with the corresponding threaded holes on each leg use the Allen wrench to fasten them together with two hex bolts per side 6 ...

Страница 23: ... down Secure roped backs to large and small bases Insert the lower brackets of the corresponding roped back components into the slots of each base The Left Arm Module large base will require the large roped back and the Armless Module small base will require the small roped back 7 ...

Страница 24: ...ach back support onto the roped backs The Left Arm Module large base will require the left arm back support and the Armless Module small base will require the small back support Align slots underneath each back support with the corresponding roped back s top bracket Then insert bracket into the slot 8 2x ...

Страница 25: ...en wrench gently fasten left arm back support onto large leg with two hex bolts Repeat with adjoining side of small back support Next align the pre drilled holes on the left arm with the holes on the L bracket Then with a Phillips Head screwdriver gently secure left arm component and left arm back support with four screws 9 ...

Страница 26: ...t 26 Add cushions First with zipper seams facing backward add left arm cushion to the left Arm Module Thread the cushion laces around the roped back posts and tie them down Then add two base cushions Finally add the two back cushions Relax You re finished 10 ...

Страница 27: ...Components Assembly Instructions Contact 27 Armless Right Arm ...

Страница 28: ...nts Assembly Instructions Contact 28 Connect large base to right arm Place the right arm component on a soft surface verifying that the two screw holes are facing upward Gently insert the long base into the arm s inner slots 1 ...

Страница 29: ...Armless Right Arm Components Assembly Instructions Contact 29 Fasten large base to right arm Using the Allen wrench fasten the large base to both legs of the right arm component with four hex bolts 2 2x ...

Страница 30: ...nts Assembly Instructions Contact 30 Fasten small leg to large base Using the Allen wrench fasten the small leg to the large base with two hex bolts Be sure to leave two threaded holes on the small leg exposed as demonstrated 3 ...

Страница 31: ...tions Contact 31 Fasten large leg to large base Stand the base upright on its legs Then with the Allen wrench fasten the large leg to the large base with two hex bolts Be sure to leave two threaded holes on the large leg exposed as demonstrated 4 ...

Страница 32: ...ly Instructions Contact 32 Connect large and small bases Gently slide small base into the slotted sections on the Right Arm Module s large and small legs Slide base until its pre drilled holes align with the threaded holes on the legs 5 ...

Страница 33: ...nts Assembly Instructions Contact 33 Fasten large and small bases After holes on the bases are aligned with the corresponding threaded holes on each leg use the Allen wrench to fasten them together with two hex bolts per side 6 ...

Страница 34: ...Arm Components Assembly Instructions Contact 34 Secure roped backs to large and small bases Insert the lower brackets of the corresponding roped back components into the slots of each base 7 2x Drain hole faced down ...

Страница 35: ...ach back support onto the roped backs The Right Arm Module large base will require the right arm back support and the Armless Module small base will require the small back support Align slots underneath each back support with the corresponding roped back s top bracket Then insert bracket into the slot 8 2x ...

Страница 36: ...our Allen wrench gently fasten back support components onto large leg with two hex bolts Repeat with adjoining side of small back support Next align the pre drilled holes on the right arm with the holes on the L bracket Then with a Phillips Head screwdriver gently secure with four screws to right arm and back support 9 ...

Страница 37: ... 37 Add cushions First with zipper seams facing backward add right arm cushion to the Right Arm Module Thread the cushion laces around the roped back posts and tie them down Then add two base cushions Finally add the two back cushions Relax You re finished 10 ...

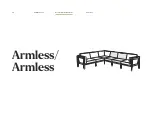
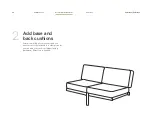
Страница 38: ...Components Assembly Instructions Contact 38 Armless Armless ...

Страница 39: ... legs and back components Armless modules can be assembled independently on a soft surface or they can also attach to existing modules i e corner or arm modules The diagram on the right demonstrates how the components are assembled and fastened with hex bolts When fully assembled both ends of this configuration can easily fit into either an armed right or left or corner module 1 ...

Страница 40: ...ents Assembly Instructions Contact 40 Add base and back cushions After assembling all components and you have successfully fastened it to other modules you can add your cushions zipper facing backward Relax You re finished 2 ...

Страница 41: ...Components Assembly Instructions Contact 41 Have a question comment feedback We love hearing from customers support hineighbor com hineighbor com Contact ...

Страница 42: ......

Отзывы: