background image

Cleaning and servicing

 en

21

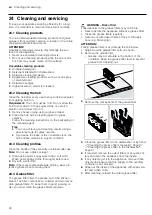
Cleaning the grease filters manually

1.

Remove the components of the grease filter.

2.

Soak the grease filter in hot soapy water.

Use a brush to clean the grease filter. Do not use

aggressive, acidic or alkaline cleaning products.

Use special grease solvent for stubborn dirt. You

can purchase the grease solvent from Customer

Service, through our online shop or in a special-

ist shop.

3.

Rinse the grease filters thoroughly.

4.

Leave the grease filter to drain.

5.

Fit the components of the grease filter.

6.

After drying, insert the grease filter into the appli-

ance.

Cleaning the grease filter in the dishwasher

1.

Remove the grease filter.

2.

Remove the components of the grease filter.

3.

Place the components of the grease filter loosely in

the dishwasher and do not jam them in.

Do not clean heavily soiled grease filters with

tableware. Do not use aggressive, acidic or al-

kaline cleaning products.

4.

Start the dishwasher. Select a maximum temperat-

ure setting of 70 °C.

5.

Leave the grease filter to drain.

6.

After drying, insert the grease filter into the appli-

ance.

24.5 Odour filter or acoustics filter

You can obtain odour filters or acoustics filters from

specialist retailers, customer service or in the online

shop.

Notes

¡

Replace the odour filters when the warning is dis-

played on the appliance. 

→ 

"Resetting the saturation indicator", Page 21

¡

Change the acoustics filters if they are dirty.

Requirement:

 To keep them in good working order,

only use genuine replacement filters.

1.

Remove the grease filter.

2.

Remove the four odour filters or acoustics filters,

and dispose of them properly.

3.

Insert two new odour filters or acoustics filters into

the left and right of the appliance and slide them for-

wards.

4.

Insert the other odour filters or acoustics filters into

the left and right of the appliance.

5.

Insert the grease filter into the appliance.

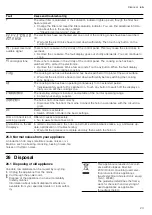
Resetting the saturation indicator

After the appliance is switched off,  ⁠ lights up.

1.

Replace the odour filters. 

→ 

"Odour filter or acoustics filter", Page 21

2.

Press and hold the ventilation sensor until a signal

tone sounds.

a

 stops lighting up. The odour filter display is reset.

24.6 Cleaning the overflow container

The overflow container collects liquids or objects that

come into the appliance from above.

Requirement:

 The appliance has cooled and the resid-

ual heat indicator has gone out.

Содержание V5 HQ4 0 Series

Страница 1: ...Induction hob with integrated ventilation system Information for Use V5 HQ4 0...

Страница 2: ...ext owner Do not connect the appliance if it has been damaged in transit 1 2 Intended use Only a licensed professional may connect ap pliances without plugs Damage caused by in correct connection is n...

Страница 3: ...from flue gases being drawn back in Room air dependent heat pro ducing appliances e g gas oil wood or coal operated heaters continuous flow heaters or water heaters obtain combustion air from the room...

Страница 4: ...grilles may cause accidents Never use hob protective grilles Metal objects on the hob quickly become very hot Never place metal objects such as knives forks spoons and lids on the hob The appliance b...

Страница 5: ...n the hob Check the cookware Lift the cookware when moving it Scratches Salt sugar or sand Do not use the hob as a work surface or storage space Damage to the appli ance Cooking with frozen cookware N...

Страница 6: ...so match the size of the cooking zone If cookware is not detected on a cooking zone place this on the cooking zone with the next smallest diameter 4 1 Size and characteristics of the cookware To be ab...

Страница 7: ...you can obtain these from spe cialist retailers from our after sales service or from our official website Air extraction set Air recirculation set Odour filter for recirculating air mode Acoustics fi...

Страница 8: ...the hob reaches the power indicated in the table in order to reduce the preheating times and keeps them running for a certain time provided the other cooking zone on the same side is not in use 5 5 C...

Страница 9: ...ce with a damp cloth You can find a list of recommended detergents on the official website www neff international com More information on care and cleaning Page 20 8 2 Preparing the appliance To ensur...

Страница 10: ...t set the power level 8 9 When cooking with the lid on reduce the power level as soon as you see steam escaping The cooking result is not affected by the steam escap ing After cooking place a lid on t...

Страница 11: ...ion system If you assign a power level to the first cooking zone the air extraction system will start up automatically The ventilation setting lights up on the ventilation sensor After the automatic s...

Страница 12: ...r level and the same settings 12 1 Positioning the cookware Use cookware that fits into the cooking zones 12 2 Switching on CombiZone 1 Select one of the two cooking zones and set the power level 2 Pr...

Страница 13: ...is activated 14 2 Switching off PowerBoost 1 Select the cooking zone 2 Touch a The display goes out and the cooking zone switches back to power level a The function is switched off Note In certain cir...

Страница 14: ...ure may differ from the selected temperature level 17 2 Switching on the Frying Sensor 1 Place the empty cookware on a cooking zone 2 Select the cooking zone 3 Press a and the preset temperature light...

Страница 15: ...gets 180 200 8 12 Fish fingers 180 8 12 Chips 200 220 4 8 Stir fries 160 180 6 10 Spring rolls 180 200 8 15 Pasties croquettes 200 220 6 8 Sauces Tomato sauce 120 20 30 Cream sauce 110 120 10 20 B cha...

Страница 16: ...o not change any settings The cooking zone displays and switches itself off The time depends on the selected power level Power level Time 1 0 1 5 10 hours 2 0 3 5 5 hours 4 0 5 0 4 hours 5 5 6 5 3 hou...

Страница 17: ...on for the ventilation system If your hob is working in air extraction mode the ventilation system is switched on at the power level for approx 6 minutes If your hob is working in circulating air mode...

Страница 18: ...Please consult the documents supplied by Home Connect Please also follow the instructions in the Home Con nect app Notes Please note the safety precautions in this instruction manual and make sure th...

Страница 19: ...Home Connect app and will be able to start the software update via the app Once the update has been successfully downloaded you can start in stalling it via the Home Connect app if you are in your ho...

Страница 20: ...n 24 3 Cleaning profiles Clean the profiles if they are dirty or stained after use Note Do not use a glass scraper 1 Clean using warm soapy water and a soft cloth Wash new sponge cloths thoroughly bef...

Страница 21: ...li ance 24 5 Odour filter or acoustics filter You can obtain odour filters or acoustics filters from specialist retailers customer service or in the online shop Notes Replace the odour filters when th...

Страница 22: ...his appliance is damaged it must be replaced with a special power cord or special appliance power cable which is available from the manufacturer or its Customer Service 25 1 Warnings Notes If or appea...

Страница 23: ...any button to switch off the display so that you can set the cooking zone The operating voltage is incorrect and outside of the normal operating range Contact your energy supplier The hob is not conn...

Страница 24: ...nts that are li censed by the copyright holders as free or open source software The applicable licence information is stored on your home appliance You can also access the applicable li cence informat...

Страница 25: ...ce Milk temperature 7 C 16 cm saucepan without lid ingredients 40 g but ter 40 g flour 0 5 l milk with 3 5 fat content and a pinch of salt Preparing B chamel sauce 1 Melt the butter stir in the flour...

Страница 26: ...Heating up Duration approx 2 min 30 sec power level 9 Simmering Power level 2 30 8 Roasting a pork loin Initial temperature of the loin 7 C 24 cm pan without lid ingredients 3 pork loins total weight...

Страница 27: ......

Страница 28: ...er te GmbH Carl Wery Stra e 34 81739 M nchen GERMANY 9001868393 9001868393 030728 en Valid within Great Britain Imported to Great Britain by BSH Home Appliances Ltd Grand Union House Old Wolverton Roa...

Отзывы: