30
Programming the hob
This section will show you how to program the hotplates. The
table contains power levels and cooking times for several
dishes.
Turning the hob on and off
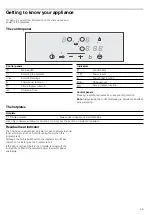
The hob is turned on and off using the main switch.
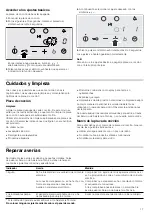
To turn on: Press the
#
symbol. A beep sounds. The indicator
located next to the main switch and the
‹
indicators of the
hotplates light up. The hob is ready for use.
To turn off: press the
#
symbol until the indicators go out. All
hotplates are turned off. The residual heat indicator will remain
lit until the hotplates have cooled down sufficiently.
Notes
■
The hob switches off automatically when all the hotplates are
switched off for more than 20 seconds.
■
The settings are memorised for 4 seconds after the hob has
been turned off. If the hotplate is switched back on within this
time then the previous settings will be applied.
Set the hotplate
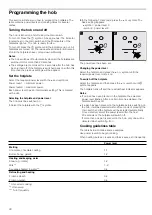
Select the required power level with the
+
and
-
symbols.
Power level 1 = minimum power.
Power level 9 = maximum power.
Each power level has an intermediate setting. This is marked
with a dot.
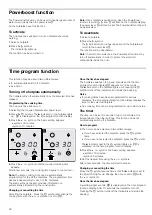
Selecting the hotplate and power level
The hob must be switched on.
1.
Select the hotplate with the
$
symbol.
2.
In the following 10 seconds, press the
+
or
-
symbol. The
basic setting appears:
+
symbol = power level 9
-
symbol = power level 4
The power level has been set.
Changing the power level
Select the hotplate and press the
+
or
-
symbol until the
required power level comes on.
To switch off the hotplate
Select the hotplate and then press the
+
or
-
symbol until
‹
symbol appears.
The hotplate turns off and the residual heat indicator appears.
Notes
■
If no pan has been placed on the hotplate, the selected
power level flashes. After a certain time has elapsed, the
hotplate switches off.
■
If a pan has been placed on the hotplate before switching on
the hob, it will be detected within 20 seconds of pressing the
main switch and the hotplate will be selected automatically.
Once detected, select the power level within the next
20 seconds or the hotplate will switch off.
If more than one pan is placed on the hob, only one will be
detected when switching it on.
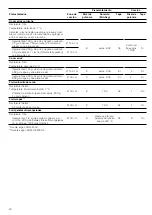
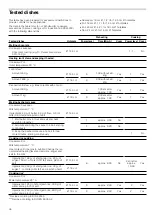
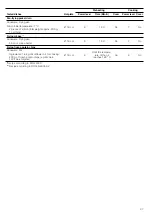
Cooking guidelines table
The table below contains some examples.
Use power level 9 to begin cooking.
When heating purées, creams and thick sauces, stir frequently.
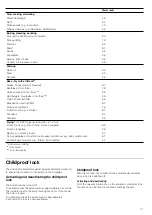
Power level
Melting
Chocolate, chocolate coating
1-1.
Butter, honey, gelatin
1-2
Heating and keeping warm
Stew (e.g., lentils)
1-2
Milk**
1.-2.
Sausages heated in water**
3-4
Defrosting and heating
Frozen spinach
3-4
Frozen goulash
3-4
* Uncovered cooking
** Uncovered
*** Turn frequently
Содержание T B10 Series
Страница 2: ...2 cm T B10...
Страница 4: ...4 INSTRUCCIONES DE MONTAJE Montaje PLQ PLQ 5 PLQ PLQ PLQ PLQ PLQ PLQ PLQ PLQ PLQ PLQ D E...
Страница 5: ...5 PLQ PLQ PLQ PLQ D E PLQ PLQ PLQ...
Страница 22: ...22 INSTALLATION INSTRUCTIONS Assembly PLQ PLQ 5 PLQ PLQ PLQ PLQ PLQ PLQ PLQ PLQ PLQ PLQ D E...
Страница 23: ...23 PLQ PLQ PLQ PLQ D E PLQ PLQ PLQ...
Страница 39: ...39 PLQ PLQ 5 PLQ PLQ PLQ PLQ PLQ PLQ PLQ PLQ PLQ PLQ D E...
Страница 40: ...40 PLQ PLQ PLQ PLQ D E PLQ PLQ PLQ...
Страница 41: ...41 I 1 2 3 4 90 C 2a 9 9 9 1a 1 D E F...
Страница 42: ...42 3 686002 20 65 2b 30 5 mm 686002 20 40 60 65 4 4a 4b 5 6 6 1 2 3 13 16 20 7 1 2 60 3 4 5 20 A 16 A 13 A...
Страница 43: ...43 Produktinfo Internet www neff international com online shop www neff eshop com 8 8 8...
Страница 44: ...44 2 cm...
Страница 45: ...45 sandwich 90 2012 19 E waste electrical and electronic equipment WEEE...
Страница 46: ...46 2 A Powerboost 3 Powerboost...
Страница 47: ...47 20 4 1 9 1 2 10 9 4 20 20 9 1 1 1 2 1 2 1 2 3 4 3 4 3 4...
Страница 50: ...50 1 10 10 30 1 Power Management 1000 W 1500 W 2000 W 10...
Страница 51: ...51 1 2 10 4 3 4 5 4...
Страница 52: ...52 3 E FD E FD 30 30 GR 18 182...
Страница 55: ......
Страница 56: ...02 940512 9000884147 9000884147 Constructa Neff Vertriebs GmbH Carl Wery Stra e 34 D 81739 M nchen...


