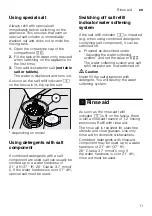
NEFF S71N65X5EU Скачать руководство пользователя страница 11

Rinse aid    

en

11

Using special salt

Always refill with special salt 
immediately before switching on the 
appliance. This ensures that overrun 
special salt solution is immediately 
washed out and does not corrode the 
rinsing tank.

1.

Open the screw-type cap of the 
compartment 

1R

.

2.

Fill the tank with water (only required 
when switching on the appliance for 
the first time). 

3.

Then add dishwasher salt 

(not table 

salt or tablets)

The water is displaced and runs out. 

As soon as the salt refill indicator 

@


on the fascia is lit, top up the salt.

* depending on model

Using detergents with salt 
component

Detergents with salt component

If combined detergents with a salt 
component are used, salt can usually be 
omitted up to a water hardness of 
21° dH (37° fH, 26° Clarke, 3.7 mmol/
l). If the water hardness is over 21° dH, 
special salt must be used.

Switching off salt refill 
indicator/water softening 
system

Switching off water softening system

If the salt refill indicator 

@

 is impaired 

(e.g. when using combined detergents 
containing salt component), it can be 
switched off.

Proceed as described under 
“Adjusting the water softening 
system” and set the value to 

:

‹‹

.

The water softening system and salt 
refill indicator are now switched off.

m

Caution

Never fill the salt dispenser with 
detergent. You will destroy the water 
softening system.

,

  Rinse  aid

R

i

n

s

e


a

i

d


As soon as the rinse-aid refill 
indicator 

H

 is lit on the fascia, there 

is still a rinse-aid reserve of 1-2 rinsing 
processes. Refill with rinse aid.
The rinse aid is required for stain-free 
utensils and clear glasses. Use only 
rinse aid for domestic dishwashers.
Combined detergents with rinse-aid 
component may be used up to a water 
hardness of 21° dH (37° fH, 
26° Clarke, 3.7 mmol/l) only. If 
the water hardness is over 21° dH, 
rinse aid must be used.

Содержание S71N65X5EU

Страница 1: ...6 LVKZDVKHU HQ QVWUXFWLRQ PDQXDO Q S...

Страница 2: ...6WDUW 5HVHW VHF...

Страница 3: ...nsil damage 13 Loading the dishwasher 13 Unloading the dishwasher 13 Cups and glasses 14 Pans 14 Cutlery basket 15 Etagere 15 Folding spikes 15 Small accessories holder 15 Knife shelf 16 Adjusting the...

Страница 4: ...Emptying the appliance 40 8Intended use I n t e n d e d u s e This appliance is intended for use in the home and the home environment Use the dishwasher only in the household and only for its designed...

Страница 5: ...has been correctly installed The electrical connection conditions must correspond with the specifications on the dishwasher rating plate 9 If the power cord of this appliance is damaged it must be re...

Страница 6: ...the connecting cables are in the supply hose Do not cut through this hose do not immerse the plastic housing in water In daily use Read and observe the safety information and instructions for use on t...

Страница 7: ...on model m Warning Risk of explosion Do not add any solvents to the washing chamber Danger of explosion m Warning Risk of scalding Open the door carefully when the programme is still running There is...

Страница 8: ...terials and recyclable materials Please dispose of the individual parts separated according to type Please ask your dealer or inquire at your local authority about current means of disposal Packaging...

Страница 9: ...ior depending on model Overview of menu The settings can be found in the individual chapters depending on model ON OFF switch 0 Programme buttons 8 Display Check water supply Salt refill indicator H R...

Страница 10: ...to Salt is not required at the set value 1 Find out about the hardness value of your tap water Your water utility company will help you with this 2 Set value can be found in the water hardness table...

Страница 11: ...over 21 dH special salt must be used Switching off salt refill indicator water softening systemSwitchingoffwatersofteningsystem If the salt refill indicator is impaired e g when using combined deterg...

Страница 12: ...wn programme button and press START button until is indicated on the digital display 4 Release both buttons The LED for button flashes and the digital display h displays the factory setting 5 Press pr...

Страница 13: ...nd cutlery out of the dishwasher as soon as possible after the programme ends Loading the dishwasher 1 Remove large food remnants It is not necessary to prerinse utensils under running water 2 Place t...

Страница 14: ...opening fully Pans Bottom basket 1j Tip Heavily soiled utensils pans should be placed in the bottom basket The more powerful spray jet provides a better dishwashing result Tip Other examples such as...

Страница 15: ...agere can be folded up if not required Depending on the model a 3 fold height adjustment is possible To do this first place the etagere vertically and pull up then place at a slight angle push down to...

Страница 16: ...n the right lever on the outside of the basket In doing so hold the sides of the basket along the upper edge to prevent it from suddenly dropping 3 To raise the basket hold the basket on the sides of...

Страница 17: ...ging If you have further questions we recommend that you contact the detergent manufacturers helpline m Warning Read and observe the safety information and instructions for use on the packaging for cl...

Страница 18: ...you want to add more utensils after the programme has started do not use the tablet collecting tray 1 as a handle for the upper basket The tablet could already be there and you will touch the partiall...

Страница 19: ...l Is optimised according to the soiling with the aid of sensors mixed utensils and cutlery part dried common household food remnants Auto 45 65 all Is optimised according to the soiling with the aid o...

Страница 20: ...g and drying results at a reduced running time water and energy consumption are increased Halfload Half load If you have only a few items to wash e g glasses cups plates you can switch to half load Th...

Страница 21: ...running time can also be adjusted to the degree of soiling Eco drying If you have selected the Eco 50 programme the door opens automatically when the programme ends This ensures a particularly econom...

Страница 22: ...ined energy and water consumption for cleaning these types of utensils OpticaldisplaywhiletheprogrammeisrunningOptical display while the programme is running depending on model While the programme is...

Страница 23: ...digital display You can change your programme selection at any time until the programme starts 7 Close the door End of programme The programme has ended when the value is indicated on the numerical di...

Страница 24: ...Open the door 2 Switch off ON OFF switch 3 Turn off the tap not applicable if Aqua Stop fitted 4 Remove the utensils when they have cooled down About the Eco drying function When Eco drying is activat...

Страница 25: ...he door 5 Switch off ON OFF switch 6 Close the door Changing the programme When the START button has been pressed the programme cannot be changed The only way a programme can be changed is by Cancel p...

Страница 26: ...lean it with a damp cloth and a little washing up liquid If the appliance is switched off for a prolonged period leave the door ajar to prevent the formation of an unpleasant odour Never use a steam c...

Страница 27: ...ustrated and take out filter system 3 Remove any residue and clean filters under running water 4 Re install filter system in reverse sequence and ensure that the arrow marks are opposite each other af...

Страница 28: ...spare parts may cause considerable damage and put the user at considerable risk Waste water pump Large food remnants or foreign objects which were not captured by the filters may block the waste wate...

Страница 29: ...bstructed Error code is lit Heating element calcified or soiled Clean appliance with dishwasher cleaning agent or descaler Operate the dishwasher with water softening system and check the setting see...

Страница 30: ...over the basket and preventing the door from closing Refill indicator for salt and or rinse aid H is lit No rinse aid Refill rinse aid No salt Refill with special salt Sensor does not detect salt tab...

Страница 31: ...process had not ended yet Wait until program ends or wait until 30 min after program ends before removing utensils The eco rinse aid used has a poor drying performance Use a proprietary rinse aid Eco...

Страница 32: ...tensive Tall narrow receptacles in corner areas are not rinsed adequately Do not place hollow receptacles too obliquely and do not place in the corner area Top basket 1 on right and left not set to sa...

Страница 33: ...utensils container or door Detergent substances are deposited Thesecoatingscannot usually be removed with chemicals appliance cleaner Change detergent brand Clean appliance mechanically Hardness rang...

Страница 34: ...may become discoloured during the service life of the dishwasher Discolouration is normal and will not impair the function of the dishwasher Plastic parts discoloured Too low rinsing temperature Sele...

Страница 35: ...lled salt Appliance does not start The mains fuse has tripped Check mains fuse Power cord not inserted Ensure that the power cord is plugged all the way into the back of the appliance and into the soc...

Страница 36: ...ot place utensils or fragrance dispenser in the tablet collecting tray Top basket presses against the door and prevents door from being closed securely Check whether rear panel is being pressed in e g...

Страница 37: ...ces depending on model 5Installation and connection I n s t a l l a t i o n a n d c o n n e c t i o n The dishwasher must be connected correctly otherwise it will not function properly The specificati...

Страница 38: ...n be found in the installation instructions Level the appliance with the aid of the height adjustable feet Ensure that the appliance is situated securely on the floor A built under or integrated appli...

Страница 39: ...f at least 40 C and no more than 60 C It is not recommended to connect the appliance to hot water if the water is supplied from an electric boiler Setting hot water 1 Open the door 2 Switch on ON OFF...

Страница 40: ...rts Drain the appliance according to the following steps 1 Turn on the tap 2 Open the door 3 Switch on ON OFF switch 4 Select programme with the highest temperature The expected programme duration is...

Страница 41: ...QJ VKHHW VSUD KHDG DUJH VKHHWV RU JULOOHV DQG SODWHV ZKLFK KDYH D GLDPHWHU JUHDWHU WKDQ FP JRXUPHW SODWHV SDVWD SODWHV GLQQHU SODWHV FDQ EH FOHDQHG ZLWK WKH DLG RI WKH VSUD KHDG 7R GR WKLV UHPRYH WKH...

Страница 42: ...O LQVWDOOHG DQG FRQQHFWHG ZLWK TXD 6WRS DFFRUGLQJ WR RXU LQVWUXFWLRQV 7KLV DOVR LQFOXGHV WKH FRUUHFW LQVWDOODWLRQ RI WKH TXD 6WRS H WHQVLRQ RULJLQDO DFFHVVRU 2XU ZDUUDQW GRHV QRW H WHQG WR GHIHFWLYH I...

Отзывы: