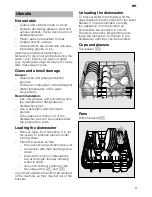
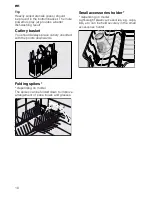
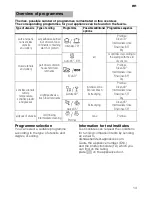
NEFF S66M63N0GB Скачать руководство пользователя страница 16

en

16

Intensive drying

The final rinse uses a higher temperature 
which improves the drying result. The 
running time may increase slightly. 
(Caution if utensils are delicate!)
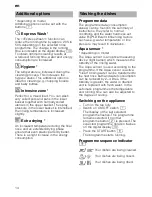
Close the door.

Switch  on  ON/OFF  switch 

(

.

Hold down programme button 

#

 and 

press START button 

`

 until the 

digital display 

)"


:

... is indicated. 

Release both buttons.
The LED for button 

#

 flashes and the 

digital display 

)"

 displays the factory 

setting 

:

‹…

.

Press programme button 

#

 until the 

factory set value 

š

:

‹‹

 is indicated on 

the digital display 

)"

.  

To change the setting,

Press  the  button 

3

 to switch the 

Intensive drying on 

š

:

‹‚

 or off 

š

:

‹‹

.

Press  START  button 

`

.

The set value is saved. 

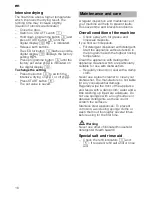
A regular inspection and maintenance of 
your machine will help to prevent faults. 
This saves time and prevents problems.

Overall condition of the machine
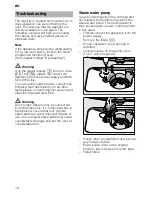
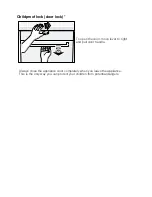
Check spray arm for grease and 
limescale deposits.

If you find such deposits:

Fill detergent dispenser with detergent. 
Start the appliance without utensils in 
the programme with the highest rinsing 
temperature.

Clean the appliance with detergents/
appliance cleaners which are particularly 
suitable for use with dishwashers.

Regularly clean door seal with a damp 
cloth.

Never use a steam cleaner to clean your 
dishwasher. The manufacturer is not liable 
for any consequential damage.
Regularly wipe the front of the appliance 
and fascia with a damp cloth; water and a 
little washing up liquid are adequate. Do 
not use sponges with a rough surface or 
abrasive detergents, as these could 
scratch the surfaces.
Stainless steel appliances: To prevent 
corrosion, avoid using sponge cloths or 
wash them out thoroughly several times 
before using for the first time.

ã=

Warning

Never use other chlorinated household 
detergents! Health hazard!

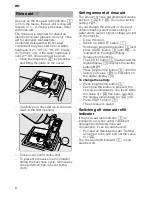
Special salt and rinse aid

Check the refill indicators 

@

 and 

H

. If required, refill salt and/or rinse 

aid.

Maintenance and care

Содержание S66M63N0GB

Страница 1: ...n Operating instructions en 9000 460 404 8908...

Страница 2: ...Start h min 2 1 6 7 8 3 4 5 A B C 10 Reset 3 sec 9 20 21 23 24 26 27 30 22 25 28 29...

Страница 3: ...dditional options 14 Express Wash 14 Hygiene 14 Intensive zone 14 Extra drying 14 Washing the dishes 14 Programme data 14 Aqua sensor 14 Switching on the appliance 14 Programme sequence indicator 14 R...

Страница 4: ...s with sharp points must be placed in the cutlery basket with the points downwards or horizontally on the knife shelf depending on model Children in the household If fitted use the childproof lock An...

Страница 5: ...that the door can no longer be closed Diagrams of the control panel and the interior of the appliance can be found in the envelope at the front Individual positions are referred to in the text Control...

Страница 6: ...mpany will help you with this Set value can be found in the water hardness table Close the door Switch on ON OFF switch Hold down programme button and press START button until is indicated on the digi...

Страница 7: ...component If combined detergents with a salt component are used salt can usually be omitted up to a water hardness of 21 dH 37 fH 26 Clarke 3 7 mmol l If the water hardness is over 21 dH special salt...

Страница 8: ...he factory setting Do not change the amount of rinse aid unless streaks select lower setting or water stains select higher setting are left on the utensils Close the door Switch on ON OFF switch Hold...

Страница 9: ...tensils Take glass and cutlery out of the dishwasher as soon as possible after the programme ends Loading the dishwasher Remove large food remnants It is not necessary to prerinse utensils under runni...

Страница 10: ...tlery basket You should always place cutlery unsorted with the points downwards Folding spikes depending on model The spikes can be folded down to improve arrangement of pans bowls and glasses Small a...

Страница 11: ...acturers helpline Warning Read and observe the safety information and instructions for use on the packaging for cleaning and rinsing agents Adding detergent If the detergent dispenser 1b is still clos...

Страница 12: ...Notes You will obtain optimum rinsing and drying results by using solo detergents and applying salt and rinse aid separately If programmes are short tablets may not have full cleaning effect due to d...

Страница 13: ...ossible additional options Programme sequence pots and pans non sensitive utensils and cutlery very adhesive burned in or dried on food remnants containing starch or protein Intensive 70 all Prerinse...

Страница 14: ...ta consumption values can be found in the summary of instructions They refer to normal conditions and the water hardness set value Different influencing factors such as e g water temperature or line p...

Страница 15: ...ng off the appliance Short time after the end of the programme Switch off ON OFF switch Turn off the tap not applicable if Aqua Stop fitted Remove the utensils when they have cooled down Warning At th...

Страница 16: ...ale deposits If you find such deposits Fill detergent dispenser with detergent Start the appliance without utensils in the programme with the highest rinsing temperature Clean the appliance with deter...

Страница 17: ...d and take out filter system Remove any residue and clean filters under running water Re install filter system in reverse sequence and ensure that the arrow marks are opposite each other after closing...

Страница 18: ...tact customer service and state the indicated fault XX Warning Don t forget Repairs may be carried out by technicians only If a component has to be replaced ensure that only original spare parts are u...

Страница 19: ...tergent residue Detergent residue in the detergent dispenser Dispenser was damp when filled Check water supply display 8 lights up Tap turned off Water supply interrupted Supply hose kinked Filter in...

Страница 20: ...lasses remain milky If phosphate free detergents are used with hard tap water white deposits may be deposited more easily on utensils and the container walls Too little unsuitable detergent Too weak p...

Страница 21: ...ng appliance on delivery Installing the appliance Waste water connection Fresh water connection Electrical connection Safety instructions Install and connect the appliance according to the installatio...

Страница 22: ...d in a fitted kitchen between wooden and plastic walls If the plug is not freely accessible an allpole disconnector with a contact opening of at least 3 mm must be fitted on the installation side to s...

Страница 23: ...f the water supply Disconnect the waste water and fresh water connections Pull out the appliance carefully pulling the hose behind Transportation Empty the dishwasher and secure loose parts Drain the...

Страница 24: ...ied with internationally standardised abbreviations e g PS polystyrene Therefore plastic waste can be sorted out when the appliance is being disposed of Please follow the safety instructions under Del...

Страница 25: ...door lock To open the door move lever to right and pull door handle Always close the appliance door completely when you leave the appliance This is the only way you can protect your children from pot...

Страница 26: ...connection on the tap This liability guarantee is valid for the service life of the appliance If our Aqua Stop system is defective and causes water damage we will make good the damage for private use...

Отзывы: