background image

en

Detergent

16

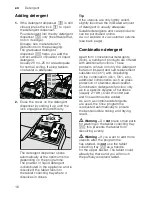
Adding detergent

1.

If the detergent dispenser 

9"

 is still 

closed, press the lock 

9*

 to open 

the detergent dispenser.
Pour detergent into the dry detergent 
dispenser

9"

 only (insert tablet flat, 

not on its edge). 
Dosage: see manufacturer’s 
instructions on the packaging. 
The graduated detergent 
dispenser

9"

 helps you add the 

correct amount of powder or liquid 
detergent.
Usually 20 ml–25 ml are adequate 
for normal soiling. If using tablets, 
one tablet is adequate.

2.

Close the cover on the detergent 
dispenser by sliding it up until the 
lock engages without difficulty.

The detergent dispenser opens 
automatically at the optimum time 
depending on the programme. 
The powder or liquid detergent 
is distributed in the appliance and is 
dissolved, the tablet falls into 
the tablet collecting tray where it 
dissolves in doses.

Tip

If the utensils are only lightly soiled, 
slightly less than the indicated amount 
of detergent is usually adequate. 
Suitable detergents and care products 
can be purchased online 
via our website or via customer service 
(see back page). 

Combination detergent

Apart from conventional detergents 
(Solo), a number of products are offered 
with additional functions. These 
products contain not only the detergent 
but also rinse-aid and salt replacement 
substances (3in1) and, depending 
on the combination (4in1, 5in1, etc.), 
additional components such as glass 
protection or stainless steel cleaner. 
Combination detergents function only 
up to a specific degree of hardness 
(usually 21°dH). Over this limit salt 
and rinse-aid must be added. 
As soon as combined detergents 
are used,  the rinse  programme 
is adjusted automatically to ensure 
the best possible rinsing and drying 
result.

ã

Warning – 

Do 

not

 place small parts 

for washing in the tablet collecting tray 

1B

; this prevents the tablet from 

dissolving evenly.

ã

Warning – 

If you want to add more 

utensils after the programme 
has started, do 

not

 use the tablet 

collecting tray

1B

 as a handle 

for the upper basket. The tablet could 
already be there and you will touch 
the partially dissolved tablet.

PO

PO

PO

Содержание S51T69X3GB

Страница 1: ...HQ 23 5 7 1 16758 7 216 Q 6 6 5...

Страница 2: ...K 6WDUW K K PLQ 5HVHW VHF...

Страница 3: ...ge 12 Loading the dishwasher 12 Unloading the dishwasher 12 Cups and glasses 13 Pans 13 Cutlery drawer 13 Folding spikes 14 Small accessories holder 14 Adjusting the height of the basket 14 Detergent...

Страница 4: ...8 Intended use Intendeduse This appliance is intended for use in the home and the home environment Use the dishwasher only in the household and only for its designed purpose for washing domestic dishe...

Страница 5: ...tor system of the domestic supply has been correctly installed The electrical connection conditions must correspond with the specifications on the dishwasher rating plate 92 If the power cord of this...

Страница 6: ...ged cracks holes broken buttons do not operate the appliance Pull out the mains plug or switch off the fuse Turn off the tap call customer service Disposal 1 Make redundant appliances unusable to prev...

Страница 7: ...s in the mouth throat and eyes or asphyxiation Keep children away from open dishwasher The water in the rinsing compartment is not drinking water and could contain detergent residue Ensure that childr...

Страница 8: ...gtoknow your appli anceDiagrams of the control panel and the interior of the appliance can be found in the envelope at the front Individual positions are referred to in the text Control panel Number d...

Страница 9: ...ut the hardness value of your tap water Your water utility company will help you with this 2 Set value can be found in the water hardness table 3 Open the door 4 Switch on ON OFF switch 5 Hold down pr...

Страница 10: ...used Switching off salt refill indicator water softening systemSw itchingoffw atersofteningsystem If the salt refill indicator H is impaired e g when using combined detergents containing salt compone...

Страница 11: ...button until is indicated on the digital display 4 Release both buttons The LED for button flashes and the digital display 8 displays the factory setting 5 Press programme button until the factory se...

Страница 12: ...cutlery out of the dishwasher as soon as possible after the programme ends Loading the dishwasher 1 Remove large food remnants It is not necessary to prerinse utensils under running water 2 Place the...

Страница 13: ...d on our homepage as a free download The corresponding Internet address can be found on the back page of these instructions for use Cutlery drawer Arrange the cutlery in the cutlery drawer 1 as illust...

Страница 14: ...odel Light weight plastic accessories e g cups lids etc can be held securely in the small accessories holder Adjusting the height of the basket The height of the upper utensils basket 12 can be adjust...

Страница 15: ...ergent according to the degree of soiling Tablets contain an adequately large amount of active ingredients for all cleaning tasks Modern powerful detergents predominantly use a low alkaline formulatio...

Страница 16: ...usually adequate Suitable detergents and care products can be purchased online via our website or via customer service see back page Combination detergent Apart from conventional detergents Solo a num...

Страница 17: ...res one tab only When using washing powder you can apply some of this cleaning agent to the inside of the appliance s door Even if the rinse aid and or salt refill indicator is lit the rinse programme...

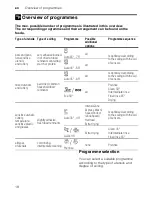
Страница 18: ...ining starch or protein Auto 65 75 all Is optimised according to the soiling with the aid of sensors Auto 45 65 all mixed utensils and cutlery part dried common household food remnants Auto 45 65 all...

Страница 19: ...mption are increased Halfload Half load If you have only a few items to wash e g glasses cups plates you can switch to half load This will save water energy and time It is recommended to put a little...

Страница 20: ...sh water In the automatic programmes the temperature and running time can also be adjusted to the degree of soiling Switching on the appliance 1 Turn on the tap fully 2 Open the door 3 Switch on ON OF...

Страница 21: ...isplayed on the floor only for settings and The running time is determined during the programme by the water temperature the number of utensils as well as the degree of soiling and may vary depending...

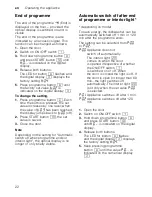
Страница 22: ...when programme ends or interior light the optical display is no longer or only briefly visible Automatic switch off after end of programme or interior light Automaticswitchoff interiorlight depending...

Страница 23: ...ping and causing long term damage to your built in furniture Interrupting the programme 1 Open the door 2 Switch off ON OFF switch The LEDs go out The programme is saved If the door was opened on an a...

Страница 24: ...Check spray arm for grease and limescale deposits If you find such deposits Fill detergent dispenser with detergent Start the appliance without utensils in the programme with the highest rinsing tempe...

Страница 25: ...lustrated and take out filter system 3 Remove any residue and clean filters under running water 4 Re install filter system in reverse sequence and ensure that the arrow marks are opposite each other a...

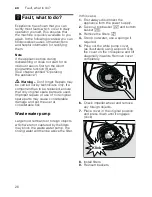
Страница 26: ...ginal spare parts are used Improper repairs or use of non original spare parts may cause considerable damage and put the user at considerable risk Waste water pump Large food remnants or foreign objec...

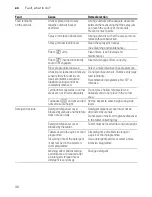
Страница 27: ...eaks Reconnect power supply Switch on the appliance Error code is lit Filters 1Z are soiled or blocked Clean filters See Cleaning and maintenance Error code is lit Waste water hose is blocked or kinke...

Страница 28: ...orfor salt H and or rinse aid P is lit No rinse aid Refill rinse aid No salt Refill with special salt Sensor does not detect salt tablets Use different special salt Refill indicatorfor salt H and or r...

Страница 29: ...g process had not ended yet Wait until program ends or wait until 30 min after program ends before removing utensils The eco rinse aid used has a poor drying performance Usea proprietary rinseaid Eco...

Страница 30: ...emnants Recommended programme Eco 50 or Intensive Tall narrow receptacles in corner areas are not rinsed adequately Do not place hollow receptacles too obliquely and do not place in the corner area To...

Страница 31: ...tensils container or door Detergent substances are deposited Thesecoatingscannot usually be removed with chemicals appliance cleaner Change detergent brand Clean appliance mechanically Hardness range...

Страница 32: ...on weak programme sequence Stubborn soiling cannot be completely removed Do not prerinse utensils Remove only large food remnants Recommended programme Eco 50 Removable streaks on glasses glasses with...

Страница 33: ...t See Terminating the programme Appliance cannot be set hardness final rinse Appliance is in the programme Appliance can be set at the start of the programme only Perform reset see Terminating the pro...

Страница 34: ...dispenser in the tablet collecting tray Top basket presses against inner door and prevents door from being closed securely Check whether rear panel is being pressed in e g by socket or by hose holder...

Страница 35: ...pliance or our customer service Dishwasher Instructions for use Installation instructions Warranty Installation materials Steam guard plate Rubber apron Power cord depending on model Safety instructio...

Страница 36: ...er from flowing out Fresh water connection 1 Connect the fresh water connection to the tap according to the installation instructions with the enclosed parts Ensure that the fresh water connection is...

Страница 37: ...from 220 V to 240 V and 50 Hz or 60 Hz via a correctly installed socket with protective earth conductor See rating plate for required fusing 92 The socket must be near the appliance and freely access...

Страница 38: ...highest temperature The expected programme duration is indicated on the numerical display 8 5 Press START button 6 Close the door Programme sequence starts 7 Open door after approx 4 minutes 8 Press...

Страница 39: ...QJ VKHHW VSUD KHDG DUJH VKHHWV RU JULOOHV DQG SODWHV ZKLFK KDYH D GLDPHWHU JUHDWHU WKDQ FP JRXUPHW SODWHV SDVWD SODWHV GLQQHU SODWHV FDQ EH FOHDQHG ZLWK WKH DLG RI WKH VSUD KHDG 7R GR WKLV UHPRYH WKH...

Страница 40: ...WLRQ RQ WKH WDS 7KLV OLDELOLW JXDUDQWHH LV YDOLG IRU WKH VHUYLFH OLIH RI WKH DSSOLDQFH I RXU TXD 6WRS V VWHP LV GHIHFWLYH DQG FDXVHV ZDWHU GDPDJH ZH ZLOO PDNH JRRG WKH GDPDJH IRU SULYDWH XVHUV 7R HQVX...

Отзывы: