background image

en

24

Installation

The required installation dimensions can 
be found in the installation instructions. 
Level the appliance with the aid of the 
height-adjustable feet. Ensure that the 
appliance is situated securely on the floor.

A built-under or integrated appliance 
which is installed subsequently as a 
free-standing appliance must be 
secured to prevent it from overturning, 
e.g. by screwing it to the wall or by 
installing it under a continuous worktop 
which is screwed to adjacent 
cupboards.

The appliance can easily be installed in 
a fitted kitchen between wooden and 
plastic walls. If the plug is not freely 
accessible, an allpole disconnector 
with a contact opening of at least 3 mm 
must be fitted on the installation side to 
satisfy the relevant safety instructions.  

Waste-water connection

The required work sequence can be 
found in the installation instructions. If 
required, fit a siphon with an drainage 
connection. 

Connect the waste-water hose to the 
drainage connection of the siphon with 
the enclosed parts.
Ensure that the drainage hose is not 
kinked, crushed or twisted and that 
there is no cover plate in the drainage 
to prevent the waste water from flowing 
out!

Fresh water connection

Connect the fresh-water connection to 
the tap according to the installation 
instructions with the enclosed parts.
Ensure that the fresh-water connection 
is not kinked, crushed or twisted.

When replacing the appliance, always 
use a new water supply hose.

Water pressure:

at least 0.05 MPa (0.5 bar), maximum 
1 MPa (10 bar). At a higher water 
pressure: connect pressure-reducing valve 
ahead.

Inlet rate:

minimum 10 litres/minute

Water temperature:

cold water preferred; hot water max. 
temperature 60 °C.

Electrical connection

Connect the appliance to an alternating 
current only, ranging from 220 V to 
240 V and 50 Hz or 60 Hz via 
a correctly installed socket with 
protective earth conductor. See rating 
plate for required fusing 

92

.

The socket must be near the appliance 
and freely accessible following 
installation.

The connection may be modified by 
technicians only.

A power cord extension may be 
purchased from customer service only.

Use only a residual current operated 
circuit-breaker which features the 
symbol 

. Only this extension 

guarantees compliance with the 
currently valid regulations.

The appliance features a water 
damage protection system. Please 
note the system will not function 

unless

 the power supply is connected.

Removing the appliance

Also observe the sequence of worksteps 
here.

Disconnect the appliance from the 
power supply.

Turn off the water supply.

Disconnect the waste water and fresh 
water connections.

Loosen the fastening screws under the 
worktop.

If fitted, remove the base panel.

Pull out the appliance, carefully pulling 
the hose behind.

Содержание S41M50N0GB

Страница 1: ...n Operating instructions en 9000 405 166 8906...

Страница 2: ...Start 2 1 4 5 6 7 8 9 3 A B C 10 Reset 3 sec 20 21 23 24 25 26 27 28 29 30 32 22 31...

Страница 3: ...me selection 14 Information about comparability tests 14 Additional options 15 Express Wash 15 Half load 15 Hygiene 15 Intensive zone 15 Extra drying 15 Washing the dishes 16 Programme data 16 Aqua se...

Страница 4: ...e To prevent injuries e g caused by stumbling open the dishwasher only briefly in order to load and unload the dishwasher Read and observe the safety information and instructions for use on the packag...

Страница 5: ...al Make redundant appliances unusable to prevent subsequent accidents Dispose of the appliance in an environmentally friendly manner Warning Children could become locked in the appliance risk of suffo...

Страница 6: ...y will help you with this Set value can be found in the water hardness table Close the door Switch on ON OFF switch Hold down programme button and press START button P until is indicated on the digita...

Страница 7: ...component If combined detergents with a salt component are used salt can usually be omitted up to a water hardness of 21 dH 37 fH 26 Clarke 3 7 mmol l If the water hardness is over 21 dH special salt...

Страница 8: ...factory setting Do not change the amount of rinse aid unless streaks select lower setting or water stains select higher setting are left on the utensils Close the door Switch on ON OFF switch Hold do...

Страница 9: ...tensils Take glass and cutlery out of the dishwasher as soon as possible after the programme ends Loading the dishwasher Remove large food remnants It is not necessary to prerinse utensils under runni...

Страница 10: ...downwards To prevent injuries place long pointed implements and knives on the knife shelf Folding spikes depending on model The spikes can be folded down to improve arrangement of pans bowls and glas...

Страница 11: ...sket press in the left and then the right lever on the outside of the basket In doing so hold the sides of the basket along the upper edge to prevent it from suddenly dropping To raise the basket hold...

Страница 12: ...questions we recommend that you contact the detergent manufacturers helpline Warning Read and observe the safety information and instructions for use on the packaging for cleaning and rinsing agents A...

Страница 13: ...add more utensils after the programme has started do not use the tablet collecting tray 12 as a handle for the upper basket The tablet could already be there and you will touch the partially dissolve...

Страница 14: ...ditional options Programme sequence pots and pans non sensitive utensils and cutlery very adhesive burned in or dried on food remnants containing starch or protein Intensive 70 all Prerinse Clean 70 I...

Страница 15: ...ed to put a little less detergent in the detergent dispenser than for a full load Hygiene The temperature is increased during the cleaning process This increases the hygiene status This additional opt...

Страница 16: ...running Remaining running time display When the programme is selected the remaining running time of the programme is indicated on the digital display The running time is determined during the program...

Страница 17: ...itch off ON OFF switch Changing the programme When the START button P has been pressed the programme cannot be changed The only way a programme can be changed is by Cancel programme Reset Intensive dr...

Страница 18: ...nges with a rough surface or abrasive detergents as these could scratch the surfaces Stainless steel appliances To prevent corrosion avoid using sponge cloths or wash them out thoroughly several times...

Страница 19: ...er not retained by the filters may block the waste water pump The rinsing water is then not pumped out and covers the filter In this case First disconnect the appliance from the power supply Remove th...

Страница 20: ...has not been inserted The appliance door has not been shut properly changing settings A setting cannot be changed a programme starts Wrong programme button pressed Terminate the programme see chapter...

Страница 21: ...tion is not possible Knocking rattling noise during rinsing Spray arm is striking utensils Utensils not arranged correctly on the utensils Food residue on the utensils Utensils placed too closely toge...

Страница 22: ...aid Activate intensive drying The combined detergent used has a poor drying performance Use rinse aid see Rinse aid chapter for setting If the advice given does not resolve your problem please contac...

Страница 23: ...ratable appliances only under continuous worktops which have been screwed to adjacent cupboards to ensure stability Do not install the appliance near heat sources radiators heat storage tanks cookers...

Страница 24: ...on instructions with the enclosed parts Ensure that the fresh water connection is not kinked crushed or twisted When replacing the appliance always use a new water supply hose Water pressure at least...

Страница 25: ...holiday home empty the appliance completely see Transportation Turn off the tap disconnect supply hose and drain water Both the packaging of new appliances and the old appliances themselves contain va...

Страница 26: ......
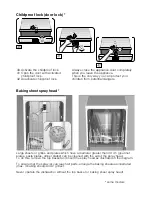
Страница 27: ...g sheet spray head Large sheets or grilles and plates which have a diameter greater than 30 cm gourmet plates pasta plates dinner plates can be cleaned with the aid of the spray head To do this remove...

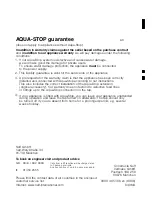
Страница 28: ...connection on the tap This liability guarantee is valid for the service life of the appliance If our Aqua Stop system is defective and causes water damage we will make good the damage for private use...

Отзывы: