NEFF N24ZA11G1 Скачать руководство пользователя страница 4

en 

Installation instructions

4

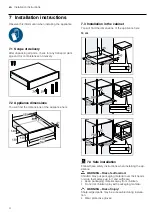
7  Installation instructions

Observe this information when installing the appliance.

7.1 Scope of delivery

After unpacking all parts, check for any transport dam-

age and for completeness of delivery.

7.2 Appliance dimensions

You will find the dimensions of the appliance here

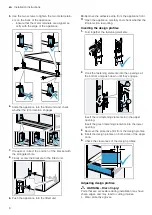
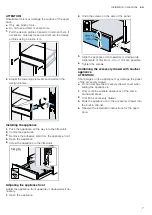
7.3 Installation in the cabinet

You will find the dimensions of the appliance here

14 cm

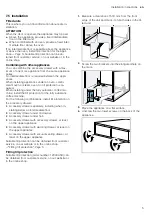
 7.4 Safe installation

Follow these safety instructions when installing the ap-

pliance.

WARNING ‒ Risk of suffocation!

Children may put packaging material over their heads

or wrap themselves up in it and suffocate.

Keep packaging material away from children.

Do not let children play with packaging material.

WARNING ‒ Risk of injury!

Sharp-edged parts may be accessible during installa-

tion.

Wear protective gloves.

Содержание N24ZA11G1

Страница 1: ...Accessory drawer User manual and installation instructions N24ZA11G1...

Страница 2: ...dangers Do not let children play with the appliance Children must not perform cleaning or user maintenance unless they are at least 15 years old and are being supervised Keep children under the age of...

Страница 3: ...gents such as washing up liquid and water 3 Dry with a soft cloth 4 Place the silicone mat into the dried appliance 5 3 Cleaning the stainless steel surfaces 1 Always remove limescale grease starch or...

Страница 4: ...here 7 3 Installation in the cabinet You will find the dimensions of the appliance here 14 cm 7 4 Safe installation Follow these safety instructions when installing the ap pliance WARNING Risk of suff...

Страница 5: ...he fully automatic coffee ma chine install the tilt protection for the fully automatic coffee machine For the following combinations install tilt protection on the accessory drawer Accessory drawer se...

Страница 6: ...e front 11 Open the appliance carefully and check whether the tilt protection is working Inserting the design profiles 1 Fold together the fastening elements 2 Hook the fastening elements into the ope...

Страница 7: ...e appliance to the fitted unit Adjusting the appliance front Adjust the appliance front upwards or downwards if ne cessary 1 Open the appliance 2 Undo the screws on the side of the panel 3 Align the a...

Страница 8: ...er te GmbH Carl Wery Stra e 34 81739 M nchen GERMANY 9001778135 9001778135 030605 en Valid within Great Britain Imported to Great Britain by BSH Home Appliances Ltd Grand Union House Old Wolverton Roa...

Отзывы: