background image

en 

Accessories

10

Microwave power
setting in watts

Maximum cooking
time in hours

Use

180 W

1:30

Defrost food and continue cooking.

360 W

1:30

Cook fish and meat. Heat up delicate foods.

600 W

1:30

Heat and cook food.

Max.

0:30

Heat liquids.

Note: 

The maximum microwave power setting is not

designed for heating food. To protect the appliance,
the maximum power of the microwave is gradually re-
duced to 600 watts during the first few minutes. Full
power is made available again after a cooling period.

4.7 Cooking compartment

The functions in the cooking compartment make your
appliance easier to use.

Shelf supports

The rails in the cooking compartment enable you to
place accessories at different heights.
→ 

"Accessories", Page 10

Your appliance has three shelf positions. The shelf pos-
itions are numbered from bottom to top.
You can remove the rails, e.g. for cleaning. 
→ 

"Rails", Page 20

Lighting

One or more oven lights illuminate the cooking com-
partment.
When you open the appliance door, the light in the
cooking compartment switches on. If the appliance
door remains open for longer than 15 minutes, the light
switches off again.
For most operating modes, the lighting is switched on
during operation. The lighting switches off again when
the operation ends.

Cooling fan

The cooling fan switches on and off depending on the
appliance's temperature. The hot air escapes above
the door.

ATTENTION!

Do not cover the ventilation slot above the appliance
door. The appliance overheats.

Ensure that the ventilation slots are unobstructed.

To ensure that the appliance cools down more quickly
after operation, the cooling fan continues to run for a
certain period afterwards.

Appliance door

If you open the appliance door during operation, the
operation stops. When you close the appliance door,
the operation continues automatically.
In microwave mode, when you close the appliance
door, you have to press   to continue.

5  Accessories

Use original accessories. These have been made espe-
cially for your appliance.

Note: 

Accessories may become deformed if they get

hot. Deformation has no effect on function. As the ac-
cessory cools down, it will regain its original shape.
The accessories supplied may differ depending on the
appliance model.

Accessories

Use

Wire rack

¡

Cake tins

¡

Ovenproof dishes

¡

Cookware

¡

Meat, e.g. roasting joints or steak

¡

Frozen meals

Universal pan

¡

Moist cakes

¡

Baked items

¡

Bread

¡

Large roasts

¡

Frozen meals

¡

Catch dripping liquids, e.g. fat when
grilling food on the wire rack.

Содержание C17MR02G0

Страница 1: ...Oven en User manual and installation instructions C17MR02G0...

Страница 2: ...use and similar applications such as In kitchens for employees in shops offices and other commercial sec tors in agriculture by customers in hotels and other residential facilities in bed and breakfas...

Страница 3: ...this may create hot steam Never pour water into the cooking compart ment when the cooking compartment is hot WARNING Risk of injury Scratched glass in the appliance door may develop into a crack Do no...

Страница 4: ...y food Never defrost or heat food with a low water content such as bread at too high a mi crowave power or for too long Cooking oil may catch fire Never use the microwave to heat cooking oil on its ow...

Страница 5: ...electric shock The appliance uses a high voltage Never remove the casing WARNING Risk of serious harm to health Inadequate cleaning may destroy the surface of the appliance reduce its service life an...

Страница 6: ...t be kept at least 2 cm from the cooking compartment walls and the inside of the door Using accessories directly on top of one another causes sparks Do not combine the wire rack with the universal pan...

Страница 7: ...the cooking time ends There will be enough residual heat to finish cooking the dish Remove any accessories that are not being used from the cooking compartment Accessories that are not being used do n...

Страница 8: ...etting options childproof lock Set the timer cooking time or Ready at time for delayed starts Activate or deactivate the childproof lock Information View additional information View the current temper...

Страница 9: ...oast poultry whole fish or larger pieces of meat The grill element and the fan switch on and off alternately The fan circulates the hot air around the food Grill large area 50 290 C For grilling flat...

Страница 10: ...operating modes the lighting is switched on during operation The lighting switches off again when the operation ends Cooling fan The cooling fan switches on and off depending on the appliance s temper...

Страница 11: ...nce to another When purchasing accessories always quote the exact product number E no of your appliance You can find out which accessories are available for your appliance in our online shop or from o...

Страница 12: ...food is ready press to switch the appli ance off 7 5 Changing the temperature You can also change the temperature once you have started the appliance 1 Use the or button to select the temperature row...

Страница 13: ...ng function Setting the cooking time 1 Set a heating function and a temperature 2 Press 3 Select the default value Button Default value 10 minutes 30 minutes 4 Use the or button to select the required...

Страница 14: ...e Baking trays e g the uni versal pan or the baking tray may create sparks and are not suitable Not microwave safe Note Observe the specifications for preventing mater ial damage Microwave Page 6 Cook...

Страница 15: ...operation stops When you close the appliance door you must press to continue the operation If you have changed the basic setting for this make sure that the microwave does not resume operation withou...

Страница 16: ...wave combina tion 3 Use to navigate to the next row 4 Use or to select the temperature 5 Use to navigate to the next row 6 Use or to select the cooking time 7 Use to start the microwave combination 10...

Страница 17: ...on 1 Press 2 Use the or button to select Settings 3 Use the button to navigate to the next row 4 Use the or button to select Automatic childproof lock 5 Use the button to select the required settings...

Страница 18: ...ration Off during operation Auto resume When you close the door No auto resume Automatic childproof lock Deactivated Activated Operation after switch on Main menu Types of heating Microwave Microwave...

Страница 19: ...nly use cleaning agents that are suitable for the differ ent surfaces on your appliance Follow the instructions on cleaning the appliance Cleaning the appliance Page 20 Appliance front Surface Suitabl...

Страница 20: ...r safe 14 2 Cleaning the appliance In order to avoid damaging the appliance you must clean your appliance only as specified and with suit able cleaning products WARNING Risk of burns The appliance and...

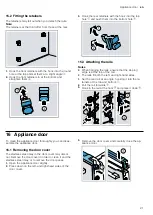
Страница 21: ...oping edge is at the top of the rail The rails fit both the left and right hand sides 1 Set the rear rail at an angle hooking it into the re tainers at the top and bottom 2 Pull the rail forwards 3 Ho...

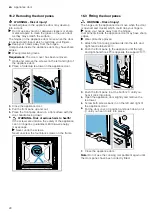
Страница 22: ...If the screws are undone the safety of the appliance can no longer be guaranteed Microwave energy may escape Never undo the screws Never unscrew the four black screws on the frame 16 3 Fitting the do...

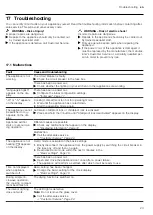
Страница 23: ...too hot for operating mode 1 Wait until the appliance has cooled down 2 Start the operating mode again The appliance cannot be switched on appears on the dis play Automatic childproof lock or childpr...

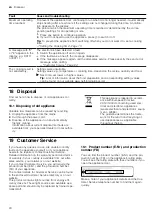
Страница 24: ...e reused by recycling 1 Unplug the appliance from the mains 2 Cut through the power cord 3 Dispose of the appliance in an environmentally friendly manner Information about current disposal methods are...

Страница 25: ...can only cook on one level 20 3 Roasting braising and grilling tips The recommended settings are for fridge temperat ure food and unstuffed oven ready poultry Place the poultry onto the cookware breas...

Страница 26: ...d 1 3 tablespoons of water or lemon juice to the food Spread the food out so that as much of it as pos sible is in contact with the bottom of the cookware Food that is in contact with the bottom will...

Страница 27: ...ray Pizza tray 1 230 240 20 30 Quiche Tart dish or tin Black tray 1 190 210 35 50 Tarte flamb e Universal pan 1 190 210 1 15 25 Bake savoury cooked ingredients Ovenproof dish 1 170 190 40 55 Bake savo...

Страница 28: ...w the instructions on the packaging Always use oven gloves to remove the dishes from the cooking compartment 1 Use shallow heat resistant glass cookware e g the lid of an ovenproof dish Do not use por...

Страница 29: ...recommended settings are for freezer temperat ure food 18 C Defrosting works best if you divide it into more than one step The steps are listed one after the other in the recommended settings tables S...

Страница 30: ...t the liquid reaches boiling tem perature without the usual steam bubbles rising to the surface Even if the container only vibrates a little the hot liquid may suddenly boil over and spatter Always pl...

Страница 31: ...e Shelf positions when baking on 2 levels Universal pan Shelf position 3 Baking tray Shelf position 1 Hot water sponge cake When baking on two levels place the springform tins at diagonally opposite c...

Страница 32: ...ation of the appliance The installation cabinet must not have a back panel behind the appliance There should be a gap of at least 35 mm between the wall and the cabinet base as well as the rear panel...

Страница 33: ...g the installation WARNING Risk of fire It is dangerous to use an extended power cord and non approved adapters Do not use extension cables or multiple socket strips If the power cord is too short con...

Страница 34: ...unit Observe the installation dimensions and the installation instructions when installing in a tall unit To ventilate the appliance the intermediate floors must have a ventilation cut out In order t...

Страница 35: ...to a pro tective contact socket that has been correctly installed Insert the plug into the protective contact socket When the appliance is installed the mains plug of the power cord must be freely ac...

Страница 36: ...screws at the top left and right Note The gap between the worktop and the appliance must not be closed by additional battens Thermal insulation strips must not be fitted to the side panels of the sur...

Страница 37: ......

Страница 38: ......

Страница 39: ......

Страница 40: ...Wery Stra e 34 81739 M nchen GERMANY 9001621064 9001621064 010507 en Valid within Great Britain Imported to Great Britain by BSH Home Appliances Ltd Grand Union House Old Wolverton Road Wolverton Mil...

Отзывы: