background image

Appliance door    

en

35

12.

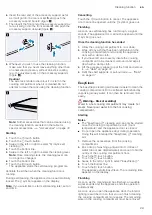
Clean the glass door panels and reflectors on both 

sides with glass cleaner and a soft cloth.

:

Warning

Risk of injury! 

Scratched glass in the appliance door may develop 

into a crack. Do not use glass scrapers, sharp or 

abrasive cleaning aids or aggressive or abrasive 

cleaning products.

Caution!

Make sure you do not damage the lighting. Do not 

clean or touch either of the LEDs 

.The two LEDs 

are on the right and left in the appliance door.

13.

Dry the door panels and refit them.

Fitting

Note: 

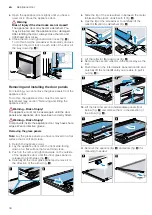
When fitting the door panels, make sure that they 

are in the original order.

1.

Insert the intermediate panel so that the 

 arrow on 

the right-hand side is pointing upwards (Fig. 

!

).

2.

Check the fit of the four spacers and two seals on 

the intermediate panel:

– Position the spacers so that each of the lines 

runs through the centre (Fig. 

"

).

– Attach the seals at the corners (Fig. 

#

).

3.

Insert the intermediate panel with the seals and 

spacers. The arrow on the intermediate panel must 

line up with the arrow on the frame (Fig. 

$

).

4.

Insert the second intermediate panel without the 

seals and spacers and push it in the direction of the 

arrow until it is fitted in the frame. The arrow on the 

intermediate panel must line up with the arrow on the 

frame (Fig. 

%

).

5.

Push down on the intermediate panel around 

ƒ

, slide 

the holder 

 in at an angle and push down until it 

clicks into place (Fig. 

&

).

The holder has been inserted (Fig. 

'

).

Caution!

Do not touch the glass rod with your bare hands. 

Greasy residues reduce light transmission. Clean the 

glass rod with glass cleaner once it has been 

inserted.

6.

Select the left-hand reflector (Fig. 

(

).

7.

Insert the left-hand reflector 

 at the top (Fig. 

)

).

8.

Insert reflector 

 (Fig. 

*

).

9.

Fit reflector 

 into slot 

 (Fig. 

+

).

D

1

D

2

F

E

G

G

H


G

G

H

Содержание B56VT64 0 Series

Страница 1: ...en INSTRUCTION MANUAL BUILT IN OVEN B56VT64 0...

Страница 2: ......

Страница 3: ...ing 17 Reheating 18 Filling the water tank 18 After every steam operation 19 O Time setting options 20 Showing and hiding the time setting options 20 Setting the timer 20 Setting the cooking time 21 S...

Страница 4: ...r damage after unpacking it Do not connect the appliance if it has been damaged in transport Only a licensed professional may connect appliances without plugs Damage caused by incorrect connection is...

Страница 5: ...during operation Never touch the hot parts Keep children at a safe distance Risk of scalding When you open the appliance door hot steam can escape Steam may not be visible depending on its temperature...

Страница 6: ...pliance Keep children away from the appliance Risk of fire If the door seal is damaged a large amount of heat will be generated around the door Do not scrub or remove the seal Never operate the applia...

Страница 7: ...cannot be removed If possible use the deeper universal pan Extremely dirty seal If the seal is very dirty the appliance door will no longer close properly during operation The fronts of adjacent unit...

Страница 8: ...ment Open the appliance door as infrequently as possible when the appliance is in use It is best to bake several cakes one after the other The cooking compartment stays warm This reduces the baking ti...

Страница 9: ...ullTouch TFT display 0 Touch buttons Touch button Use on off Switching the appliance on or off Switching the appliance on and off on page 15 Steam assisted cook ing Switching on steam assisted cooking...

Страница 10: ...r traditional baking and roasting on one level Especially suitable for cakes with moist toppings Heat is emitted evenly from the top and bottom Circo roasting 50 250 C For roasting poultry whole fish...

Страница 11: ...the cooling fan continues to run for a certain period afterwards Note You can change how long the cooling fan continues to run for in the basic settings Basic settings on page 22 Water tank The applia...

Страница 12: ...to get burnt when they are pulled out The accessories can be pulled out approximately halfway without tipping You can use the pull out rails to pull the accessories out further Ensure that the access...

Страница 13: ...ccessories from the after sales service and specialist retailers or on the Internet You will find a comprehensive range of products for your appliance in our brochures and on the Internet Both availab...

Страница 14: ...ardness range to 4 very hard If you use mineral water you must only use non carbonated mineral water Initial use As soon as the appliance is connected to the power supply the first setting Language ap...

Страница 15: ...nt about the controls and how they work Now we will explain how to set your appliance You will learn about what happens when you switch the appliance on and off and how to select the operating mode Sw...

Страница 16: ...Operating modes such as the cleaning function cannot be cancelled Heating up the appliance quickly You can use the Rapid heat up and PowerBoost functions to reduce the preheat time Whether the applian...

Страница 17: ...2 Fill the water tank 3 Set the type of heating and temperature 4 Touch the touch button to switch on steam assistance 5 On the display swipe to the left or right to select the steam intensity 6 Touc...

Страница 18: ...ing Risk of injury and risk of fire Only fill the water tank with water or with the descaling solution that is recommended by us Do not pour any flammable liquids e g alcoholic drinks into the water t...

Страница 19: ...during operation Allow the appliance to cool down before cleaning Caution Enamel damage Do not start any operations when there is water on the cooking compartment floor Before operation wipe away the...

Страница 20: ...our so that the cooking compartment dries completely OTime setting options Time settingoptionsYour appliance has different time setting options Note If you have set a time setting option the time inte...

Страница 21: ...wipe to the left or right in the touch display to change the settings To delete a time setting option set The setting is applied automatically AChildproof lock ChildprooflockYour appliance is equipped...

Страница 22: ...ch button 3 Swipe to the left or right to select MyProfile 4 4 Touch the bottom line 5 Swipe to the left or right to select the required setting 6 Touch the bottom line 7 Swipe to the left or right to...

Страница 23: ...ype of heating for you It suggests a suitable temperature and cooking time which you can change if you wish Information is provided e g on cookware shelf position or the addition of liquid when cookin...

Страница 24: ...ight of your food The program then applies the most suitable settings To achieve good results the cooking compartment must not be too hot for the type of food you have selected If it is a message will...

Страница 25: ...up time depends on the temperature of the food and the water amongst other things As soon as the cooking time has elapsed an audible signal sounds and the appliance ends the operation automatically T...

Страница 26: ...ents To ensure that the different surfaces are not damaged by using the wrong cleaning agent observe the information in the table Depending on the appliance model not all of the areas listed may be on...

Страница 27: ...dish cloth and then dry with a soft cloth Soften baked on food remnants with a damp cloth and soapy water Use stainless steel wire wool or oven cleaner to remove stubborn dirt Caution Never use oven...

Страница 28: ...me Preparation Warning Risk of fire Loose food residues grease and meat juices may catch fire during the cleaning function Before starting the cleaning function remove coarse dirt from the cooking com...

Страница 29: ...ed until the 5 symbol goes out Once the cleaning function has ended 1 Allow the cooking compartment to cool down 2 Wipe off any ash that has been left behind in the cooking compartment and around the...

Страница 30: ...nd dry the water tank If the descaling process is interrupted for example due to a power failure or because the appliance has been switched off you are prompted to rinse the appliance twice after it i...

Страница 31: ...ilsWith good care and cleaning your appliance will retain its appearance and remain fully functional for a long time to come This will tell you how to remove the shelves and clean them Changing the sh...

Страница 32: ...also rests against the cooking compartment wall here and press it downwards figure qAppliance door AppliancedoorWith good care and cleaning your appliance will retain its appearance and remain fully...

Страница 33: ...ay break off Do not carry the appliance door by the door handle To carry or remove the appliance door take hold of it with both hands one on the left and one on the right 5 Take hold of the appliance...

Страница 34: ...ance door may have sharp edges Wear protective gloves Removing the glass panels Note Lay the glass panels you have removed on a flat surface that is soft and clean 1 Detach the appliance door 2 Lay th...

Страница 35: ...Position the spacers so that each of the lines runs through the centre Fig Attach the seals at the corners Fig 3 Insert the intermediate panel with the seals and spacers The arrow on the intermediate...

Страница 36: ...iance from the power supply when work is carried out on the electronics Switch off the circuit breaker or remove the fuse from your household fuse box I I Fault Possible cause Notes remedy The applian...

Страница 37: ...appliance to the power supply Power cut Check whether other kitchen appliances are working The circuit breaker is faulty Check in the fuse box to make sure that the fuse for the appliance is OK Fault...

Страница 38: ...ry energy efficient and radiates very little heat to its surroundings during operation Due to the high difference in temperature between the appliance interior and the external parts of the appliance...

Страница 39: ...baking tins ceramic dishes and glass dishes extend baking time and mean that the baked item will not brown evenly If you wish to bake using these baking tins dishes and using top bottom heating slide...

Страница 40: ...in 28 cm 2 150 160 2 25 35 Sponge base 2 eggs Flan base tin 3 160 180 20 30 Sponge base 2 eggs Flan base tin 2 150 160 1 20 35 Sponge flan 3 eggs Springform cake tin 26 cm 2 160 170 25 35 Sponge flan...

Страница 41: ...ls Universal pan baking tray 3 1 150 170 25 40 Puff pastry Baking tray 3 170 190 20 35 Puff pastry Baking tray 3 200 220 1 15 25 Puff pastry 2 levels Universal pan baking tray 3 1 170 190 20 45 Puff p...

Страница 42: ...to expand well and brown on all sides The cake is too dry Set the temperature 10 C higher and shorten the baking time The cake is generally too light in col our If the shelf position and the cookware...

Страница 43: ...optimal heating type for various kinds of bread and bread roll The temperature and baking time depend on the amount and consistency of the dough mixture For this reason the table specifies setting ran...

Страница 44: ...an 3 220 230 3 20 30 Bread rolls Part cooked rolls or baguette pre baked Universal pan 3 180 200 10 15 Part cooked rolls or baguette pre baked Baking tray 3 200 220 2 10 20 Bread rolls sweet fresh Bak...

Страница 45: ...resistant to heat and steam for use in steam assisted baking Greaseproof paper Only use greaseproof paper that is suitable for the selected temperature Always cut greaseproof paper to size Frozen pro...

Страница 46: ...team assisted cooking Recommended setting values In the table you can find the ideal heating type for various bakes and souffl s The temperature and cooking time are dependent on the quantity of food...

Страница 47: ...also result in less smoke and ensure that the cooking compartment stays cleaner Roasting in cookware Only use cookware which is suitable for use in an oven Check whether the cookware fits in the cook...

Страница 48: ...ion and temperature of the food Setting ranges are indicated for this reason Try using the lower values at first You can increase the temperature next time if necessary The setting values are based on...

Страница 49: ...ookware which is suitable for use in an oven Check whether the cookware fits in the cooking compartment Glass cookware is most suitable Place hot glass cookware onto a dry mat after cooking If the sur...

Страница 50: ...r with the slanted edge facing the appliance door Any dripping fat will be caught When grilling try wherever possible to use pieces of food which are of a similar thickness and weight This will allow...

Страница 51: ...Wire rack 4 275 16 20 Pork medallions 3 cm thick Wire rack 4 290 10 14 Beef Fillet of beef medium 1 kg Wire rack 2 210 220 40 50 Fillet of beef medium 1 kg Cookware uncovered 2 190 200 1 50 60 Pot ro...

Страница 52: ...g dishes made from stainless steel or aluminium reflect heat like a mirror and are therefore not particularly suitable The fish cooks more slowly and browns less Use a higher temperature and or a long...

Страница 53: ...definitely use the lower temperature If cooking several fish you should use the weight of the heaviest fish as a reference for determining the cooking time The individual fish should be approximately...

Страница 54: ...ning You can use a higher setting next time if necessary The setting values apply to dishes placed into a cold cooking compartment If you preheat the oven the indicated cooking times will be reduced b...

Страница 55: ...ins and dishes on the wire rack Universal pan or baking tray Slide the universal pan or the baking tray in carefully as far as the limit stop with the bevelled edge facing the appliance door Baking ti...

Страница 56: ...3 250 275 15 20 Bread rolls sweet fresh Baking tray 3 170 190 15 20 Bread rolls fresh Baking tray 3 180 200 20 30 Meat Joint of pork without rind e g neck 1 5 kg Cookware uncovered 2 180 190 120 140...

Страница 57: ...nly start operation when the cooking compartment has fully cooled down Allow the cooking compartment to warm up for approx 15 minutes with the cookware inside Sear the meat on the hotplate at a very h...

Страница 58: ...s in the table as a reference Type of heating used CircoTherm Preserving You can preserve fruit and vegetables using your appliance Warning Risk of injury If the food is preserved incorrectly the pres...

Страница 59: ...average values for preserving fruit and vegetables They may be influenced by room temperature the number of jars quantity heat and quality of the jar contents The specifications are based on 1 litre r...

Страница 60: ...y defrosted from the cooking compartment Leave the defrosted food to rest for another 10 to 30 minutes in the appliance whilst it is switched off so that the temperature balances out Type of heating u...

Страница 61: ...his is indicated in the table Remove unused accessories from the cooking compartment This will allow you to achieve ideal cooking results and save energy Type of heating used Reheat Keeping warm You c...

Страница 62: ...bles about preheating The setting values are valid without rapid heating up For baking use the lower of the indicated temperatures first Types of heating used CircoTherm Top bottom heating Circotherm...

Страница 63: ...ht and the cooking compartment stays cleaner Type of heating used Full surface grill Dish Accessories Shelf posi tion Type of heating Tempera ture in C Cooking time in mins Grilling Toasting bread Wir...

Страница 64: ...9001331664 9001331664 980720 en...

Отзывы: