background image

English

3

WIFICDPC10xx
Indoor doorbell for Wi-Fi video 

doorphone
Description

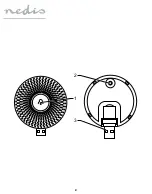
1.  Status indicator

2.  Pairing button 

Reset button

3.  USB plug (power)

Safety

•  To reduce risk of electric shock, this product should 

only be opened by an authorized technician when 

service is required.

•  Disconnect the product from the mains and other 

equipment if a problem should occur.

•  Read the manual carefully before use. Keep the 

manual for future reference.

•  Only use the device for its intended purposes. Do not 

use the device for other purposes than described in 

the manual.

•  Do not use the device if any part is damaged or 

defective. If the device is damaged or defective, 

replace the device immediately.

Use

1.  Power the doorbell using a USB adapter (not 

included) close to the video doorphone. After 

installation, you can relocate the doorbell.

2.  Open the app “Nedis SmartLife” on your mobile 

device.

3.  Tap the video doorphone to open the interface.

4.  Open the menu by clicking the button in the top 

right corner.

5.  Open “Ring settings” in the menu to add the indoor 

doorbell.

6.  Press the pairing button (on each doorbell to be 

connected). The status indicator starts flashing.

7.  Tap “Add” in the app. The status indicator stops 

flashing. You can set the ringtone and the volume.

8.  Test the device by pressing the doorbell button on 

the video doorphone.

9.  Relocate and power the doorbell anywhere else 

within a range of 50 m from the video doorphone.

Cleaning and maintenance

Warning!

•  Do not use cleaning solvents or abrasives.

•  Do not clean the inside of the device.

•  Do not attempt to repair the device. If the device 

does not operate correctly, replace it with a new 

device.

•  Clean the outside of the device using a soft, damp 

cloth.

Support

If you need further help or have comments or 

suggestions please visit www.nedis.com/support

Contact

NEDIS B.V., De Tweeling 28, 5215 MC ‘s-Hertogenbosch, 

The Netherlands

Содержание WIFICDP10 Series

Страница 1: ...ng DE Guía de inicio rápido ES Guide de démarrage rapide FR Guida rapida IT Guia de iniciação rápida PT Hurtigstartsguide DA Hurtigstartsguide NO Snabbstartsguide SV Pikaopas FI Γρήγορος οδηγός EL Krótki przewodnik PL Rychlá příručka CS Gyors útmutató HU Ghid rapid RO Hızlı başlangıç kılavuzu TR Lühike juhend LV ...

Страница 2: ...2 2 3 1 ...

Страница 3: ...pp Nedis SmartLife on your mobile device 3 Tap the video doorphone to open the interface 4 Open the menu by clicking the button in the top right corner 5 Open Ring settings in the menu to add the indoor doorbell 6 Press the pairing button on each doorbell to be connected The status indicator starts flashing 7 Tap Add in the app The status indicator stops flashing You can set the ringtone and the v...

Страница 4: ... Open de Nedis SmartLife app op uw mobiele apparaat 3 Tik op de videodeurtelefoon om de interface te openen 4 Open het menu door op de knop in de rechterbovenhoek te klikken 5 Open Ring settings in het menu om de binnendeurbel toe te voegen 6 Druk op de koppelingsknop op iedere deurbel die moet worden aangesloten De statusindicator begint te knipperen 7 Tik op Add in de app De statusindicator topt...

Страница 5: ... Sie die App Nedis SmartLife auf Ihrem mobilen Gerät 3 Tippen Sie auf die Video Türsprechanlage um die Schnittstelle zu öffnen 4 Öffnen Sie das Menü indem Sie auf die Schaltfläche in der rechten oberen Ecke klicken 5 Öffnen Sie Ring settings im Menü um die Türklingel für den Innenbereich hinzuzufügen 6 Drücken Sie die Kopplungstaste an jeder anzuschließenden Türklingel Die Statusanzeige beginnt zu...

Страница 6: ...ra la aplicación Nedis SmartLife en su dispositivo móvil 3 Toque el videoportero para abrir la interfaz 4 Abra el menú haciendo clic en el botón en la esquina superior derecha 5 Abra Ring settings en el menú para agregar el timbre interior 6 Pulse el botón de emparejamiento en cada timbre que va a conectarse El indicador de estado empieza a parpadear 7 Toque Add en la aplicación El indicador de es...

Страница 7: ...onnette 2 Ouvrez l app Nedis SmartLife sur votre dispositif mobile 3 Touchez le système de vidéophonie pour ouvrir l interface 4 Ouvrez le menu en cliquant sur le bouton du coin supérieur droit 5 Ouvrez Ring settings dans le menu pour ajouter la sonnette de la porte d entrée 6 Appuyez sur le bouton d appariement sur chaque sonnette à connecter L indicateur d état commence à clignoter 7 Touchez Add...

Страница 8: ...posizionare il campanello 2 Aprire l app Nedis SmartLife sul dispositivo mobile 3 Toccare il videocitofono per aprire l interfaccia 4 Aprire il menu facendo clic sul pulsante nell angolo destro 5 Aprire Ring settings nel menu per aggiungere il campanello da interni 6 Premere il pulsante di accoppiamento su ogni campanello da collegare L indicatore di stato inizia a lampeggiare 7 Toccare Add nell a...

Страница 9: ...s a instalação pode reposicionar a campainha 2 Abra a aplicação Nedis SmartLife no seu telemóvel 3 Toque no videoporteiro para abrir a interface 4 Abra o menu clicando no botão no canto superior direito 5 Abra Ring settings no menu para adicionar a campainha de interior 6 Prima o botão de emparelhamento em cada campainha para ativação O indicador de estado começa a piscar 7 Toque em Add na aplicaç...

Страница 10: ... på din mobile enhed 3 Prik på video dørtelefonen for at åbne grænsefladen 4 Åbn menuen ved at klikke på knappen i øverste højre hjørne 5 Åbn Ring settings i menuen for at tilføje den indendørs dørklokke 6 Tryk på parringsknappen for hver dørklokke der skal tilsluttes Statusindikatoren begynder at blinke 7 Prik på Add i appen Statusindikator holder op med at blinke Man kan indstille ringetonen og ...

Страница 11: ... 2 Åpne appen Nedis SmartLife på mobilenheten din 3 Trykk på dørtelefonen for å åpne grensesnittet 4 Åpne menyen ved å trykke på knappen øverst i høyre hjørne 5 Åpne Ring settings i menyen for å legge til dørklokken 6 Trykk på parkoblingsknappen på hver enkelt dørklokke som skal kobles til Statusindikatoren begynner å blinke 7 Trykk på Add i appen Statusindikatoren stopper å blinke Du kan stille i...

Страница 12: ...förflytta ringklockan 2 Öppna appen Nedis SmartLife på din mobila enhet 3 Peka på portövervakning för att öppna gränssnittet 4 Öppna menyn genom att klicka på knappen i det övre högra hörnet 5 Öppna Ring settings för att lägga till inomhusringklockan 6 Tryck på parningsknappen på varje ringklocka som ska anslutas Statusindikatorn börjar blinka 7 Peka på Add i appen Statusindikatorn slutar blinka D...

Страница 13: ...le 2 Avaa Nedis SmartLife sovellus mobiililaitteessasi 3 Avaa käyttöliittymä napauttamalla video ovipuhelinta 4 Avaa valikko napsauttamalla painiketta oikeassa yläkulmassa 5 Avaa valikossa Ring settings lisätäksesi sisäoven ovikellon 6 Paina laiteparin muodostuspainiketta kussakin liitettävässä ovikellossa Tila merkkivalo alkaa vilkkua 7 Napauta Add sovelluksessa Tila merkkivalo lopettaa vilkkumis...

Страница 14: ...τε την εφαρμογή Nedis SmartLife στη φορητή σας συσκευή 3 Πατήστε τη θυροτηλεόραση για να ανοίξετε το περιβάλλον εργασίας 4 Ανοίξτε το μενού επιλέγοντας το κουμπί στην πάνω δεξιά γωνία 5 Επιλέξτε Ring settings στο μενού για να προσθέσετε το εσωτερικό κουδούνι θύρας 6 Πιέστε το κουμπί ζεύξης σε κάθε κουδούνι προς σύνδεση Η ένδειξη κατάστασης αρχίζει να αναβοσβήνει 7 Πατήστε Add στην εφαρμογή Η ένδει...

Страница 15: ... pobliżu wideofonu Po montażu można zmienić lokalizację dzwonka do drzwi 2 Uruchomić aplikację Nedis SmartLife na urządzeniu przenośnym 3 Puknij wideofon aby otworzyć interfejs 4 Otwórz menu klikając przycisk w prawym górnym rogu 5 Otwórz Ring petting w menu aby dodać wewnętrzny dzwonek do drzwi 6 Naciśnij przycisk parowania na każdym dzwonku który ma być podłączony Wskaźnik stanu zaczyna migać 7 ...

Страница 16: ...lním telefonu zapněte aplikaci Nedis SmartLife 3 Pro otevření rozhraní klepněte na video komunikátor 4 Kliknutím na tlačítko v pravém horním rohu otevřete nabídku 5 Pro přidání nového zvonku otevřete nabídce položku Ring settings 6 Stiskněte tlačítko párování na každém zvonku který chcete připojit Indikátor stavu začne blikat 7 V aplikaci klepněte na položku Add Indikátor stavu přestane blikat Můž...

Страница 17: ...st a mobilkészülékén 3 Koppintson a video kaputelefonra hogy megnyithassa az interfészt 4 Nyissa meg a menüt úgy hogy a jobb felső sarokban található gombra kattint 5 Nyissa meg a Ring settings opciót a menüben hogy hozzáadhassa a beltéri csengőt 6 Nyomja meg a párosítás gombját minden ajtócsengőn amelyet szeretne csatlakoztatni Az állapotjelző villogni kezd 7 Koppintson az Add opcióra az alkalmaz...

Страница 18: ...deți aplicația Nedis SmartLife pe dispozitivul mobil 3 Atingeți videofonul de acces imobil pentru a deschide interfața 4 Deschideți meniul prin clic pe butonul din colțul dreapta sus 5 Deschideți Ring settings din meniu și adăugați soneria de interior 6 Apăsați butonul de asociere de pe fiecare sonerie care se va conecta Indicatorul de stare începe să clipească 7 Atingeți Add în aplicație Indicato...

Страница 19: ...lirsiniz 2 Mobil cihazınızda Nedis SmartLife uygulamasını açın 3 Arayüzü açmak için görüntülü kapı telefonuna dokunun 4 Sağ üst köşedeki düğmeye tıklayarak menüyü açın 5 İç kapı zilini eklemek için menüdeki Zil ayarları nı açın 6 Eşleştirme düğmesine basın bağlanacak olan her kapı zilindeki Durum göstergesi yanıp sönmeye başlar 7 Uygulamadaki Ekle seçeneğine dokunun Durum göstergenin yanıp sönmesi...

Страница 20: ...sekella mujale paigutada 2 Avage mobiilseadmes rakendus Nedis SmartLife 3 Puudutage video fonolukku liidese avamiseks 4 Avage menüü klõpsates paremal ülanurgas olevat nuppu 5 Siseruumide uksekella lisamiseks avage menüüs Helinaseaded 6 Vajutage sidumisnuppu igal ühendataval uksekellal Oleku märgutuli hakkab vilkuma 7 Puudutage rakenduses käsku Lisa Oleku märgutuli lõpetab vilkumise Saate määrata h...

Страница 21: ...T 31 0 73 5993965 E service nedis com W www nedis com contact NEDIS B V De Tweeling 28 5215 MC s Hertogenbosch THE NETHERLANDS ...

Отзывы: