background image

E–14

2. INSTALLATION

This section describes how to set up your VT45 projector and
how to connect video and audio sources.

Setting up Your Projector

Your VT45 Projector is simple to set up and use. But before you
get started, you must first:
1. Determine the image size.
2. Set up a screen or select a non-glossy white wall onto which

you can project your image.

Ensure that the power cable and any other cables connecting to
video sources are disconnected before moving the projector.
When moving the projector or when it is not in use, cover the
lens with the lens cap.

SOURCE

SELECT

AUTO ADJUST

ON


STAND BY

STATUS

POWER

MENU

E

N

T

E

R

C

A

N

C

E

L

Screen

Top view

Screen

Side view

Using a Tabletop or Cart

1. Place your projector on a flat level surface at the optimal dis-

tance from the screen or wall so you realize the size image
you want. (Avoid having bright room lighting or sun light
directly on the screen or wall where you’ll be projecting the
image.)

2. Connect the power cable, remove the lens cap and turn the

projector on. (If no input signal is available, the projector
will display a background image.)

3. Ensure that the projector is square to the screen.

5. To center the image vertically, lift the front edge of the pro-

jector and press the One-Touch Tilt button on the front side
of the projector to release the Front Adjustable foot.

Selecting a Location

The further your projector is from the screen or wall, the larger
the image. The minimum size the image can be is approximately
25" (0.64 m) measured diagonally when the projector is roughly
3 feet (1.0 m) from the wall or screen. The largest the image can
be is 300" (7.6 m) when the projector is about 39.3 feet (12.0 m)
from the wall or screen.

4. Move the projector left or right to center the image horizon-

tally on the screen.

(There is approximately 10 degrees of up and down adjust-
ment for the front of the projector.)

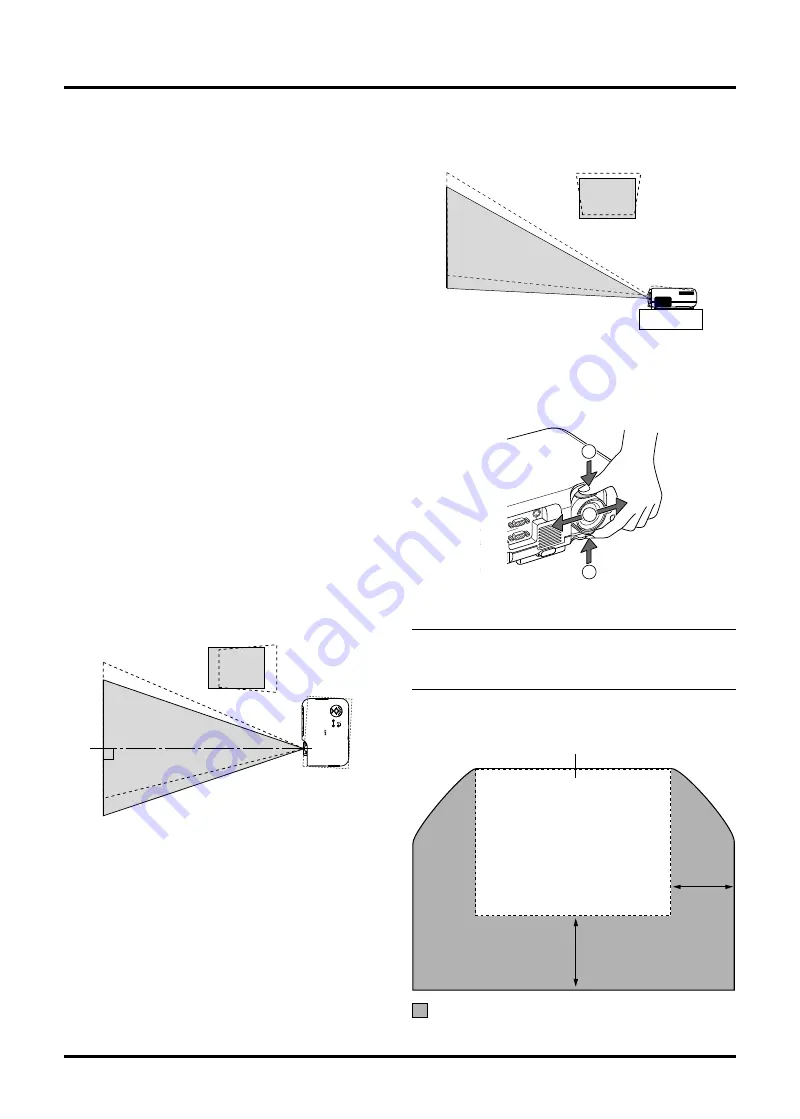
1. Grip the lens shift lever on the top and bottom.
2. Hold the lever to move the lens vertically or horizontally.

NOTE: 

It may not be possible to obtain maximum shift range

due to the rounded off area near the edge of the lens. The amount
of lens shift adjustable range depends on the direction that the
lens is shifted. See diagram below.

Lens Shift Adjustable Range

Maximum shift image position

Width of
Projected
Image

1/3

Height of Projected
 Image

1/2

 Adjustable Range

Using the Lens Shift

IN

OUT

L/MO

NO

R

IN

IN

RGB  OUT

RGB  IN

CONTROL

PC

2

1

1

Содержание VT45KG

Страница 1: ...LCD Projector User s Manual Printed in China NEC VT45 User s Manual VT_H1 4 01 9 17 3 26 PM 1 Black 7N8P0881...

Страница 2: ...nAnfangseinstellungen Setup einschlie lich der Einstellungen der Benutzersteuerungen Diese Kosten sind vom H ndler zu tragen von dem das Produkt erworben wurde 6 Bezahlung von Transportkosten GARANZIA...

Страница 3: ...E 1 VT45 LCD Projector User s Manual English...

Страница 4: ...WARNING The Federal Communications Commission does not allow any modifications or changes to the unit EXCEPT those specified by NEC Technologies in this manual Failure to comply with this govern ment...

Страница 5: ...40 V 50 60 Hz AC Ensure that your power supply fits this requirement before attempting to use your projector 2 Handle the power cable carefully and avoid excessive bending A damaged cord can cause ele...

Страница 6: ...ace between your projector and a wall 2 Prevent foreign objects such as paper clips and bits of paper from falling into your projector Do not attempt to retrieve any objects that might fall into your...

Страница 7: ...Brightness Contrast Color Hue Sharpness Volume E 29 Image Options E 29 Keystone E 29 Lamp Mode E 30 Advanced Options E 30 Aspect Ratio E 30 Position Clock E 31 Resolution E 31 Video Filter E 31 Factor...

Страница 8: ...om in front or behind a screen and the projector can even be installed on the ceiling NEC Technologies exclusive Advanced AccuBlend intel ligent pixel blending technology an extremely accurate image c...

Страница 9: ...g and rivet R G B V ID E O S V ID E O P O W E R A U T O A D J V O L U M E M A G N IF Y P IC T U R E F R E E Z E M U T E A S P E C T M E N U E N T E R H E L P C A N C E L R D 3 72 E Remote control Powe...

Страница 10: ...Adjustable Tilt Foot Button AC Input Connect the supplied power cable s three pin plug here Remote Sensor Zoom Lever Air Filter inlet Terminal Panel Adjustable Tilt Foot Lens Lens Cap Ventilation outl...

Страница 11: ...anism a hard polyurethane protective lens pad is attached to the lens Before using the projector remove the protective lens pad After use reattach the protective lens pad NOTE Before reattaching the p...

Страница 12: ...When this indicator is green the projector is on when the indicator is orange it is in standby mode 4 Select Buttons Use these buttons to select the menu of the item you wish to adjust Use these butto...

Страница 13: ...is output NOTE1 ON AUDIO IN OUT The audio input mini jack 3 is available for RGB source only The audio input RCA 4 is available for Video or S Video source only The audio output mini jack 5 operates...

Страница 14: ...Freeze Button This button will freeze a picture Press again to resume mo tion 9 Mute Button This button turns off the image and sound for a short period of time Press again to restore the image and so...

Страница 15: ...lation 1 Push to open the battery cover 2 Remove both old batteries and install new ones AA Ensure that you have the batteries polarity aligned correctly 3 Put the battery cover back on Do not mix dif...

Страница 16: ...that the projector is square to the screen 5 To center the image vertically lift the front edge of the pro jector and press the One Touch Tilt button on the front side of the projector to release the...

Страница 17: ...200 5080 160 4064 120 3048 60 1524 294 7480 324 8240 0 0 11 5 10 5 210 5334 168 4267 126 3200 63 1600 309 7860 341 8650 0 0 11 5 10 5 240 6096 192 4877 144 3658 72 1829 354 8980 389 9890 0 0 11 5 10...

Страница 18: ...n center C Throw distance D Vertical distance between lens center and top of screen Throw angle Lens Offset 5 4mm inch mm inch mm inch mm inch mm inch mm inch mm inch mm degree degree 25 635 20 508 15...

Страница 19: ...ok type Document Camera DVD Player with component output VCR DVD Player or LaserDisc Player NOTE When using with a notebook PC be sure to connect between the projector and the note book PC before turn...

Страница 20: ...ier if connecting a signal cable longer than the supplied one IBM VGA or Compatibles Desktop type Audio cable not supplied Connecting your PC to your VT45 projector will enable you to project your com...

Страница 21: ...ct your Macintosh computer to the projector 3 Turn on the projector and the Macintosh computer Connecting Your Macintosh Computer Macintosh Desktop type Audio cable not supplied For older Macintosh us...

Страница 22: ...eously view on a monitor the image you re projecting To do so 1 Turn off the power to your projector monitor and computer 2 Use a 15 pin cable to connect your monitor to the RGB Monitor Output Mini D...

Страница 23: ...use a commercially available component video cable RCA 3 and the optional 15 pin to RCA female 3 cable to connect your DVD player to the RGB INPUT connector on the projector For a DVD player without c...

Страница 24: ...ojector Use an audio cable not supplied to connect the audio from your VCR or laser disc player to your audio equipment if your VCR or laser disc player has this capability Be careful to keep your rig...

Страница 25: ...Shift the Image Size and the Focus Use the Lens Shift lever to adjust the image position Use the Zoom lever to adjust the image size then use the Focus ring to obtain the best focus Use the Magnify b...

Страница 26: ...Basic menu will be displayed in the language you have selected To close the menu press the Cancel button After this has been done you can proceed to the advanced menu operation If you want you can sel...

Страница 27: ...Each of the feet height can be changed up to 1 mm or at angles up to 1 degree Use keystone correction for proper adjustment See page E 29 Shifting Image Position Use the lens shift lever to shift the...

Страница 28: ...e projector cabinet to quit the menu display In this example the lens is shifted vertically to move the image to the top or bottom SO UR CE AU TO AD JUS T ON STA ND BY STA TUS PO WE R EM N U C N A C E...

Страница 29: ...entation Desktop Front Ceiling Rear Desktop Rear Ceiling Front Cinema Position Top Center Bottom Background Blue Black Logo Signal Select RGB Auto RGB Component Signal Select Video Auto NTSC3 58 NTSC4...

Страница 30: ...indicates the item is active Tab Indicates a group of features in a dialog box Selecting on any tab brings its page to the front Radio button Use this round button to select an option in a dialog box...

Страница 31: ...al Color Increases or decreases the color saturation level not valid for RGB Hue Varies the color level from green to blue The red level is used as reference This adjustment is only valid for Video an...

Страница 32: ...ct Ratio Normal Zoom Cinema Wide Zoom Aspect Ratio allows you to select the best Aspect mode to display your source image You can also display the Aspect Ratio window by pressing the Aspect button on...

Страница 33: ...or deactivate the Advanced AccuBlend feature Auto Turns on theAdvanced AccuBlend feature The projector automatically reduces or en larges the current image to fit the full screen Native Turns off theA...

Страница 34: ...orrection OFF Mode1 Mode3 sRGB Mode2 User2 User1 Menu Setup Menu Menu Menu mode Language Source Display No Input Display Volume Bar Keystone Bar Menu Display Time Basic English On On On Auto 45 Sec Of...

Страница 35: ...cally be turned off in 5 seconds if no buttons are pressed within 5 seconds Auto 15 sec The menu will automatically be turned off in 15 seconds if no buttons are pressed within 15 seconds Auto 45 sec...

Страница 36: ...r or not Keystone Save This option enables you to save your current keystone set tings Saving your change once affects all sources The changes are saved when the projector is off Fan High Speed Mode T...

Страница 37: ...Lamp Hour Meter Resets the lamp clock back to zero Selecting this option displays submenu for a confirmation To reset the lamp us age hour meter use the or button to select Yes NOTE The projector wil...

Страница 38: ...s in Eco 1 mode hours of service If this happens be sure to replace the lamp If you continue to use the lamp after 1000 hours up to 2000 hours in Eco 2 mode and up to 1500 hours in Eco 1 mode of use t...

Страница 39: ...new filter cover NOTE Do not detach the sponge from the filter cover Do not wash the filter cover with soap and water Soap and water will damage the the filter membrane Before replacing the filter cov...

Страница 40: ...E 31 Reposition the projector to improve its angle to the screen See page E 14 Use the Keystone on the Image Options Menu to correct the trapezoid distortion See page E 29 Adjust the focus See page E...

Страница 41: ...izontal 600 dots vertical Power Requirement 100 120 200 240 VAC 50 60 Hz Input Current 2 3 A 100 120 VAC 1 2A 200 240 VAC Power Consumption 200 W 185 W in Eco 1 175W in Eco 2 Mechanical Dimensions 11...

Страница 42: ...DJUST ON STAND BY STATUS POWER MENU E N T E R C A N C E L AUDIO IN OUT S VIDEO VIDEO IN IN L MONO R IN IN RGB OUT RGB IN AC IN VT45 CONTROL PC 207 8 15 117 4 61 299 11 77 80 3 15 24 0 94 47 1 85 5 4 0...

Страница 43: ...Red Cr 2 Green or Sync on Green Y 3 Blue Cb 4 Ground 5 Ground 6 Red Ground Cr Ground 7 Green Ground Y Ground 8 Blue Ground Cb Ground 9 No Connection 10 Sync Signal Ground 11 12 Bi directional DATA SDA...

Страница 44: ...MAC 1024 768 60 241 74 93 80 VESA 1024 768 60 023 75 03 78 75 VESA 1024 768 68 677 85 94 5 VESA 1152 864 67 5 75 108 MAC 1152 870 68 681 75 06 100 SUN 1152 900 61 796 65 95 92 94 SGI 1152 900 71 736 7...

Страница 45: ...ctor PC Control Codes Function Code Data POWER ON 02H 00H 00H 00H 00H 02H POWER OFF 02H 01H 00H 00H 00H 03H INPUT SELECT RGB 02H 03H 00H 00H 02H 01H 01H 09H INPUT SELECT VIDEO 02H 03H 00H 00H 02H 01H...

Отзывы: