Disassembly and Reassembly 3-7
Keyboard
Remove the keyboard assembly as follows.
1.
Power off the system, unplug any attached peripherals, and remove the primary battery.
2.
Turn the notebook over.
3.
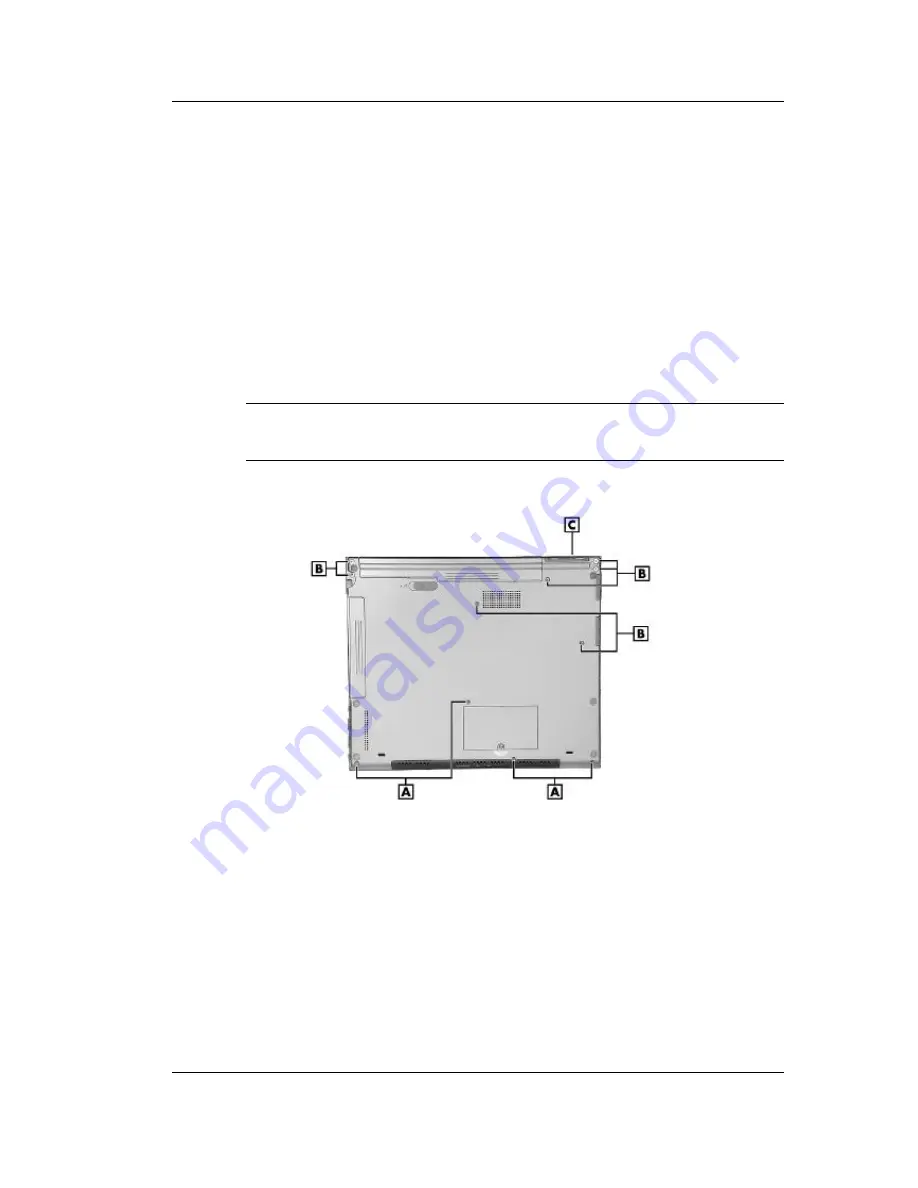
Locate and remove the bottom screws (see the following figure).
n
If you need to remove the keyboard, front cover and VersaGlide assembly, hard disk
drive, CMOS battery, PC card assembly, Bluetooth board, or USB board, only remove
the four front cover screws from the bottom of the notebook.
n
If you need to remove the top cover, LCD panel, main board, Mini PCI board, or sound
board, remove the four front cover screws and the seven top cover and LCD panel
screws from the bottom of the system. Also remove the LCD panel screw at the back
side of the notebook.
Note
Several different types and lengths of screws are used. As yo u remove the screws,
note the screw type, length, and position. Use care to ensure that all screws are returned to their
original positions.
Removing the bottom screws
A
– Front Cover Screws (4)
C
– LCD Panel Screw (on back side)
B
– Top Cover and LCD Panel Screws (7)
4.
Grasp the top and bottom of the notebook to hold it together, turn it over, and open the LCD
panel.
5.
Carefully lift up the front cover and VersaGlide assembly and slide it away from the
keyboard about a half-inch. Use care to avoid pulling out the cover’s cables.
6.
Lift up the keyboard at the Fn and End keys and tilt the keyboard vertically.
Содержание Versa TXi Series
Страница 1: ...NEC Versa TXi Series Notebook Computers VERSA TXi S E R V I C E M A N U A L ...
Страница 42: ...3 Disassembly and Reassembly n Required Tools and Equipment n Disassembly n Reassembly ...
Страница 72: ...6 Troubleshooting n Problem Checklist n Startup Problems n Diagnostics ...
Страница 81: ...7 Specifications n System Components n Memory Map n Interrupt Controllers ...


