background image

2-12      Setup and Operation


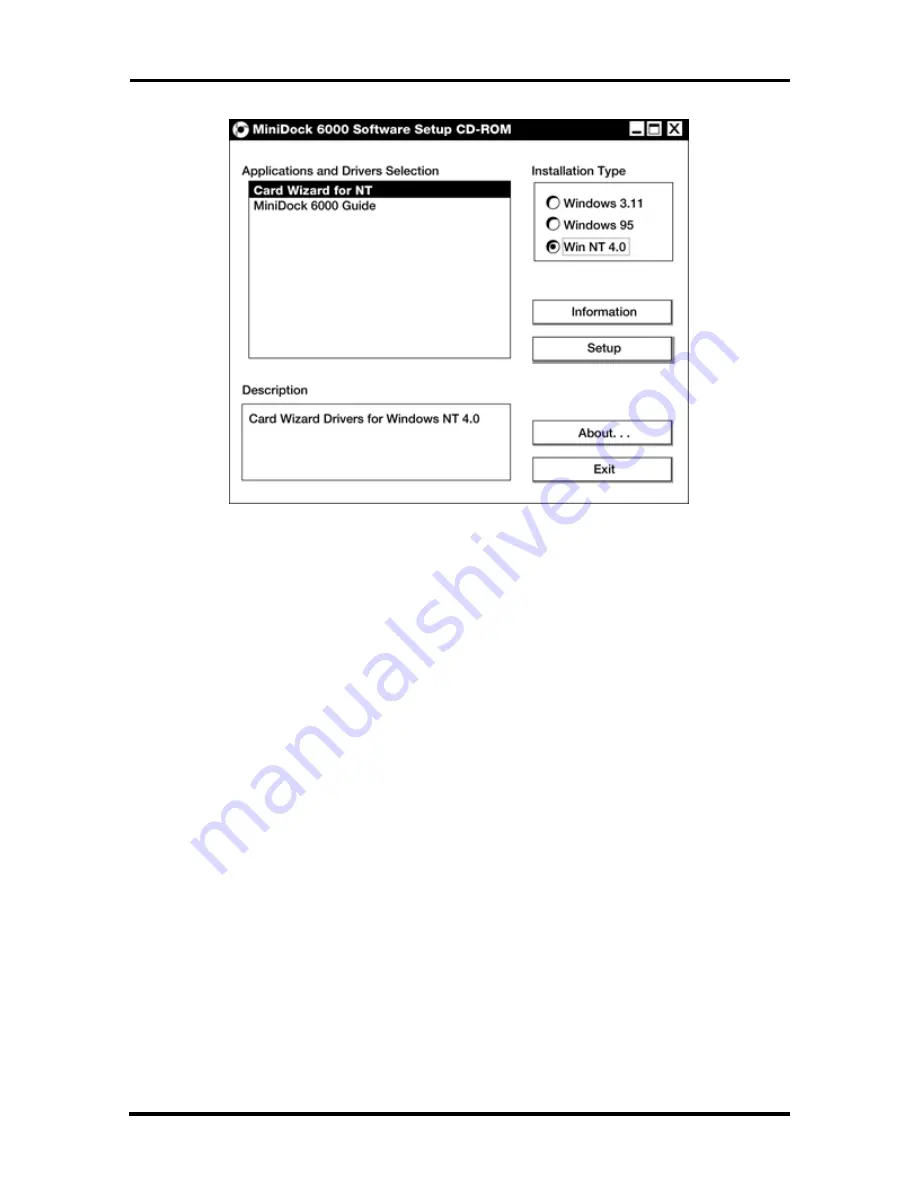
 Figure 2-13   Main Setup screen

„


In Installation Type, select your operating system. Choose Windows
3.11 (for Windows for Workgroups), Windows 95, or Windows NT
4.0.

„


In the Applications and Drivers Selection box, highlight a selection and
press Setup.


Windows 95 offers only one setup option — to install the online
user’s guide. This is optional. (Windows 95 comes with its own
utility for PC cards.)


Windows 3.11 and Windows NT offer two setup options, one to
install the CardWizard drivers and one to install the user’s guide.
Loading the user’s guide is optional. However, you must load the
PC Card slot drivers in order to use the slots.


After you press the Setup button, the system displays a Windows setup
screen.

6. 

Follow the on-screen instructions to install your selection.


If you have another selection to load, repeat steps 4 and 5.

7. 

From the Main Setup screen, press Exit.

The NEC Versa on the MiniDock is now fully functional!

Содержание VERSA MINIDOCK 6000

Страница 1: ...panying each product However actual performance of each such product is dependent upon factors such as system configuration customer data and operator control Since implementation by customers of each product may vary the suitability of specific product configurations and applications must be determined by the customer and is not warranted by NECCSD To allow for design and specification improvemen...

Страница 2: ...rface components System specifications are listed including dimensions weight environment safety compliance and power consumption Section 2 Setup and Operation takes the authorized service technician or dealer from unpacking to setup and operation The section includes a description of docking station connectors operating controls and software Section 3 Troubleshooting and Repair provides disassemb...

Страница 3: ...memory access DMAC DMA controller DOS disk operating system DRAM dynamic RAM DTE data terminal equipment ECC error checking and correction EDS error detecting system EGA Enhanced Graphics Adapter EPP enhanced parallel port EPROM erasable and programmable ROM EVGA Enhanced Video Graphics Array F Fahrenheit FAX facsimile transmission FCC Federal Communications Commission FG frame ground FM frequency...

Страница 4: ...ic flat package PIO parallel input output pixel picture element PJQFP plastic J lead quad flat pack PLCC plastic lead chip carrier PLL phase lock loop p p peak to peak PPI programmable peripheral interface PQFP plastic quad flat package PROM programmable ROM QFP quad flat pack RAM random access memory RAMDAC RAM digital to analog RAS row address strobe RGB red green blue RGBI red green blue intens...

Страница 5: ...i VESA video electronics standards association VFO variable frequency oscillator VGA Video Graphics Array VLSI very large scale integration VRAM virtual RAM W watt µf microfarad µPD microprocessor µs microsecond Ω ohm ...

Страница 6: ...E Controller PCI0646U 1 9 I O Address Map 1 9 Interrupt Availability 1 10 Specifications 1 11 Section 2 Setup and Operation Unpacking the Unit 2 1 Environment 2 1 Hardware Setup 2 1 Preparing the NEC Versa for Docking 2 3 Docking the NEC Versa 2 5 Undocking the NEC Versa 2 9 Software Setup 2 10 Plug and Play Software Setup 2 10 Running the Setup Utility 2 10 Using the Setup Utility 2 11 Section 3 ...

Страница 7: ... 6000 LEDs 1 3 1 4 NEC Versa MiniDock 6000 Left Features 1 4 1 5 NEC Versa MiniDock 6000 Right Features 1 5 1 6 NEC Versa MiniDock 6000 Rear Features 1 6 2 1 AC Power Cable Connection 2 2 2 2 Main Power Switch 2 3 2 3 NEC Versa Expansion Port Cover 2 4 2 4 Stowing the Expansion Port Cover 2 4 2 5 Docking Status LEDs 2 5 2 6 Adjusting the AC Port Guard 2 6 2 7 Lowering the NEC Versa onto the MiniDo...

Страница 8: ...nter Port A 3 A 4 Monitor Port A 4 List of Tables 1 1 NEC Versa MiniDock 6000 Chip Types and Technologies 1 8 1 2 I O Address Map 1 9 1 3 NEC Versa MiniDock 6000 Specifications 1 11 3 1 NEC Versa Series MiniDock 6000 Disassembly Sequence 3 3 3 2 NEC Versa Series MiniDock 6000 Field Replaceable Parts 3 17 3 3 Packaging and Documentation Part Numbers 3 18 3 4 NEC Service and Information Telephone Nu...

Страница 9: ...ction 1 Technical Information The NEC Versa MiniDock 6000 provides the user with a way to transform his her NEC Versa 6000 Series notebook computer into a desktop system Figure 1 1 NEC Versa MiniDock 6000 ...

Страница 10: ...is aligned properly for docking These guides fit into specially placed notches on the bottom of the notebook computer Eject Lever disconnects the NEC Versa from the MiniDock docking connec tor Before pressing the Eject lever you must prepare your system for undocking by pressing the Undocking button or the Power button on the side of the Mini Dock See Chapter 2 Docking and Undocking in the MiniDoc...

Страница 11: ...xpansion port on the notebook computer to the docking connector on the MiniDock Docking LEDs inform you of the current docking status IDE drive access and diskette drive access LEDs are shown in the following figure and LED states are described after the figure Figure 1 3 NEC Versa MiniDock 6000 LEDs Status LEDs Descriptions Docking Status When power is on to the MiniDock this LED lights as fol lo...

Страница 12: ...res Features on the left hand side of the MiniDock are shown in the following figure Descrip tions follow the figure Figure 1 4 NEC Versa MiniDock 6000 Left Features Left Feature Descriptions PC Card Slots lets you install two Type II PC cards one Type III PC card or one Type III card in the top slot and one Type II card in the bottom slot for use while docked MIDI Game Port supports MIDI game dev...

Страница 13: ...NEC Versa for undocking For warm undocking you must press the Undocking button before pressing the Eject lever to successfully undock See Chapter 2 Docking and Undocking for details about undocking the system If an eject request is rejected the Docking LED returns to solid green Suspend Resume Button puts your NEC Versa into Standby mode to conserve energy To return to Operating mode press the but...

Страница 14: ...ton ejects a device installed in the MiniDock 6000 VersaBay II Power Button lets you power on and off the NEC Versa notebook computer docked on the MiniDock Rear Features Features on the rear of the MiniDock 6000 are shown in the following figure Descriptions follow the figure Figure 1 6 NEC Versa MiniDock 6000 Rear Features Rear Feature Descriptions Keyboard Port lets you connect a PS 2 style ext...

Страница 15: ...niDock or one that is appropriate for your country See the cable listed in the MiniDock 6000 User s Guide Appendix A Specifications Main Power Switch turns power on to the MiniDock Pressing this button to remove power while the notebook is docked and powered on shuts down everything and can cause a system crash Parallel Port lets you connect a parallel device to the MiniDock External Monitor Port ...

Страница 16: ...s two 32 bit CardBus credit card size add in modules that give the PC access to peripheral devices such as modems video programming printers external video monitors and local area networks bandwidth significantly greater than that of other CardBus controllers supports two 32 bit CardBus credit card size and also supports 16 bit PCMCIA Personal Computer Memory Card Industry Association or PC Card a...

Страница 17: ...major operating systems including MS DOS Win dows 3 1 Windows NT Windows 95 and Novell NetWare supports isochronous and asynchronous transfer types supports dynamic hot insertion and removal of devices I O ADDRESS MAP Refer to Table 1 2 for the MiniDock address map Table 1 2 I O Address Map Address Function 0170 0177H IDE Controller Secondary 01F0 01F7H IDE Controller Primary 0376H Alternate HDD C...

Страница 18: ...rt IRQ 5 Audio IRQ 6 Diskette drive IRQ 7 Parallel Port IRQ 8 Real Time Clock IRQ 9 IR Port IRQ10 IntA Assigned by Windows 95 Cardbus driver IRQ11 IntB Assigned by Windows 95 Cardbus driver IRQ12 VersaGlide Mouse IRQ13 Math Coprocessor IRQ14 Primary Hard Drive IRQ15 Secondary Hard Drive MD6000 Drive These IRQ s are available for reassignment IRQ12 is available only with the NEC Versa 6020 6030 ...

Страница 19: ...port Docking Connector connects to Versa expansion connector VersaBay II 20 pin connector Serial RS 232C 9 pin connector Parallel EPP 25 pin connector MIDI Game port 15 pin connector VGA CRT 15 pin port PS 2 style mouse port PS 2 style keyboard port Microphone in Port accepts a standard monophonic microphone jack Headphone accepts standard stereo headphone or external speaker Line In external audi...

Страница 20: ...iniDock 6000 Setup utility BIOS Update Diskette Recommended Environment Temperature 41 to 95 F 5 to 35 C Relative Humidity 8 to 80 noncondensing Storage Requirements Temperature 4 to 140 F 20 to 60 C Relative Humidity 5 to 95 non condensing Administrative Compliance UL 1950 CSA C22 2 No 950 D3 CE EN60950 1992 A1 A2 1993 A3 1995 A 4 ...

Страница 21: ... and user documentation Environment Use the NEC Versa MiniDock 6000 in a location that meets the following environmental conditions Temperature 41 to 95 F 5 to 35 C Humidity 20 to 80 noncondensing Store the NEC Versa MiniDock 6000 in a location that meets the following conditions Temperature 4 to 140 F 20 to 60 C Humidity 5 to 95 noncondensing HARDWARE SETUP The power cable that comes with the uni...

Страница 22: ...n the back of the MiniDock Press the white dot on the switch to turn on the MiniDock s power A vertical line icon above the Power switch indicates that power is on CAUTION Make sure the main Power switch on the back of the MiniDock is powered on before docking the NEC Versa Docking the NEC Versa while the MiniDock is powered off can result in a system crash This caution applies to the Windows 95 o...

Страница 23: ... prepare the NEC Versa for docking 1 Set NEC Versa power for your system as follows If you have a Plug and Play NEC Versa you can either put your sys tem into Suspend mode or leave it in full Operation mode for docking For example an NEC Versa with Windows 95 running is a Plug and Play system If you have a non Plug and Play system turn off system power before docking Systems running Windows for Wo...

Страница 24: ... the expansion port cover and slide it underneath the expansion port Check that all other NEC Versa port covers are closed Figure 2 3 NEC Versa Expansion Port Cover Figure 2 4 Stowing the Expansion Port Cover 4 Verify that the power cord is plugged into the MiniDock and that MiniDock power is turned on See Connecting the Power Cable for details When the Docking Status LED lights steady amber power...

Страница 25: ...e used with NEC Versa systems that run the Windows 95 operating system Hot Docking with NEC Versa power on and the system in full opera tion mode This procedure can be used with NEC Versa systems with the Windows 95 operating system Use the following steps to dock the NEC Versa 1 Locate the AC Port Guard on the MiniDock You may need to adjust the guard position to suit the size of your system For ...

Страница 26: ... the MiniDock with the docking grooves on the bottom of the NEC Versa Lower the NEC Versa onto the MiniDock Once the notebook is properly seated on the docking guides the docking connector and the expansion port are properly aligned Figure 2 7 Lowering the NEC Versa onto the MiniDock 5 Verify that the Docking LED is a steady amber color This indicates that the MiniDock is ready for docking ...

Страница 27: ...t the left front and right front of the NEC Versa Continue to press until the connection between the computer and the MiniDock is secure Figure 2 8 Docking the NEC Versa NOTE Keep the NEC Versa straight If the com puter is pushed at an angle it does not dock prop erly 7 If using the NEC Versa without an external monitor open the LCD panel Figure 2 9 Opening the LCD Panel ...

Страница 28: ...he Docking Status LED blinks green push a little harder on the NEC Versa to reseat it for docking This usually corrects the problem and the LED will light a steady green The LED continues to blink green when something has gone wrong with the docking sequence due to an error or hardware failure Pro ceed as follows Press the Eject lever to eject the NEC Versa from the MiniDock Check that the Docking...

Страница 29: ...s exit Windows and press the Power button on the side of the MiniDock to power off the system 2 For easier undocking close the LCD panel This is not required but is recommended Figure 2 11 Undocking and Suspend Resume Buttons 3 Press the Undocking button on the side of the MiniDock The Docking Status LED blinks green When the LED turns a steady amber you are ready to undock NOTE Wait until the LED...

Страница 30: ...er the computer is a Plug and Play system or a Non Plug and Play system Plug and Play Software Setup Plug and Play systems for example the NEC Versa 6060 with Windows 95 installed oper ate with a Plug and Play BIOS and require no special software installation Simply dock the NEC Versa and reboot the system The MiniDock is automatically configured for use with the NEC Versa system RUNNING THE SETUP...

Страница 31: ...e NEC Versa is not docked 2 Power up the NEC Versa 3 Insert the NEC MiniDock Setup Utility CD into the reader and close the tray 4 Proceed as follows If your system is set to AutoPlay the setup interface screen appears Go to the next step If your system is not set to AutoPlay or does not have AutoPlay in Windows for Workgroups select Run from the File menu in Program Manager in Windows 95 or Windo...

Страница 32: ...5 comes with its own utility for PC cards Windows 3 11 and Windows NT offer two setup options one to install the CardWizard drivers and one to install the user s guide Loading the user s guide is optional However you must load the PC Card slot drivers in order to use the slots After you press the Setup button the system displays a Windows setup screen 6 Follow the on screen instructions to install...

Страница 33: ...MiniDock in dusty environments Do not use or store the MiniDock near chemicals Do not cover the air vents or put anything near enough to them to block air cir culation Avoid excessive vibration or shock Keep the MiniDock away from machinery that generates strong electric or mag netic fields Do not place heavy objects on the MiniDock Make sure the CRT base is in posi tion before placing an external...

Страница 34: ... are some maintenance procedures to use when servicing a hard disk Always back up the data files from the hard disk Run a virus detecting program to detect a possible virus infested area on the hard disk Use SCANDISK to correct any errors found in the directory and File Allocation Table FAT This will also free up space from any unused sectors Never move or raise the MiniDock while the hard disk is...

Страница 35: ...e in reverse order Table 3 1 NEC Versa MiniDock 6000 Disassembly Sequence Sequence Part See Page 1 Shelter Cover 3 4 2 Undock Lever 3 5 3 Undock Shelter 3 6 4 Battery and Bottom Screws 3 7 5 Separating the Top and Bottom Cover 3 8 6 Fan Assembly 3 9 7 PCB Main 3 10 8 Frame PCB Main 3 11 9 Undock Unit 3 12 10 VersaBay Panel 3 13 11 Power Supply Unit 3 14 12 PCB Sub 3 15 When disassembling the MiniD...

Страница 36: ...eps to remove the MiniDock 6000 top cover Shelter Cover 1 Remove the upper shelter cover by inserting a flat head screwdriver and com press the latch Figure 3 1 Upper Shelter Cover 2 Lift the upper shelter cover from the top cover assembly upper shelter cover ...

Страница 37: ...d Repairs 3 5 Undock Lever 1 Locate and remove two screws on the back underside of the undock lever Figure 3 2 Undock Lever Screw Location 2 Slide the undock lever toward the rear of the MiniDock 6000 and lift to remove ...

Страница 38: ...3 6 Troubleshooting and Repairs Undock Shelter 1 Locate and remove two screws on the undock shelter Figure 3 3 Undock Shelter Screws 2 Slide the undock shelter from the top cover assembly ...

Страница 39: ...y 1 Turn over the MiniDock 6000 2 Remove the seven screws one screw on the battery compartment bay cover and six on the bottom surface Figure 3 4 Bottom of the MiniDock 6000 3 Disconnect the battery cable from the connector on the PCB at connector CN20 board 4 Lift the battery from the compartment ...

Страница 40: ...Covers 1 Turn the MiniDock 6000 back over 2 Gently separate the top and bottom cover by starting at the front and working to wards the rear 3 When the top cover is loose slide it forward and lift away from the bottom cover Figure 3 5 Interior of the MiniDock 6000 ...

Страница 41: ...nents of the MiniDock 6000 During these steps it will be necessary to disconnect various cables Fan Assembly Follow these directions to remove the fan assembly 1 Locate and remove three screws Figure 3 6 Fan Assembly Screws 2 Disconnect the inline cable connector 3 Lift the fan assembly from the unit ...

Страница 42: ...rd at connector CN6 Slide the PCB sub assembly from the unit Reassembly The recommended sequence for inserting and tightening screws is shown in the prior Fig ure 3 7 by circled numbers Follow the sequence indicated by the circled numbers When the quantity of screws exceeds the circled numbers any order maybe used to tighten the remaining screws The FPC has two different connectors Do not force th...

Страница 43: ...B Main 2 Lift the frame from the sub assembly Reassembly The recommended sequence for inserting and tightening screws is shown in the prior Fig ure 3 8 by circled numbers Follow the sequence indicated by the circled numbers When the quantity of screws exceeds the circled numbers any order maybe used to tighten the remaining screws ...

Страница 44: ...3 12 Troubleshooting and Repairs Undock Unit 1 Locate and remove the one screw that secures the undock unit Figure 3 9 Undock Unit Screw Location 2 Lift and remove the undock unit ...

Страница 45: ...g and Repairs 3 13 VersaBay Panel 1 Locate and remove two screws to remove the VersaBay panel one screw is found on the exterior of the bottom cover Figure 3 10 VersaBay Panel 2 Lift the VersaBay panel from the unit ...

Страница 46: ...ng and Repairs Power Supply Unit 1 Remove seven screws five screws that secure the board to the interior of the unit and two from the rear of the unit Figure 3 11 Power Supply Unit 2 Lift and remove the power supply unit ...

Страница 47: ...r switch is hardwired to the PCB sub board 3 Lift and remove the PCB sub board and Power switch Reassembly The recommended sequence for inserting and tightening screws is shown in the prior Fig ure 3 12 by circled numbers Follow the sequence indicated by the circled numbers When the quantity of screws exceeds the circled numbers any order maybe used to tighten the remaining screws ...

Страница 48: ...following figure shows the system ex ploded view diagram or IPB Table 3 3 lists field replaceable parts and corresponding part numbers Review the entire exploded diagram to see how each part is connected or assembled Try to sub divide the entire diagram paying particular attention to the LCD Assembly Top Unit Cover Assembly and the Base Unit Assembly Figure 3 13 NEC Versa MiniDock 6000 IPB ...

Страница 49: ... PSU Sub PCB R2276508 11 Cable Main Sub PCB R2276511 12 Lithium Battery RM010059A 13 Cover battery R2271031B 14 Fan Fan Bracket R2276819 R2271093A 15 PCB Sub R2277021D 16 Power Supply Unit RG010221A 17 FPC R227500 18 Push Switch Assembly R2276506A 19 Push Button 3 R2271008E 20 Panel VersaBay R2271030E 21 Cover Upper Assembly R2270500 22 Insulator R2271050C 23 Insulator 2 R2271103A 24 AC Power Cabl...

Страница 50: ...ON NEC service and information telephone numbers are listed in Table 3 4 Table 3 4 NEC Service and Information Telephone Numbers Service Call To order NECCSD spare parts In the U S call 1 800 632 4525 To order options in the U S Local Sales Office To access the NECCSD Electronic Bulletin Board System BBS 1 978 635 4706 To download files provides software drivers and the latest ROM BIOS 1 978 635 4...

Страница 51: ...ted electronic information service used to obtain up to date product application notes installation procedures troubleshooting tips data sheets techni cal information bulletins price lists and other information Information can be obtained from the FaxFlash service 24 hours a day 7 days a week Using a touch tone telephone call the FaxFlash number order the desired information through the automated ...

Страница 52: ...Flash introduction and jump to the automated instructions for ordering a document or catalog Press 2 for an introduction to FaxFlash followed by the automated instructions for ordering a document or catalog 5 When asked by the automated attendant enter your fax number and telephone number For international use first enter the international long distance access number 011 your country code area cod...

Страница 53: ...l keyboard and mouse are 6 pin mini DIN female ports The key board and mouse connectors are male connectors Figure A 1 Keyboard and Mouse Ports Table A 1 Keyboard Mouse Pin Assignments Pin Signal I O Function 1 KBDATA MOUSEDATA I O Keyboard data Mouse data 2 NC Not connected 3 GND Ground 4 5V Power 5 KBCLK MOUSECLK I O Keyboard clock Mouse clock 6 NC Not connected ...

Страница 54: ...port pin assignments are as follows Figure A 2 COM port Table A 2 COM Port Pin Assignments Pin Function 1 Carrier Detect 2 Receive Data 3 Transmit Data 4 Data Terminal Ready 5 Signal Ground 6 Data Set Ready 7 Request to Send 8 Clear to Send 9 Ring Indicator ...

Страница 55: ...lows Figure A 3 Printer port Table A 3 Printer Port Pin Assignments Pin Function 1 Strobe 2 Data Bit 0 3 Data Bit 1 4 Data Bit 2 5 Data Bit 3 6 Data Bit 4 7 Data Bit 5 8 Data Bit 6 9 Data Bit 7 10 Acknowledge 11 Busy 12 PE 13 Select 14 Auto Feed XT 15 Error 16 Initialize 17 Select In 18 25 Ground ...

Страница 56: ...llows Figure A 4 Monitor Port Table A 4 Monitor Port Pin Assignments Pin Function 1 Red 2 Green 3 Blue 4 VESA option 1 5 Ground 6 Red return ground 7 Green return ground 8 Blue return ground 9 5V 10 Sync return ground 11 VESA Option 2 12 VESA Data 13 Horizontal sync 14 Vertical sync 15 VESA CLK ...

Страница 57: ...Std PCI Bus Grants 14 to 15 GND Digital GND 16 AD31 PCI Address and Data Bus 31 17 AD30 PCI Address and Data Bus 30 18 AD28 PCI Address and Data Bus 28 19 AD27 PCI Address and Data Bus 27 20 AD25 PCI Address and Data Bus 25 21 AD24 PCI Address and Data Bus 24 22 AD23 PCI Address and Data Bus 23 23 AD22 PCI Address and Data Bus 22 24 AD20 PCI Address and Data Bus 20 25 AD19 PCI Address and Data Bus...

Страница 58: ... AD7 PCI Address and Data Bus 7 44 AD5 PCI Address and Data Bus 5 45 AD4 PCI Address and Data Bus 4 46 AD2 PCI Address and Data Bus 2 47 AD1 PCI Address and Data Bus 1 48 MDGNDN Barrack Board DAA 49 SYSACT Not Used 50 MDNEG Barrack Board DAA 51 OHRC Barrack Board DAA 52 MDPOS Barrack Board DAA 53 MDGNDP Barrack Board DAA 54 DSMICDET Barrack Board Mic Detect 55 JOYF0 Joystick 56 JRC0 Joystick 57 DS...

Страница 59: ...RQ 10 80 AD26 PCI Address and Data Bus 26 81 IRQ9 ISA IRQ 9 82 C BE3 PCI Bus Command and Byte Enable 3 83 IRQ7 ISA IRQ 7 84 AD21 PCI Address and Data Bus 21 85 IRQ6 ISA IRQ 6 86 AD18 PCI Address and Data Bus 18 87 IRQ5 ISA IRQ 5 88 C BE2 PCI Bus Command and Byte Enable 2 89 IRQ4 ISA IRQ 4 90 GND Digital GND 91 IRQ3 ISA IRQ 3 92 TRDY PCI Target Ready 93 GND Digital GND 94 LOCK PCI Lock 95 PBID1 Por...

Страница 60: ...ard DAA 113 to 114 GND Digital GND 115 JOYF1 Joystick 116 to 117 AGNDS Analog GND for Sound 118 JRC1 Joystick 119 DSLINL Barrack Board Line In Left 120 NC Not Used 121 VCR1 VCR Power On Detect 1 122 CONT VESA Control 123 BLUE CRT Blue 124 GND Digital GND 125 AGNDV Analog GND for Video 126 OPT2 VESA Option 2 127 OPT1 VESA Option 1 128 to 129 GND Digital GND 130 RTS Request to Send 131 GND Digital G...

Страница 61: ...l Battery Charge Enable 152 GND Digital GND 153 NC Not Used 154 GND Digital GND 155 NC Not Used 156 GND Digital GND 157 to 158 NC Not Used 159 POWOK NB Power Good 160 DCKINTR Dock Interrupt 161 EXMSDAT External Mouse Data 162 FDS FD Select 163 EXMSCLK External Mouse Clock 164 DSDET Barrack Board Detect 165 EXKBDAT External Keyboard Data 166 QBUFEN Q Buffer Enable 167 EXKBCLK External Keyboard Cloc...

Страница 62: ...gital GND 193 PCTYPE1 PC Type ID 1 194 DCD Device Carrier Detect 195 PCTYPE2 PC Type ID 2 196 TXT 1Transmit Data 1197 1PCTYPE3 1PC Type ID 3 1198 1DSR 1Data Set Ready 1199 1HDDIC 1HDD LED 1200 1DVSEL0 1Drive Select 0 1201 1FDDIC 1FDD LED 1202 1MOT0 1FDD Motor 0 1203 1CHRGE 1Charge LED 1204 1DVSEL1 1Drive Select 1 1205 1SCSIIC 1SCSI LED 1206 1MOT1 1FDD Motor 1 1207 1DSPCI 1PCI Bus VCC 1208 1PDATA0 ...

Страница 63: ...6 1Printer Data 6 1221 1PE 1Printer Paper Empty 1222 1PDATA7 1Printer Data 7 1223 1NC 1Not Used 1224 1PSTROBE 1Printer Data Strobe 1225 1GND 1Digital GND 1226 1PSELIN 1Printer Select Input 1227 to 231 1GND 1Digital GND 1232 1MIDIN 1MIDI In 1233 1JOYF3 1Joystick 1234 to 235 1AGNDS 1Analog GND for Sound 1236 1JRC3 1Joystick 1237 1DSCDL 1Docking Station CD In Left 1238 1DSOUTR 1Barrack Board Out Righ...

Страница 64: ... controller 1 9 IDE drive access LED 1 4 Installing the online guide 2 10 Interrupt level assignments 1 10 K Keyboard and mouse connectors A 1 L LED Diskette drive access 1 4 Docking status 1 3 IDE drive access 1 4 LEDs 1 3 Loading drivers 2 10 M Maintenance 3 1 MiniDock front 1 2 LEDs 1 3 right side 1 2 1 4 1 5 1 6 top 1 2 MiniDock 6000 specifications 1 11 Monitor port pin assignments A 4 N Norma...

Страница 65: ...for docking 2 3 Setting up the software 2 10 Software setup plug and play systems 2 10 Storage temperature 2 1 T Technical support 3 19 U Undock lever 3 5 Undock shelter 3 6 Undock unit 3 12 Undocking button 2 9 Unpacking 2 1 Upper shelter cover 3 4 Using the Setup utility 2 11 Using the undocking button 2 9 V VersaBay panal 3 13 W Warm docking 2 5 ...

Страница 66: ...ons However there is no guarantee that interference will not occur in a particular installation If this equipment does cause harmful interference to radio or television reception which can be determined by turning the equipment off and on the user is encouraged to try to correct the interference by one or more of the following measures Reorient or relocate the receiving antenna Increase the separa...

Отзывы: