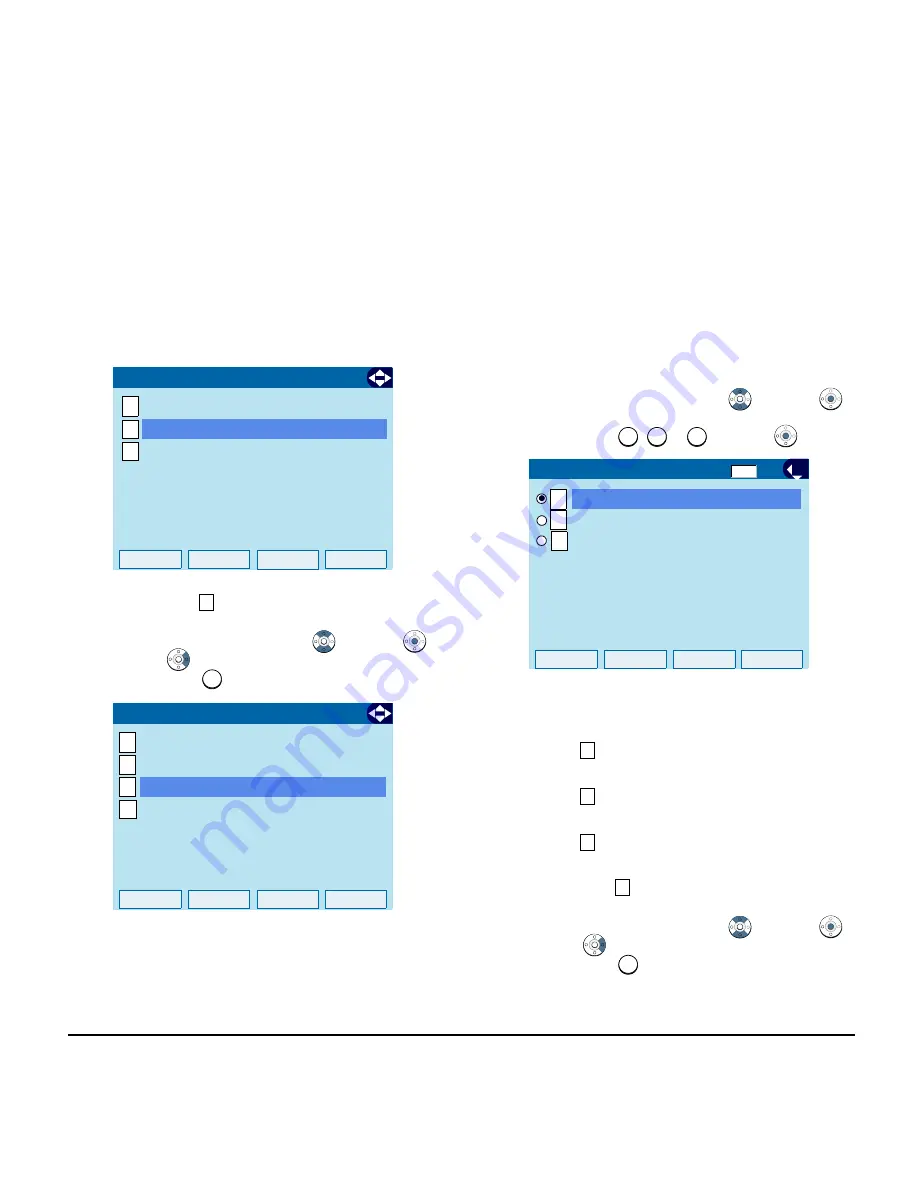
background image

 68 

1.

STEP 4:

Select 

Protocol

.

Select an item by one of the following operations.
• Highlight an item by using 

, and press 

 or 

OK

.

• Press  . 


STEP 5:

Choose a protocol used by the server 
which stores the download file.

Select an item by one of the following operations.
• Highlight an item by using 

, and press 


or 

OK

.

• Press 

 or 

, and press 

 or 

OK

.  

STEP 6:

The display returns to the 

Download 

Menu

 screen.

If 

FTP 

is selected here, continue with 

STEP 7.

If 

TFTP 

is selected here, proceed to 

STEP 15

.

If 

HTTPS 

is selected here, proceed to 

STEP 7

.

STEP 7:

Select 

Account Settings

.

Select an item by one of the following operations.
• Highlight an item by using 

, and press 

 or 

OK

.

• Press  .

Menu

OK

1

2

Data Backup/Restore

[Setting]

3

User Setting

1/1

Download

3

3

Back

OK

1

2

[Download Menu]

3

1/1

4

       Account Settings

Download Files

Download Address

Protocol

1

2

3

1

2

OK

Back

1/1

FTP

TFTP

[Protocol]

HTTPS

3

1

2

3

4

4

Содержание Univerge DT820

Страница 1: ...DT820 NDA 31729 ISSUE 3 0 USER GUIDE SV9100 ...

Страница 2: ......

Страница 3: ...ation contained herein is the property of NEC Enterprise Communication Technologies Inc and shall not be reproduced without prior written approval of NEC Enterprise Communication Technologies Inc Dterm NEAX and UNIVERGE are registered trademarks of NEC Corporation Windows is a registered trademark of Microsoft Corporation Copyright 2018 NEC Enterprise Communication Technologies Inc 3929 W John Car...

Страница 4: ......

Страница 5: ... Menu Key and Cursor Key 15 Shortcut Menu 18 Soft Keys 19 Multi Window 21 Pop up Windows 28 2 TERMINAL SETUP Setup With Up Down Key 31 Setup With Feature Key 31 Setup with Menu Key 32 3 BASIC OPERATION Login 85 Logout 85 4 FEATURE OPERATION Answering Calls 87 Placing Calls 88 Microphone Control 91 Speakerphone Calls 91 Group Listen 91 ...

Страница 6: ...y Messaging 105 Station Relocation 106 Code Restriction Dial Block 106 Account Code Entry 107 Automatic Call Distribution ACD 108 5 DIRECTORY OPERATION Add New Data 118 Find Registered Data 119 Make a Call From Directory 120 Delete All Directory Data 120 Delete Specific Directory Data 121 6 CALL HISTORY OPERATION View Call History 124 Make a Call From Call History 124 Store Call History Data to Sp...

Страница 7: ... Icon Display Menu List CHAPTER 2 TERMINAL SETUP Explains the operating procedures for terminal settings of the DT Series CHAPTER 3 BASIC OPERATION Explains the basic operation of DT Series CHAPTER 4 FEATURE OPERATION Explains operating procedures for various Telephony Server features CHAPTER 5 DIRECTORY OPERATION Explains operating procedures for Directory function CHAPTER 6 CALL HISTORY OPERATIO...

Страница 8: ...2 1 Face Layout ITY 6D 1 6 Button with LCD Note Not all terminal models are available in all regions ITY 8LDX 1 Self Labeling 8 Button ...

Страница 9: ...3 1 ITY 8LCGX 1 Color Self Labeling 8 Button ...

Страница 10: ...l Key 1 key Soft Key 6 keys Exit Help and 4 keys Handset Narrowband supporting HAC Hands Free Full Duplex Narrowband Headset Wired Recommended model SUPRAPLUS HW251N Plantronics Headset Wireless APD 80 cable Recommended model SAVI W710 Plantronics External Interface LAN Connector 2 ports Handset Modular 1 port Headset Modular 1 port Power Supply PoE IEEE802 3at Type1 Power Consumption IEEE802 3at ...

Страница 11: ... A law G 729a IP Address Setting DHCP RFC 2131 compatible DHCP Vendor Extensions RFC 2132 compatible QoS ToS IP Precedence Diffserv Status Icon Missed Call Voice Mail Security Mode RTP Encryption Ecology Mode Call Recording Headset Ring Cursor VLAN Tag VLAN IEEE802 1Q p Security IEEE802 1x authentication EAP MDS EAP TLS EAPOL Forwarding SIP RTP Encryption NAT Static NAPT VPN L2TP IPSec IPv4 Downlo...

Страница 12: ...this key 4 Softkeys Any feature shown at the bottom of the LCD is available The appropriate feature key is displayed on the screen according to the call handling process 5 Help The user can press this key followed by a programmable key to check what Line or Programmable Feature is programmed on the key 6 Programmable Keys These keys can be programmed as Flexible Line key Programmable Feature Key b...

Страница 13: ...sily 12 Cursor By using this Key DT Series user can access various features with simple operation Two lines of menu items can be displayed at a time Use Up or Down key to scroll to the item 13 Enter Note ITY 6D 1 does not support the Shortcut Menu 14 Redial CID Scroll Last Number Call Speed Calling Station Group Press key once to activate redial feature Press redial and scroll through numbers that...

Страница 14: ...e station user to transfer established calls to another station without attendant assistance 17 Hold Press this key to place an internal or external call on hold ITY 8LDX 1 Self Labeling 8 Button with LCD 1 Call Indicator Lamp On the SV9100 this lamp flashes fast when a call terminates to the terminal and flashes slower when a message has been left 1 4 3 7 8 5 6 10 9 12 11 13 2 14 15 16 17 18 19 ...

Страница 15: ...aximum 13 characters excluding icon a Icon Status of the Line key such as Call Ringing Call Hold or Busy and setting on the Feature key are shown as Icons User s Status Icon Flashing Pattern Idle I HOLD Blink Note Others Hold Recall Blink Note Incoming Ringing During Conversation Indi vidual Use Call Transfer Conference During Conversation Other Party Use Active Feature Under a set ting of feature...

Страница 16: ...ng to the call handling process 7 Scroll Key This key is used to turn over the page of 8LD display 8 Help The user can press this key followed by a programmable key to Check what Line or Programmable Feature is programmed on the key 9 Recall Press key to finish an outside call and hear the dial tone With Centrex trunks press the recall key to hook flash the line 10 Feature Used to activate any fea...

Страница 17: ...ion Group Press key once to activate redial feature Press redial and scroll through numbers that have been dialed When the desired number is displayed press the key to activate dialing Press key twice to activate the CID scroll feature Press key twice and scroll through numbers that have been received When the desired number is displayed go off hook to activate dialing 17 Speaker Controls the buil...

Страница 18: ...keys are provided They can be programmed as Flexible Line Programmable feature key by Telephony Server Administrator For the SV9100 the programmable keys can be set by WebPro PCPro Handset Pro and the user can also set them Note Maximum 11 characters including icon Maximum 13 characters excluding icon a Icon Status of the Line key such as Call Ringing Call Hold or Busy and setting on the Feature k...

Страница 19: ...user can exit from a screen mode by pressing this key User s Status Icon Flashing Pattern Idle I HOLD Blink Note Others Hold Recall Blink Note Incoming Ringing During Conversation Indi vidual Use Call Transfer Conference During Conversation Other Party Use Active Feature Under a set ting of feature key like a Call Forwarding Others Steady Lit Key is busy example if pro grammed as a virtual extensi...

Страница 20: ...to hook flash the line 10 Feature Used to activate any features as terminal setup functions 11 Answer When LED on this key is flashing press key to answer a waiting call 12 Mic Press the key to Mute Un Mute the speaker and or handset 13 Menu From this key the user can access to the functions not normally used such as terminal settings downloads and access to XML applications easily 14 Cursor By us...

Страница 21: ...s displayed go off hook to activate dialing 17 Speaker Controls the built in speaker which can be used for Hands Free dialing monitoring LED on key lights when key is active DT820 supports half full duplex handsfree 18 Transfer Allows the station user to transfer established calls to another station without attendant assistance 19 Hold Press this key to place an internal or external call on hold M...

Страница 22: ...gistered in the service URL is displayed When the service URL is not registered Service icon is not displayed 4 Setting ITY 6D 1 ITY 8LDX 1 ITY 8LCGX 1 To make the user settings of DT820 such as incoming call and display and download various files such as ringtones Music on Hold and directories XML Services 5 Phone Portal ITY 6D 1 ITY 8LDX 1 ITY 8LCGX 1 When the home URL is not registered Phone sc...

Страница 23: ...ITY 8LDX 1 ITY 8LCGX 1 When you select the Phone icon a pop up screen is displayed on an XML application screen When XML application is registered in the home URL the phone icon is displayed When a home URL is not registered the phone icon is not displayed Note If pop up window display is disabled at installation this icon is not displayed 10 Home URL icon ITY 6D 1 ITY 8LDX 1 ITY 8LCGX 1 XML appli...

Страница 24: ...nter You can also check missed calls or access the new voice mails from shortcut menu Shortcut Menu Ubiquitous Tourist Hotel Map Restaurant Transportation Miscellaneous Feature Description Missed Calls Access history of Missed Calls The icon disappears after checking the history Voice Mail Access history of incoming Voice Mail The icon disappears after checking the voice mails 1 2 ...

Страница 25: ...nce you check the missed call this icon will disappear Voice Mail This icon provides notification of incoming Voice Mail Once you check the mail this icon will disappear Security Mode This icon appears when the network negotiation between DT820 and UNIVERGE SV8000 and SV9000 series is encrypted RTP Encryption This icon appears when the conversation is encrypted Ecology Mode This icon appears when ...

Страница 26: ...EP 4 Press Set to set DND or Cncl to cancel it BUSY CONSULTATION HOLD 1 CONNECTION RINGING Voice MW VMsg 3 18 TUE 3 49PM STA 101 CALLING MW VMsg Camp 3 18 TUE 3 49PM STA 101 BUSY Barg Conf 3 18 TUE 3 49PM 101 TALKING TO VMsg InPg ExPg 3 18 TUE 3 49PM HOLD STA 101 STA 150 List Dir VMsg 150 3 18 TUE 3 49PM STA 150 ICM Prog 150 3 18 TUE 3 49PM PGM Save Menu Cfwd DND STA SET DND Set Cncl ...

Страница 27: ... Calendar Selection on Map Other Information Ubiquitous City 2010 07 12 3 3 2 0 within 100 night Hotel Search Lake Sea of XXX Ubiquitous St 1 2 3 4 5 8 9 6 7 10 11 12 15 16 13 14 17 18 19 22 23 20 21 24 25 26 29 30 27 28 2010 June City Map Related Sites Distance Admission Fee Small Children Categories Transportation Area Art Music Ubiquitous City by walking Search City Music Hall 2 3 1 Ubiquitous ...

Страница 28: ...ervice icon of the XML Ubiquitous Tourist Hotel Map Restaurant Transportation Miscellaneous Portal History Directory Setting Service When a home URL is registered Portal History Directory Setting Service When a home URL is registered Ubiquitous Tourist Hotel Map Restaurant Transportation Miscellaneous Portal History Directory Setting Service Restaurant Restaurants Reservation Distance Price Small ...

Страница 29: ...y is closed National Theater National Library Within 5 minutes Within 100 x City Hall West Park Lib rary East Park Japanese Restaurant Italian Restaurant French Restaurant Main St North Park East Park River North City Music Hall National Theater National Library The Book Novel History I History II Piano Recital New Restaurants Reservation Distance Price Small Children Categories Transportation Are...

Страница 30: ...icons to launch the application or setting Menu ITY 8LCGX 1 Portal History History Directory Setting Local application icon Phone History Directory Setting 8 RTP USB 31313 MIC DND 7 25 MON 26 MAR 2012 When a home URL is not registered Phone History Directory Setting When a home URL is not registered Phone History Directory Setting 8 RTP USB 31313 MIC DND 7 25 MON 26 MAR 2012 ...

Страница 31: ...urrently running applications is displayed While this error message is displayed you cannot execute any operations on XML applications If you try to launch a fifth application an error message to ask you to exit one of the currently running applications is displayed Press Next Phone History Directory Setting Phone History History Directory Setting 1 2 3 4 Delete All Missed Outgoing Incoming Histor...

Страница 32: ...nning application icon is added to the right TIP If you do not operate anything for 10 seconds after an error message is displayed the trial of launching the new application is automatically canceled 4 windows already set You need to close 1 window Cancel Next 4 windows already set You need to close 1 window Cancel Next Currently running XML application icons excluding the Portal Please close 1 wi...

Страница 33: ...e Destination Date Air Port Flight No Ubiquitous Air Ubiquitous International Air Port UB 001 London 2010 7 20 Search On Map 0 00 6 00 12 00 18 00 24 00 World Weather London Rome Alexandria Los Angeles Tokyo Beijing Ubiquitous Air Portal History Directory Setting Service Hotel Restaurant Transport Newly running application icon Portal Transport Hotel Restaurant History Directory Setting Service Ne...

Страница 34: ...cation icon appear alternately every second History Portal Directory Setting Service Hotel Map NEW UP NEW icon UPDATE icon TIP A procedure how to display a pop up window is set at installation For details contact the System Administrator How to Display By selecting Phone icon on the menu screen When there is an incoming call to the phone By going off hook lifting the handset etc When receiving a r...

Страница 35: ...eing answered XML application server directs to do so Pop Up Close on the XML application is pressed TIP If the previous page of the menu screen is the default home screen the telephone icon of the menu screen will not be displayed TIP When using Help key on the POP UP window Help key operation setting is required For details see Set Usability Menu ...

Страница 36: ...30 1 This page is for your notes ...

Страница 37: ... call Adjust Speaker Volume STEP 1 Press Up or Down during speakerphone operation or during a call Adjust Ringer Tone STEP 1 Press Up or Down during ringing Adjust LCD Contrast ITY 6D 1 ITY 8LDX 1 STEP 1 Press the Up Down key in the on hook status Setup With Feature Key Microphone On Off STEP 1 LED on shows the status of the built in microphone STEP 2 Press the MIC key or press and HANDSET 3 18 TU...

Страница 38: ...oming Call Select an item by one of the following operations Highlight an item by using and press or OK Press STEP 4 Select Offhook Ring Select an item by one of the following operations Highlight an item by using and press or OK Press 1 1 Menu OK 1 2 Data Backup Restore Setting 3 Download User Setting 1 1 1 1 OK Back 1 1 User Setting 1 2 3 4 5 6 0 Display Change Password Usability Talk Security I...

Страница 39: ... User Setting Select an item by one of the following operations Highlight an item by using and press or OK Press STEP 3 Select Incoming Call Select an item by one of the following operations Highlight an item by using and press or OK Press TIP Default setting is Enabled TIP The enabled item is highlighted 1 2 1 2 1 2 1 1 Disable OK Back Enable Offhook Ring 1 1 Menu OK 1 2 Data Backup Restore Setti...

Страница 40: ...o Set Ringer Tone The procedure below shows how to change the ringer tone for internal call and external call STEP 1 Display the Menu screen select Setting STEP 2 Select User Setting Select an item by one of the following operations Highlight an item by using and press or OK Press 2 3 OK Back 1 1 Incoming Call 1 2 3 4 Ring Tone Illumination Offhook Ring Headset Ring 1 2 1 2 1 2 Enable 1 1 Disable ...

Страница 41: ... one of the following operations Highlight an item by using and press or OK Press or STEP 6 Select a desired tone type You can preview designated ringer tone Select an item by one of the following operations Highlight an item by using and press or OK Press the digit key of desired number and press or OK For example press to select Download 1 1 1 OK Back 1 1 User Setting 1 2 3 4 5 6 0 Display Chang...

Страница 42: ...e 1 520 660 16Hz modulation 2 Tone Type 2 520 660 8Hz modulation 3 Tone Type 3 1400 1100 Door Phone 4 Tone Type 4 1100 No modulation 5 Tone Type 5 540 No modulation 6 Tone Type 6 1100 1400 16Hz modulation 7 Tone Type 7 660 760 16Hz modulation 8 Tone Type 8 1100 Envelope 9 Tone Type 9 Door Phone Melody 10 Tone Type 10 Melody 1 11 Tone Type 11 Melody 2 12 Tone Type 12 Melody 3 13 Tone Type 13 Melody...

Страница 43: ...ss STEP 3 Select Incoming Call Select an item by one of the following operations Highlight an item by using and press or OK Press STEP 4 Select Illumination Select an item by one of the following operations Highlight an item by using and press or OK Press 1 1 Menu OK 1 2 Data Backup Restore Setting 3 Download User Setting 1 1 1 1 OK Back 1 1 User Setting 1 2 3 4 5 6 Display Change Password Talk Se...

Страница 44: ...ht an item by using and press or OK Press and press or OK Note When selecting Automatic the preview function will not operate Note When selecting Automatic or not performing this illumination setting Red is automatically applied 1 2 1 2 Back OK 1 2 Illumination External Call 1 1 Internal Call 0 9 TIP You can set the illumination pattern for the telephone here Illumination pattern can be set for Na...

Страница 45: ...n item by one of the following operations Highlight an item by using and press or OK Press STEP 4 Select RTP Alarm Select an item by one of the following operations Highlight an item by using and press or OK Press 1 1 Menu OK 1 2 Data Backup Restore Setting 3 Download User Setting 1 1 2 2 OK Back 1 1 User Setting 1 2 3 4 5 6 Display Change Password Security Incoming Call Talk 0 Setting Reset Usabi...

Страница 46: ...s or OK Press STEP 3 Select Talk Select an item by one of the following operations Highlight an item by using and press or OK Press Menu Items Description 0 Automatic Follow the system settings If no setting is made in the system the default setting Alarm ON is applied 1 Disable Follow the terminal settings OFF 2 Enable Follow the terminal settings ON TIP For the setting on the system contact the ...

Страница 47: ...ssword Security Incoming Call Talk 0 Setting Reset Usability 2 2 Back OK 1 1 Talk 1 2 3 4 5 Key Touch Tone Hold Music Prefix RTP Alarm DTMF Tone Menu Items Description 0 Automatic Follow the system settings If no setting is made in the system the default setting DTMF ON is applied 1 Disable Follow the terminal settings OFF 2 Enable Follow the terminal settings ON TIP For the setting on the system ...

Страница 48: ...or OK Press STEP 3 Select Talk Select an item by one of the following operations Highlight an item by using and press or OK Press STEP 4 Select Key Touch Tone Select an item by one of the following operations Highlight an item by using and press or OK Press 1 1 Menu OK 1 2 Data Backup Restore Setting 3 Download User Setting 1 1 2 2 OK Back 1 1 User Setting 1 2 3 4 5 6 Display Change Password Secur...

Страница 49: ... 2 Select User Setting Select an item by one of the following operations Highlight an item by using and press or OK Press STEP 3 Select Talk Select an item by one of the following operations Highlight an item by using and press or OK Press TIP Default setting is Automatic TIP The enabled item is highlighted 0 1 2 3 0 3 0 1 2 3 OK Back 1 1 Key Touch Tone No Tone Tone Automatic Voice 1 1 Menu OK 1 2...

Страница 50: ... of the following operations Highlight an item by using and press or OK Press or and press or OK Note You can preview the designated music on hold When selecting Download the music on hold file must be downloaded in advance If there is no downloaded file you hear no tone in the preview function in actual operating conditions Minuet is automatically applied 4 4 Back OK 1 1 Talk 1 2 3 4 5 Prefix RTP...

Страница 51: ...ng and press or OK Press STEP 3 Select Display Select an item by one of the following operations Highlight an item by using and press or OK Press STEP 4 Select Calendar Format Select an item by one of the following operations Highlight an item by using and press or OK Press 1 1 Menu OK 1 2 Data Backup Restore Setting 3 Download User Setting 1 1 3 3 OK Back 1 1 User Setting 1 2 3 4 5 6 Change Passw...

Страница 52: ...lect Setting STEP 1 Select User Setting Select an item by one of the following operations Highlight an item by using and press or OK Press STEP 2 Select Display Select an item by one of the following operations Highlight an item by using and press or OK Press Menu Items Description 0 Automatic Follow the system settings 1 12 hour indication 12 hour clock 2 24 hour indication 24 hour clock TIP For ...

Страница 53: ...Enable is applied OK Back 1 1 User Setting 1 2 3 4 5 6 0 Change Password Security Incoming Call Talk Display Setting Reset Usability 2 2 Back OK 1 1 1 2 3 4 5 6 Back Light Language Font Size Screen Saver Calendar Format Display 7 Advanced Local Volume Menu Items Description 0 Automatic Each volume level is displayed on LCD 1 Disable Each volume level is not displayed on LCD 2 Enable Each volume le...

Страница 54: ...m by one of the following operations Highlight an item by using and press or OK Press STEP 3 Select Display Select an item by one of the following operations Highlight an item by using and press or OK Press STEP 4 Select Screen Saver Select an item by one of the following operations Highlight an item by using and press or OK Press 1 1 Menu OK 1 2 Data Backup Restore Setting 3 Download User Setting...

Страница 55: ...tep 7 Select Wait Time Input Wait Time to launch the screen saver 1 999 min and press or OK 1 1 Back OK 1 2 Screen Saver Wait Time Screen Saver Mode 1 1 1 2 1 2 1 2 OK Back 1 1 Screen Saver Enable Disable TIP Default setting is Disable ITY 6D 1 ITY 8LDX 1 Default setting is Enable ITY 8LCGX 1 If 1 Disable is specified an afterimage may occur on the LCD if the terminal is used for an extended lengt...

Страница 56: ...m by one of the following operations Highlight an item by using and press or OK Press STEP 4 Select Back Light Select an item by one of the following operations Highlight an item by using and press or OK Press 1 1 Menu OK 1 2 Data Backup Restore Setting 3 Download User Setting 1 1 3 3 OK Back 1 1 User Setting 1 2 3 4 5 6 0 Change Password Security Incoming Call Talk Display Setting Reset Usability...

Страница 57: ...item by one of the following operations Highlight an item by using and press or OK Press STEP 3 Select Display Select an item by one of the following operations Highlight an item by using and press or OK Press TIP Default setting is Level 3 TIP The enabled item is highlighted 1 4 1 2 OK Back 1 1 3 Level 1 Bright Level 3 Back Light 4 Level 4 Dark Level 2 1 1 Menu OK 1 2 Data Backup Restore Setting ...

Страница 58: ...the Menu screen select Setting STEP 2 Select User Setting Select an item by one of the following operations Highlight an item by using and press or OK Press STEP 3 Select Display Select an item by one of the following operations Highlight an item by using and press or OK Press 5 5 Back OK 1 1 1 2 3 4 5 6 Language Screen Saver Calendar Format Display 7 Advanced Local Volume Back Light Font Size 1 2...

Страница 59: ...1 1 User Setting 1 2 3 4 5 6 0 Change Password Security Incoming Call Talk Display Setting Reset Usability 6 6 Back OK 1 1 1 2 3 4 5 6 Screen Saver Calendar Format Display 7 Advanced Local Volume Back Light Font Size Language TIP Default setting is Automatic TIP When selecting Automatic follow the setting on the System For the setting on the System contact to the System Administrator TIP The enabl...

Страница 60: ...Select an item by one of the following operations Highlight an item by using and press or OK Press STEP 4 Select Advanced Select an item by one of the following operations Highlight an item by using and press or OK Press 1 1 Menu OK 1 2 Data Backup Restore Setting 3 Download User Setting 1 1 3 3 OK Back 1 1 User Setting 1 2 3 4 5 6 0 Change Password Security Incoming Call Talk Display Setting Rese...

Страница 61: ...y The following steps show how to set the displayed character color on the LCD Note Font characters are displayed in LCD 4 line display area Note ITZ 12DG 3 does not support Font Color setting STEP 1 Display the Menu screen select Setting STEP 2 Select User Setting Select an item by one of the following operations Highlight an item by using and press or OK Press 1 1 Back OK 1 2 Advanced 3 Wallpape...

Страница 62: ...ess STEP 6 Select a desired color Select an item by one of the following operations Highlight an item by using and press or OK Press the digit key of desired number and press or OK For example press to select Color 15 3 3 OK Back 1 1 User Setting 1 2 3 4 5 6 0 Change Password Security Incoming Call Talk Display Setting Reset Usability 7 7 Back OK 1 1 1 2 3 4 5 6 Screen Saver Calendar Format Displa...

Страница 63: ... of the color selection TIP Default setting is Color 2 TIP The enabled item is highlighted 1 2 8 1 Color 1 Back OK 2 Color 3 3 Color 4 4 Color 5 5 Color 6 6 Color 7 7 Color 8 Font Color Color 2 2 2 16 9 Color 10 Back OK 10 Color 11 11 Color 12 12 Color 13 13 Color 14 14 Color 15 15 Color 16 Font Color Color 9 ...

Страница 64: ...EP 3 Select Display Select an item by one of the following operations Highlight an item by using and press or OK Press STEP 4 Select Advanced Select an item by one of the following operations Highlight an item by using and press or OK Press 1 1 Menu OK 1 2 Data Backup Restore Setting 3 Download User Setting 1 1 3 3 OK Back 1 1 User Setting 1 2 3 4 5 6 0 Change Password Security Incoming Call Talk ...

Страница 65: ...l application For details contact the System Administrator STEP 8 The display returns to the Turn Off Display screen When Enable is selected at Step 7 Choose Wait Time 3 4 Back OK 1 2 Advanced 3 1 1 4 5 Wallpaper Font Color Home Frame Turn Off Display Backlight Fade Control 1 1 Back OK 1 2 Turn Off Display Wait Time Turn Off Display Mode 1 1 TIP If you select App priority the screen saver is set t...

Страница 66: ...ght an item by using and press or OK Press STEP 3 Select Display Select an item by one of the following operations Highlight an item by using and press or OK Press TIP When App priority is selected for Turn Off Display Mode if the external application does not give instructions to turn off the display the setting of Wait Time will be invalid TIP Default value is 180 min Back OK 1 2 Turn Off Displa...

Страница 67: ... one of the following operations Highlight an item by using and press or OK Press or and press or OK OK Back 1 1 User Setting 1 2 3 4 5 6 0 Change Password Security Incoming Call Talk Display Setting Reset Usability 7 7 Back OK 1 1 1 2 3 4 5 6 Screen Saver Calendar Format Display 7 Local Volume Back Light Font Size Language Advanced 4 5 TIP Default value is Enable Back OK 1 2 Advanced 3 Wallpaper ...

Страница 68: ... or Enable Change Password To change an existing password follow the procedure below This password is used for the following occasions To lock unlock the telephone To delete the directory data To reset the telephone settings STEP 1 Display the Menu screen select Setting STEP 2 Select User Setting Select an item by one of the following operations Highlight an item by using and press or OK Press 1 1...

Страница 69: ...r the new password After entering the new password press or Set STEP 6 Enter the new password again After entering the retry password press or OK Note A maximum of 32 digits 0 9 and can be used when setting a new password 4 4 OK Back 1 1 User Setting 1 2 3 4 5 6 0 Security Incoming Call Talk Display Change Password Setting Reset Usability OK Cancel BK 1 Change Password New Pass Retry Pass Old Pass...

Страница 70: ...r Setting Select an item by one of the following operations Highlight an item by using and press or OK Press STEP 3 Select Usability Select an item by one of the following operations Highlight an item by using and press or OK Press TIP When the password entry ends in failure the following error message is issued In that case press OK and make a retry OK Complete Password OK Password Error Password...

Страница 71: ...ight an item by using and press or OK Press or and press or OK OK Back 1 1 User Setting 1 2 3 4 5 6 0 Usability Security Incoming Call Talk Display Change Password Setting Reset 1 1 OK Cancel 1 Help Key Mode 1 1 Usability No Item Description 1 SubMenu Set the Help key which displays submenu 2 Pop up Window Set the Help key which displays pop up window 1 2 OK Cancel 1 1 1 Help Key Mode SubMenu 2 Po...

Страница 72: ...e of the following operations Highlight an item by using and press or OK Press STEP 4 Enter the password After entering the password press or OK STEP 5 When the password entry completes successfully the display changes as follows Press or OK to clear the personal data off the telephone 1 1 Menu OK 1 2 Data Backup Restore Setting 3 Download User Setting 1 1 0 0 OK Back 1 1 User Setting 2 3 4 5 6 0 ...

Страница 73: ... default is C InetPub ftproot of the FTP server TFTP server Put the downloading file into a desired directory of TFTP server and specify it as the directory for downloading HTTPS server Put the downloading file into a desired directory of the HTTPS server and specify the directory for downloading Note Refer to the DT Resource Manual for HTTPS server STEP 2 Display the Menu screen select Setting ST...

Страница 74: ...e display returns to the Download Menu screen If FTP is selected here continue with STEP 7 If TFTP is selected here proceed to STEP 15 If HTTPS is selected here proceed to STEP 7 STEP 7 Select Account Settings Select an item by one of the following operations Highlight an item by using and press or OK Press Menu OK 1 2 Data Backup Restore Setting 3 User Setting 1 1 Download 3 3 Back OK 1 2 Downloa...

Страница 75: ...tings screen Select Password Select an item by one of the following operations Highlight an item by using and press or OK Press OK Back 1 1 Download Menu 1 2 3 4 Download Files Download Address Protocol Account Settings 1 1 Back OK 1 2 Account Settings 3 1 1 Password Folder User ID TIP For details on character entry method see How to Input Characters OK Back BK A User ID Input a user ID 2 2 Back O...

Страница 76: ... item by using and press or OK Press STEP 13 Enter the directory where the download file is stored After entering the directory press or OK TIP For details on character entry method see How to Input Characters OK Back BK A Input a password Password 3 3 TIP For details on character entry method see How to Input Characters OK Back 1 1 1 2 3 Account Settings User ID Password Folder OK Back BK A Folde...

Страница 77: ...et the IP address of 10 41 208 205 enter 10 41 208 205 separate with an asterisk STEP 17 The display returns to the Download Menu screen Select Download Files Select an item by one of the following operations Highlight an item by using and press or OK Press Back OK 1 2 Account Settings 3 1 1 Password Folder User ID 2 2 OK Back 1 1 Download Menu 1 2 3 4 Download Files Protocol Account Settings Down...

Страница 78: ... a file for ringer tone the default file name is Melody1 2 3 wav When downloading a file for Music on Hold Select Hold Music and go to STEP 20 When downloading a file for ringer tone Select Ring Tone and go to STEP 19 When downloading a file for directory Select Directory and go to STEP 20 When downloading a file for Wallpaper Select Directory and go to STEP 20 1 2 3 4 2 1 2 3 1 3 Back OK 1 2 Ring...

Страница 79: ...A maximum of 20 characters 0 9 A Z a z or _ can be entered as a file name STEP 22 Press or Exec to start the downloading process While downloading a file the LCD displays Downloading first and Saving File Format Maximum Size PCM µ law 8kHz s wav under 32 seconds File Name Directory csv Fixed Code Unicode UTF 8 Directory BK A Input a file name Directory csv Cancel Exec File Format Maximum Size bmp ...

Страница 80: ...etPub ftproot for the backed up file TFTP server Specify a desired destination directory for the backed up file HTTPS server Specify a desired destination directory for the backed up file STEP 2 Display the Menu screen select Setting STEP 3 Select Data Backup Restore Select an item by one of the following operations Highlight an item by using and press or OK Press Check Points Actions Download fil...

Страница 81: ... returns to the Backup Restore screen If FTP is selected continue to with STEP 7 If TFTP is selected proceed to STEP 15 If HTTPS is selected proceed to STEP 7 STEP 7 Select Account Settings Select an item by one of the following operations Highlight an item by using and press or OK Press Menu OK 1 2 Setting 3 User Setting 1 1 Download Data Backup Restore 4 4 Back OK 1 2 3 1 1 4 Data Backup Data Re...

Страница 82: ...creen Select Password Select an item by one of the following operations Highlight an item by using and press or OK Press OK Back 1 1 1 2 3 4 Server Address Protocol Backup Restore 5 Account Settings Data Backup Data Restore 1 1 Back OK 1 2 Account Settings 3 1 1 Password Folder User ID TIP For details on character entry method see How to Input Characters OK Back BK A User ID Input a user ID 2 2 Ba...

Страница 83: ...the destination directory of the FTP HTTPS server After entering the directory press or OK STEP 14 The display returns to the Account Settings screen Press or Back to display the Backup Restore screen OK Back BK A Input a password Password 3 3 OK Back 1 1 1 2 3 Account Settings User ID Password Folder TIP For details on character entry method see How to Input Characters OK Back BK A Folder Input a...

Страница 84: ...ct Data Backup Select an item by one of the following operations Highlight an item by using and press or OK Press STEP 18 The default file name is displayed as follows Note Do not change the extension of the backup file The setting data of the telephone can only be backed up as a tgz file 3 3 OK Back 1 1 Backup Restore 1 2 3 4 Data Backup Data Restore 5 Account Settings Protocol Server Address OK ...

Страница 85: ...TP HTTPS Server must be entered from DT820 STEP 1 Set up the FTP TFTP HTTPS server FTP server Put the backup file you want to restore into the designated directory for Windows IIS the default is C InetPub ftproot of the FTP server TFTP server Put the backup file you want to restore into a desired directory of TFTP server and specify it as the directory for downloading HTTPS server Put the backup f...

Страница 86: ...light an item by using and press or OK Press STEP 5 Choose a protocol used by the server which stores the backup file Select an item by one of the following operations Highlight an item by using and press or OK Press or and press or OK 3 3 Menu OK 1 2 Setting 3 User Setting 1 1 Download Data Backup Restore 4 4 Back OK 1 2 3 1 1 4 Data Backup Data Restore Server Address Account Settings Protocol 5 ...

Страница 87: ...press or OK Press STEP 8 Select User ID Select an item by one of the following operations Highlight an item by using and press or OK Press STEP 9 Enter a User ID Enter a User ID by using digit keys then press or OK 1 2 3 5 5 OK Back 1 1 1 2 3 4 Server Address Protocol Backup Restore 5 FTP Settings Data Backup Data Restore 1 1 TIP For details on character entry method see How to Input Characters Ba...

Страница 88: ...Folder Select an item by one of the following operations Highlight an item by using and press or OK Press STEP 13 Enter the directory where the backup file is stored Enter the directory and press or OK TIP For details on character entry method see How to Input Characters 2 2 OK Back BK A User ID Input a user ID OK Back BK A Input a password Password TIP For details on character entry method see Ho...

Страница 89: ... file For example to set the IP address of 10 41 208 205 enter 10 41 208 205 sepa rate with an asterisk After entering an IP address press or OK STEP 17 The display returns to the Backup Restore screen Select Data Restore Select an item by one of the following operations Highlight an item by using and press or OK Press Back OK 1 2 FTP Settings 3 1 1 Password Folder User ID 3 3 Back OK 1 2 3 1 1 4 ...

Страница 90: ... Saving Note Do not power OFF the DT820 while Saving is displayed on the LCD STEP 20 After the download process completes the display changes to the following Back OK 1 2 3 1 1 4 Data Backup Data Restore Server Address Account Settings Protocol 5 Backup Restore BK A Cancel Exec Input a folder name PersonalData tgz Data Restore TIP When changing the default file name press BK once to delete the def...

Страница 91: ...ned Logout Feature Key on the terminal Note This location is an example Note Logout button is assigned by data setting at the ECP Enterprise Communication Platform 2 LOGOUT is displayed on the LCD of the terminal 3 Press the Logout Feature Key on the terminal again Password Login ID 2000 Cancel BK Set OK Login ID 2000 Cancel BK Set OK Password 28 APR MON 8 45AM List Dir VMsg 101 STA 101 28 APR MON...

Страница 92: ...86 This page is for your notes ...

Страница 93: ... handset 2 Start conversation Note 1 A Second Incoming Extension key must be assigned to appear and ring Note 2 A Line key must be available to answer an incoming outside call Answering Outside Calls Using the Answer Key 1 Receive outside call 2 Press the Answer key 3 Talk with the incoming calling party 4 When additional outside calls are received press the Answer key to place the current call on...

Страница 94: ...ft the handset or press the Speaker key Off Hook Signaling With a call in progress 1 Receive Off Hook signaling 2 Press the Answer key then converse with the second party Note 3 The second call may be placed on Hold Note 4 Press the flashing Line key or Conf key to return to the first call Placing Calls Internal Calls 1 Lift the handset 2 Dial a station number or 0 for attendant 3 Voice announce a...

Страница 95: ...LUME DOWN keys to search for the desired number 4 Lift the handset or press Speaker to place the call Speed Dial System Group Station To dial a Station Speed Dial number 1 Press the Speaker key 2 Dial 7 default Service Code Note To preselect press a Line key in step 1 instead of Speaker 3 Dial the Station Speed Dial buffer number 0 9 1 Station Speed Dial buffer 1 2 Station Speed Dial buffer 2 0 St...

Страница 96: ...If you have a DSS Console you may be able to press a DSS Console key to chain to a stored number To dial a Group Speed Dialing number 1 Press the Speaker key 2 Dial 4 default Service Code OR Press the Redial key OR Press the Group Speed Dialing key Service Code 751 28 Note To preselect press a Line key in step 1 instead of pressing Speaker 3 Dial the Group Speed Dial buffer number none at default ...

Страница 97: ...tor a call press the Speaker key the Speaker LED lights and replace the handset Group Listen To initiate Group Listen 1 Place or answer a call using the handset 2 Press the Speaker key twice do not hang up Note 1 The Speaker LED flashes Note 2 You can talk to the caller through the handset Your coworkers hear your caller s voice over your telephone s speaker Note 3 When you press the Speaker key o...

Страница 98: ...r key 2 Dial the station number 3 Announce the call optional 4 Replace the handset Using Direct Station Selection DSS With a call in progress 1 Press the Transfer key 2 Press the programmed DSS 3 Announce the call optional 4 Replace the handset Note 1 If the called station is busy replace the handset to initiate a camp on Unanswered camp on calls and unscreened transfers will recall to the transfe...

Страница 99: ...eat steps 2 4 above to add more parties Call Park System To Park a call in a system orbit Note You can Park intercom or trunk calls 1 Press the Park key Service Code 752 04 orbit Note The Park key LED lights 2 Use Paging to announce the call 3 Press the Speaker key to hang up Note If not picked up the call will recall you OR 1 Press the Transfer key 2 Dial 6 and the Park orbit 01 64 Note If you he...

Страница 100: ...on calls you back Note 1 If the unavailable extension was unanswered not busy the Callback goes through after your co worker uses their telephone for the first time Note 2 If you have Callback Automatic Answer you automatically place a call to the formerly busy extension when you lift the handset If you do not have Callback Automatic Answer you must press the ringing line appearance to place the c...

Страница 101: ...er dial 0 or press your Message Waiting key to automatically leave a message To cancel all your Messages Waiting Note This includes messages you have left for other extensions and messages other extensions have left for you 1 Press the Speaker key 2 Dial 773 3 Hang up OR Press the Cncl Softkey To cancel the Messages Waiting you have left at a specific extension 1 Press the Speaker key 2 Dial 771 3...

Страница 102: ... talk with the party Department Step Call To make a Step Call 1 Place a call to a busy Department Group member OR Place a call to a Department Group pilot number 2 Dial Department Step Code 2 to call the next available Department Group member 3 Repeat step 2 to call other Department Group members Voice Over To initiate a Voice Over to a busy extension 1 Press the Voice Over key Service Code 751 48...

Страница 103: ...this feature before hanging up 1 Press the Save Number Dialed key Service Code 751 30 To redial a saved number 1 Press an idle trunk line key Note This selects a specific trunk for the call 2 Press the Save Number Dialed key Service Code 751 30 Note The stored number dials out OR 1 Press the Speaker key 2 Dial 715 Note 1 Save Number Dialed automatically selects a trunk from the same group as your ...

Страница 104: ...de 751 31 Repeat Redial To use Repeat Redial if the outside party you call is unavailable or busy 1 Place a trunk call Note Listen for busy tone or Ring No Answer 2 Press the Feature Redial keys OR Press the Repeat Redial key Service Code 751 29 Note The Repeat Redial key lights while you wait for the system to redial 3 Press the Speaker key to hang up Note 1 The system periodically redials the ca...

Страница 105: ...hone s display will show Check List 1 Press the Call History key Service Code 751 08 or press the LIST Softkey and CID Note The last addition to the list is displayed 2 Press the Arrow Down Softkey to scroll through the list of numbers in memory 3 Press the DEL Softkey to delete the entry and scroll to the next entry 4 The Call History key will remain on as long as entries remain in memory 5 To pl...

Страница 106: ...up calls To answer a call ringing a telephone in another Pickup Group when you do not know the group number 1 Pick up the handset or press the Speaker key 2 Press the Group Call Pickup key Service Code 751 25 OR Dial 769 To answer a call ringing a telephone in another Pickup Group when you know the Group Number 1 Pick up the handset or press the Speaker key 2 Press the Group Call Pickup key Servic...

Страница 107: ...for All Call or 22 for internal all call paging OR 1 Press the Speaker key or lift the handset 2 Dial 701 and the Paging Zone number 0 9 or 00 64 Note Dialing 0 or 00 calls All Call Internal Paging 3 Dial 1 and the Combined Paging Group code 1 8 or 0 for Internal External All Call Note The display indicates the Combined Paging as an External Page Note If the Internal Page Zone is busy or if there ...

Страница 108: ... or if there are no extensions in a page group the page will be announced as an External Page only 3 Make the announcement Meet Me Answer To join a Meet Me Internal Page 1 Press the Speaker key or pick up the handset 2 Dial 763 if your extension is in the zone called OR Dial 764 and the zone number if your extension is not in the zone called OR Press the Meet Me Conference Paging Pickup key Servic...

Страница 109: ...on Key Service Code 751 10 3 Dial 1 Set 4 Dial the destination extension or off premise number 5 Press the Speaker key or hang up Note Your Call Forwarding Programmable Function Key lights To cancel Call Forward Immediate at a forwarding station 1 Pick up the handset or press the Speaker key 2 Dial the Call Forward Immediate Service Code default 741 OR Press the Call Forwarding Programmable Functi...

Страница 110: ...Call Forward Busy No Answer at a forwarding station 1 Pick up the handset or press the Speaker key 2 Dial the Call Forward Busy No Answer Service Code default 744 OR Press the Call Forwarding Programmable Function Key Service Code 751 13 3 Dial 0 Cancel 4 Press the Speaker key or hang up To set Call Forward Both Ring at a forwarding station 1 Pick up the handset or press the Speaker key 2 Dial the...

Страница 111: ...te You can append messages 1 8 and 10 with digits e g the time when you get back You enter the time in 24 hour format 5 Press Speaker to hang up Note Intercom calls to extensions with Selectable Display Messaging set will receive a DND signal and receive the display message on their telephone s display instead of ringing the display STA 12345678 IN MEETING UNTIL 08 48 List Dir VMsg No Message Chan...

Страница 112: ...sword not assigned at default 4 Dial the extension to be swapped with or relocated to 5 When successfully completed a confirmation tone will be heard and the display will show completed 6 Press the Speaker key twice Code Restriction Dial Block To set Dial Block 1 Press the Speaker key 2 Dial 600 default 3 Dial the 4 digit Dial Block Code user defined 4 Dial 1 Note The confirmation tone is heard 5 ...

Страница 113: ...odes you must use this procedure If it has Verified Account Codes you can use this procedure instead of letting the system prompt you for your Account Code You may also use this procedure if your system has Optional Account Codes If your system has Verified Account Codes enabled be sure to choose a code programmed into your Verified Account Code list 1 Access trunk for outside call Note You can ac...

Страница 114: ...f the ID code is disabled Display before Agent login Display after Agent login Agent Log Out Display AIC Agent Log In To log in 1 Press the ACD LOG IN LOG OUT key Service Code 752 10 OR Press the Speaker key and dial the AIC Log In service code not assigned at default 2 Dial the log in code up to 20 digits Note This step is not required if the ID code is disabled 3 Dial the Agent Identity Code AIC...

Страница 115: ... Service Code 752 10 1 to accept 2 Press the Speaker key and dial the AIC Log In service code not assigned at default Note The ACD LOG IN LOG OUT key goes out Rest Mode To set the manual Rest Mode 1 From an idle state press the ACD Rest Mode key Service Code 752 13 Note The ACD Rest Mode key lights If the Rest Mode key is pressed while the agent is on an active call the key will flash until the ag...

Страница 116: ... When Logged Out of ACD Group When ACD agents are logged out and a call is placed into the ACD queue the telephones of the logged out agents will display the Queue Status and hear the alarm according to the settings defined in system programming Pressing the Queue Status Display key will return the telephone to idle until the timer expires again Answering a Call Using a Headset 1 Press the Headset...

Страница 117: ...to 1 Enter characters 1 _ Æ Á À Â Ã Ç É Ê ì ó 2 Enter characters A C a c 2 3 Enter characters D F d f 3 4 Enter characters G I g I 4 5 Enter characters J L j l 5 6 Enter characters M O m o 6 7 Enter characters P S p s 7 8 Enter characters T V t v 8 9 Enter characters W Z w z 9 0 Enter characters 0 ô Õ ú ä ö ü á å è Enter characters B E ó S Accepts an entry only required if two letters on the same ...

Страница 118: ...00 will erase the function from the key Note 2 In some cases the Hold key needs to be pressed before pressing the Speaker key Function Number Function Additional Data 00 Not Defined 01 DSS One Touch Extension number or any numbers up to 24 digits Press HOLD to write 02 Microphone Key ON OFF 03 DND Key 04 BGM ON OFF 05 Headset 06 Transfer Key 07 Conference Key 08 Incoming Call Log 09 Day Night Mode...

Страница 119: ...nce 33 Override Off Hook Signaling 34 Barge In 35 Camp On 36 Step Call Function Number Function Additional Data 37 DND FWD Override Call 38 Message Waiting 39 Room Monitoring 40 Handset Transmission Cutoff 41 Secretary Call Buzzer Extension Number 42 Secretary Call Manager Extension Number 43 Series Call 44 Common Hold 45 Exclusive 46 Department Group Log Out 47 Reverse Voice over Extension Number...

Страница 120: ...acility Key 73 Keypad Hold Key Function Number Function Additional Data 74 Keypad RETRIEVE Key 75 Keypad Conference Key 76 Application Key 77 Voice Mail In Skin Extension Number or Pilot Number 78 In Skin Conversation Recording 79 In Skin Automated Attendant Extension Number or Pilot Number 80 Tandem Ringing 1 Set 0 Cancel Extension Number to Tandem Ring 81 Automatic Transfer to Transfer Key Trunk...

Страница 121: ...115 91 Live Monitoring Key 94 Call Attendant 97 Doorphone Access Function Number Function Additional Data ...

Страница 122: ...116 This page is for your notes ...

Страница 123: ...hones By using the Directory function you can make a call with a simple operation Directory function can register up to 500 records The user can add view edit delete these records Add New Data Find Registered Data Make a Call From Directory Delete All Directory Data Delete Specific Directory Data ...

Страница 124: ...ame or telephone number to be registered in the directory using the dial pad 4 After entering the name or telephone press the Hold key 5 The following list appears Select a desired group by entering a number 6 Enter the telephone number as indicated in the display and press the Hold key 7 Enter a desired Memory ID 8 After entering the Memory ID the display goes back to the main directory screen Pr...

Страница 125: ... list 4 The following is an example when NAME GRP NUM and MEM are selected as a search Search Method Description 1 Name Search data from the name list registered in the directory 2 Group Display the lists registered to each group 01 20 groups 3 Tel Number Search data from the telephone number list registered in the directory 4 Memory ID Search data from the memory number registered in the director...

Страница 126: ...he first telephone number Delete All Directory Data 1 Display the main directory screen 2 To delete all the registered data press the Enter Key or 4 Softkey to delete all the data Below is a sample display of a deleted number 3 After 4 digit password is entered Default 0000 the display asks if you want to delete all the Directory data To delete press Yes 4 After the appropriate Directory data is d...

Страница 127: ...o be deleted Select one by using the Cursor key or Softkey The example below displays a specific group deleted Select Group 01 3 Select 1 NEC 4 Press the DEL Softkey to delete the appropriate Directory data 5 After the appropriate Directory data is deleted the following display appears 6 The following confirmation message appears Directory Directory Directory Directory Directory ...

Страница 128: ...122 This page is for your notes ...

Страница 129: ... By using the Call History function you can make a call with a simple operation The Incoming Call History can register up to 50 records The Outgoing Call History can resister up to 10 records View Call History Make a Call From Call History Store Call History Data to Speed Dial Delete Call History Data ...

Страница 130: ... Make a Call From Call History 1 Display the Call History data of the target telephone number referring to Make a Call from Call History The following is an example when the history of Caller ID is displayed 2 Lift the handset or press the Speaker key while displaying the call history information for the target telephone number on the LCD Note While the call history data is displayed the user cann...

Страница 131: ...displaying the call history information for the target telephone number The display changes as follows 3 Select STA to store in a Speed Dial bin or select Abb to store in a System Speed Dial bin Select TELBK to store in a Telephone Book Delete Call History Data 1 Press soft key then List The menu screen is displayed in the LCD 2 Select CID Softkey 3 Select DEL Softkey 4 Select One to delete a sing...

Страница 132: ...126 This page is for your notes ...

Страница 133: ......

Страница 134: ...NEC Enterprise Communication Technologies Inc Issue 3 0 DT820 User Guide SV9100 ...

Отзывы: