manualshive.com logo in svg
background image

10

EDIT

1. Press the menu button to select

INSTALL.

2. Press the 

C

/

B

buttons and then

INSTALL SYSTEM.

3. Select EDIT with the PR 

y

/

x

buttons and press the 

C

/

B

buttons to start EDIT.

4. DELETE PROGRAM POSITION DATA.

Position the blue-line to the
program to delete with the PR

y

/

x

buttons and the DELETE

button.

5. CHANGING THE ORDER OF THE CHANNELS  

Position the blue-line to a program to move with the PR 

y

/

x

buttons and the move button. 
Press the PR 

y

/

x

buttons to position the blue-line to another

program to exchange.
By  pressing  the  MOVE  button  again, selected  two  program will
be exchanged.

6. ENTER A STATION NAME

Locate the cursor to below NAME with the 

C

/

B

buttons.

Using the PR 

y

/

x

buttons, select the desired letter, number or

blank.
Press the 

B

(right button) to select the next position.

7. SELECT THE PICTURE SYSTEM

Position the blue-line to the PICTURE to select with the 

C

/

B

buttons and change the picture (ex. PAL, SECAM, NTSC, ..) with
the PR 

y

/

x

buttons or you can select the PICTURE mode with the

SYSTEM button on the remote controller.

8. SELECT THE SOUND SYSTEM

Position the blue-line to the SOUND to select with the 

C

/

B

buttons

and change the SOUND (ex. BG, DK, I, M, ..) with the PR 

y

/

x

buttons.

9. SKIPPING THE CHANNELS

You can select  SKIP with  the SKIP  button in  EDIT mode  or
locate  in the cursor to  below SKIP  with the 

C

/

B

buttons and  then

press the PR 

y

/

x

buttons to skip the desired program.

A program marked  with skip “V” is skipped when  changing
channel using the program UP/DOWN(on normal operation).

Press the NUMBER buttons 0~9 or the PR

y

/

x

buttons to select

program number you want.  The screen will change according to
the selected program number.

11

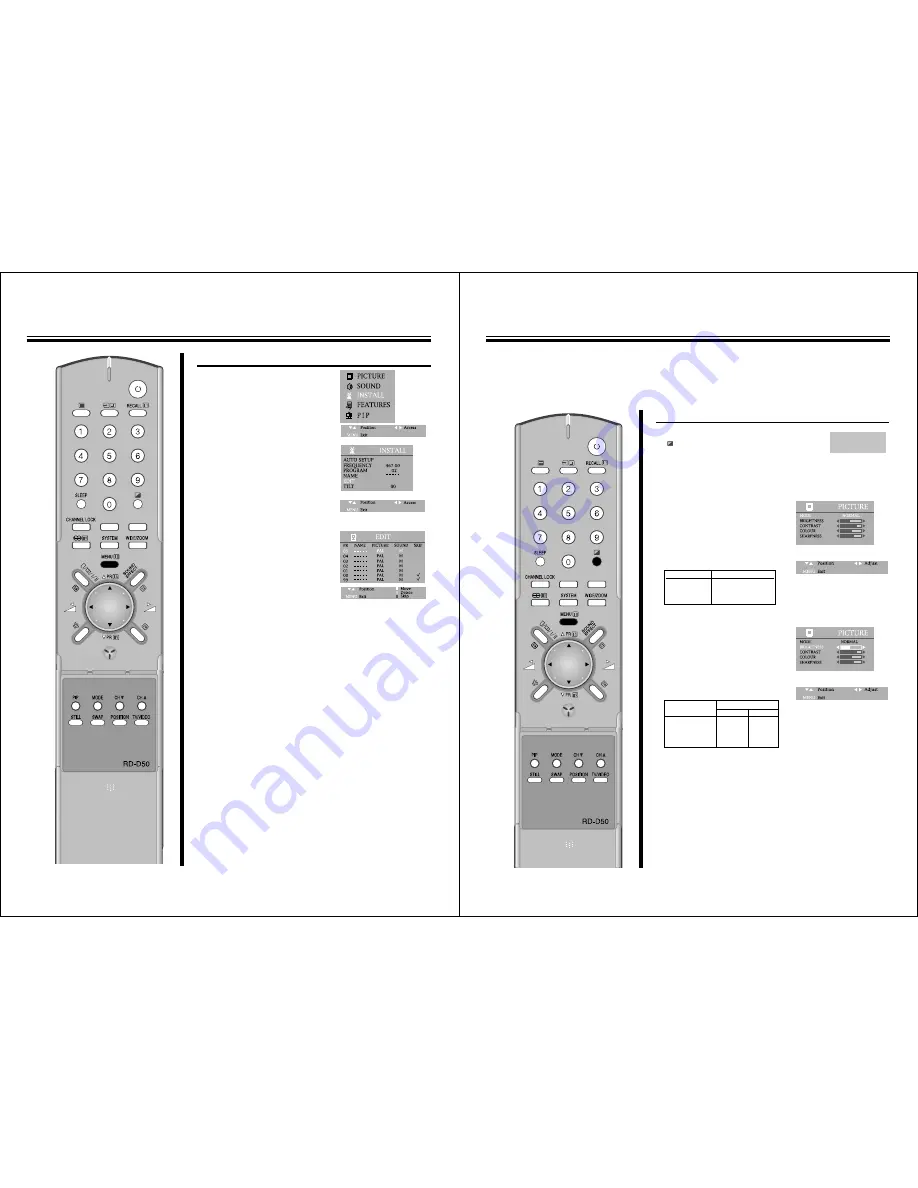
TO SELECT THE PICTURE MODE

1. Press the SELECTABLE PICTURE

(

) button at remote control to select

the desired picture quality.

Normal,  Mild and Favourite can be selected cyclically.

2. Or press the MENU button to

select the PICTURE and then to
be displayed on the right
appearance.
BY pressing the 

C

/

B

buttons, the

following three mode change
cyclically.

3. You can select the BRIGHTNESS,

CONTRAST, COLOUR, and
SHARPNESS with the PR 

y

/

x

buttons.
Select the desired item with the
PR

y

/

x

buttons and press with

the

C

/

B

buttons adjust the level.

CONVENIENT PICTURE CONTROL

M

You can select the picture quality instantly.

MODE

Picture Quality

NORMAL hard 

picture

MILD

soft picture

FAVOURITE

adjustable

Item

Pressing

C

B

BRIGHTNESS

darker

lighter

CONTRAST

weaker

stronger

COLOUR

paler

deeper

SHARPNESS

softer

sharper

- - : - -

NORMAL

STEREO

Содержание PF32W503

Страница 1: ...ograms 16 Using other menus 17 To set clock 17 To turn on the TV automatically wake time 18 To turn off the TV automatic off time 18 Sleep time setting 19 To select the screen color 20 To select demo 20 To select the auto volume control 21 To select channel lock 21 To select child lock 21 Watching picture in picture 22 To watch a TV or an external source as a sub picture 23 To switch the main and ...

Страница 2: ...rong don t try any fix it yourself get a qualified service agent to look at it M The appliance is not intended for use by young children or infirm persons without supervision M Young children should be supervised to ensure that they do not play with the appliance NOTE If the receiver is moved or placed in a different direction the MAIN POWER ON OFF SWITCH must be switched off for at least 15 minut...

Страница 3: ...allation Tips for remote operation 1 2 Remove the battery cover Insert two size AA batteries matching the polarities of the battery to the marks inside the battery compartment M When the remote control will not be used for a long period of time or when the batteries are worn out remove the batteries to prevent leakage M Do not throw the batteries into a fire Dispose of used batteries in the specif...

Страница 4: ...l provide with TV signal output of the selected channel 2 Under this button pressed once TV goes to the state of STAND BY STANDBY ON CH VOL MENU TV AV 7 REMOTE CONTROL TV VIDEO DVD INPUT SELECT TEXT SOUND MUTE PR DOWN PAGE DOWN SLEEP TIME SELECT CHANNEL LOCK SELECTABLE SOUND SYSTEM MENU STEREO BILINGUAL SELECT VOLUME DOWN POWER ON OFF RECALL PR SELECT 0 9 PAGE SELECTOR 0 9 SELECTABLE PICTURE WIDE ...

Страница 5: ...roadcast for a day is finished the TV will automatically turn off after about 30 minutes However if the Off time or Sleep time is operating it takes precedence This Auto Power Off feature does not operate in the VIDEO mode LAST MODE MEMORY Settings of picture and sound conditions and preset programs are stored in the memory even after turning off the power therefore next time the power is turned o...

Страница 6: ... change the SOUND ex BG DK I M with the PR y x buttons 9 SKIPPING THE CHANNELS You can select SKIP with the SKIP button in EDIT mode or locate in the cursor to below SKIP with the C B buttons and then press the PR y x buttons to skip the desired program A program marked with skip V is skipped when changing channel using the program UP DOWN on normal operation Press the NUMBER buttons 0 9 or the PR...

Страница 7: ...lume Down Up button on the upper of the set or with the C B buttons on the remote control TO MUTE THE SOUND The muting function is convenient when you need to pay attention to surround sounds answer a phone call receive a visitor etc 1 Press the SOUND MUTE button 2 To restore the sound press the SOUND MUTE button again TO DISPLAY THE POSITION NUMBER Generally the programme number and stereo or bil...

Страница 8: ... button to decrease the right speaker volume and the B button to decrease the left speaker volume TO ADJUST SOUND FREQUENCY Press the MENU button to select the SOUND and then to be displayed on the right appearance Select the sound frequency 120HZ 500HZ 1500HZ 5000HZ 10KHZ with the PR y x buttons By pressing the C B buttons to activate the sound frequency TO SELECT SOUND EFFECT Press the SOUND EFF...

Страница 9: ...LINGUAL BROADCASTS M The unit receivers both stereo and bilingual broadcasts transmitted in either the NICAM or German stereo bilingual broadcasts system PR08 MONO PR08 DUAL 1 Sound to be heard NICAM German stereo DUAL 1 Main sound Main sound DUAL 2 Sub sound Sub sound 17 TO SET CLOCK 1 Press the MENU button to select the FEATURES and then to be displayed on the right appearance 2 Select the CLOCK...

Страница 10: ... every 20 minutes can be set to the sleep timer 2 If you press the SLEEP button for the first time SLEEP 0 sign of the non set sleep timer appears on the upper left side of the screen 3 When this button pressed again 20 minute are set to the sleep timer 4 This display disappears within 4 seconds useless any button is pressed Whenever pressed again the setting time is increased by 20 minute SLEEP 0...

Страница 11: ...to select the FEATURES and then to be displayed on the right appearance 2 Press the PR y x buttons to select the AVC auto volume control 3 Press the C B buttons to change AVC auto volume control ON NOTE With the AVC auto volume control ON the maximum volume level can be down You can maximize the volume level with the AVC auto volume control OFF TO SELECT CHANNEL LOCK 1 You can prevent the watching...

Страница 12: ...e CH y x buttons to select lower program numbers and CH y x buttons to select higher ones 5 To turn off the sub picture press the PIP button again 6 Or press the MENU button to select the PIP and then to be displayed on the right appearance Select the PIP with the PR y x buttons Press the C B buttons to select the PIP ON or OFF 7 Select SELECT with the PR y x buttons Press the C B buttons to selec...

Страница 13: ... repeatedly when a sub picture is displayed The display position of the sub picture will changed in order to PIP mode 1 4 25 CONNECTING OTHER MACHINES LIKE VIDEO NAMES AND FUNCTIONS OF CONNECTIVE TERMINALS AUDIO SET GAME PLAYER VCR CAMCORDER LASER DISC PLAYER DVD Input terminals of VIDEO1 picture sound on left right A V OUTPUT TERMINAL This always provides with TV signal output of the selected cha...

Страница 14: ...NECTING AT AV2 SCART L Connecting to a HI FI STEREO VIDEO STEREO mode is defaulted 1 Prepare the connective plug for picture sound 2 Connect the VIDEO input output terminal with the VIDEO2 AV2 terminal 3 Press the TV VIDEO DVD button on the Remote control and select AV2 4 Select the STEREO mode with the STEREO BILINGUAL SELECT button 2 L Connecting to a MONO VIDEO STEREO mode is defaulted 1 Use a ...

Страница 15: ...CART to SCART STEREO mode is defaulted 1 Prepare the connective plug for picture sound 2 Connect the SCART input output terminal of VIDEO with the SCART input output terminal of TV 2 SCART INPUT OUTPUT HI FI STEREO VIDEO REAR SCART TERMINAL 29 CONNECTING WITH VIDEO CAMERA CAMCORDER VIDEO AUDIO R L S VIDEO L To connect VIDEO CAMERA with the TV M When watching a recording by VIDEO CAMERA it s conven...

Страница 16: ...H Bahrain Kuwait Israel Oman Qatar United Arab Emirates Yemen etc India Indonesia Malaysia Singapore Thailand etc CONNECTING DVD PLAYER MWhen connecting the DVD player 1 Prepare the connective plug for picture sound 2 Connect the DVD Y output terminal of DVD player with the DVD Y input terminal of TV 3 Connect the Cr DVD Cb output terminal of DVD player with the Cr DVD Cb input terminal of TV 4 Pr...

Страница 17: ...ceived on your TV Your choice of TV program also governs which Teletext service you will receive 33 REVEAL Some Teletext pages play a role in concealing part of the display in for example a quiz page with concealed answer The REVEAL button releases the concealed text as long as the REVEAL button is not again HOLD Some Teletext pages contain more information than can be displayed simultaneously and...

Страница 18: ...57kg 32 REAL FLAT TYPE MODEL PF32W503 NEC Service Centres P N 48586921E103 R0 NEC Australia Pty Ltd ABN 86 001 217 527 Home Electronics Group NEC Service centres PH 131 632 NEW South Wales Sydney 184 Milperra Rd Revesby 2212 02 9780 8688 Newcastle 120 Parry Street Newcastle 2302 02 4926 2466 Victoria Melbourne Unit 1 6 Garden Road Clayton 3168 03 8562 6245 Queensland Brisbane Unit 4 305 Montague R...

Отзывы: