background image

-46-

Using the Memory Feature

Displaying the Menu.

Press the “menu” button
The following menu will
appear on the screen

Viewing the Sub-Items.

Select "Utilities" using the

/

buttons

When the “Vol

button is

pressed, an extended
menu will appear on the
screen.

Choosing "Time Setting"

Select "time setting"
pressing the 

/

buttons

Viewing Extended Menu

When the “Vol

button is

pressed, an extended
menu will appear on the
screen.

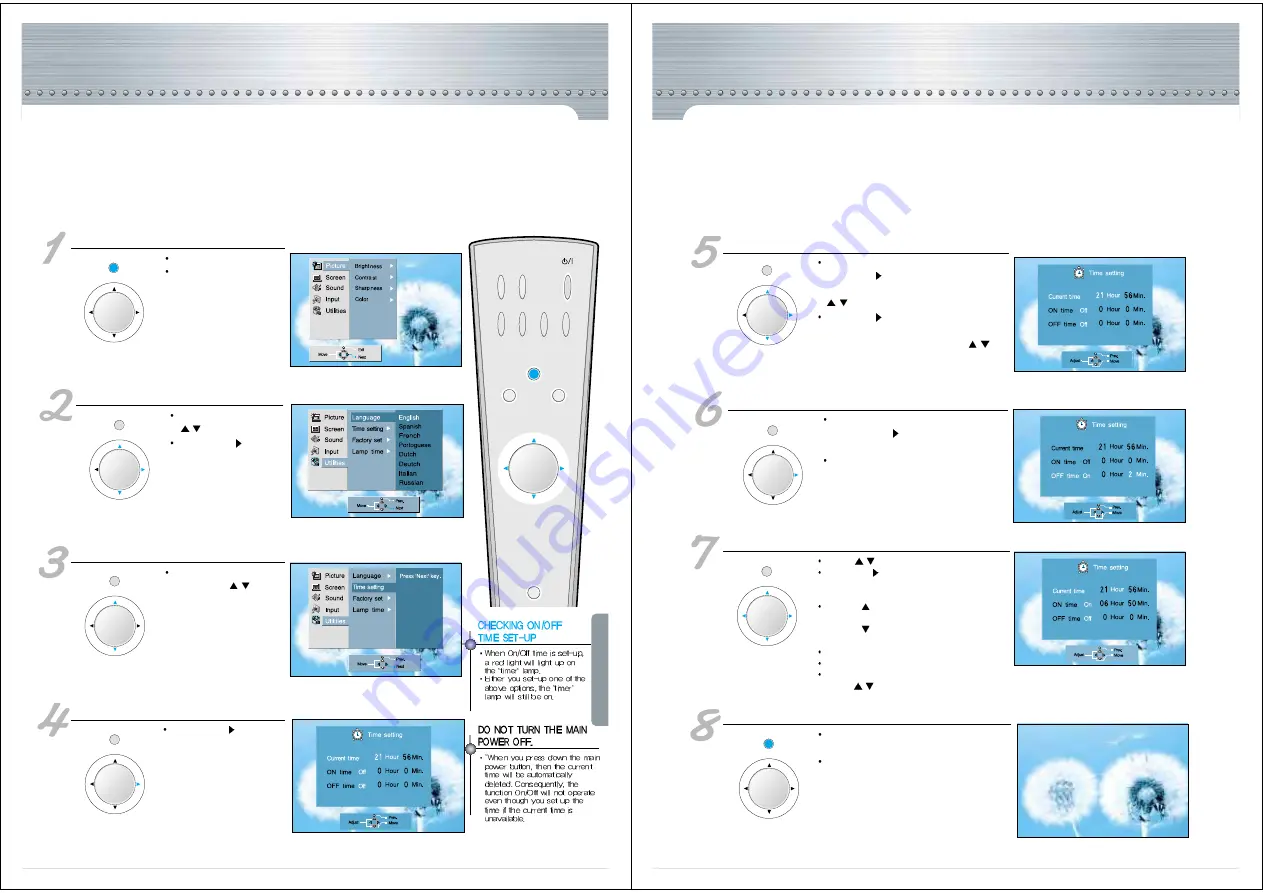
Time Setting

This feature makes the Monitor turn on automatically at a certain time that you set-up.

You must set-up the current time before utilizing this memory feature.

VIDEO

MULTI

MEDIA

POWER

MENU

RECALL

DOLBY

SOUND

SOUND

MODE

SCREEN

SIZE

MUTE

SCREEN

MODE

SLEEP

VOL

VOL

MENU

VOL

VOL

MENU

VOL

VOL

MENU

VOL

VOL

MENU

VOL

VOL

LCD PROJECTION - MONITOR

-47-

Selecting "Current Time"

The word "Current Time" will turn into light blue
Press the “Vol

button and select "hour". The

word "hour" will turn into yellow. Press the

/

buttons to adjust the time.

Press the “Vol

button and select "minute" as

you have done above. The word "minute" will turn
into yellow, and at this time, press the 

/

buttons and adjust the minutes.

Choosing "on time" or "off time"

You may select either "On time" or "Off time"
pressing the “Vol

button after you had set

up the current time.
When "On time" is selected, the word "On time"
will turn into light blue.

When Adjusting "On time"

Use the 

/

buttons to select "Utilities"

Press the “Vol

button and select "hour" when the

word "On time" is in light blue. The word "hour" will
turn into yellow.
When the 

“ ”

button is pressed, the number will

increase; 

When the 

“ ”

button is pressed, the number will

decrease.

Use the same method to adjust the minutes.
Use the same method to set -up "Off Time"
If you want to turn the "On Time/Off Time" option off,
use the 

/

button to change the set-up to "off"

Exiting time setting

Press the menu button until the menu
window disappears from the screen.
The 'Timer" lamp will light up red when
the setting has been completed.

MENU

VOL

VOL

MENU

VOL

VOL

MENU

VOL

VOL

MENU

VOL

VOL

Содержание NRP-60LCD1

Страница 1: ...ection Monitor NRP 60LCD1 has improved its light source by using 130W which makes the images of the screen much clear and much brighter than just a normal LCD Projection Monitor LCD panels of 2 76 million pixels The LCD Rear Projection Monitor NRP 60LCD1 has three separate LCD panels of 2 76 million pixels that help to generate sharper clearer and brighter images No magnetic influence The LCD type...

Страница 2: ... never been previously offered to the home theater The advanced circuitry has the ability to accept Conventional video 480i 576i Progressive scan video 480p 576p Both 1080i 720p and 480p HDTV images VGA S VGA XGA SXGA and UXGA computer graphics HD Upgradeable With the use of an optional DTV receiver your NEC big screen can display high definition pictures Wide Screen Picture Format You will be abl...

Страница 3: ...all not be exposed to dripping or splashing and that no objects filled with liquids such as vases shall be placed on the apparatus 6 Accessories Do not place the Monitor on an unstable cart stand tripod or table The Monitor may fall causing serious injury to a child or adult and serious damage to the Monitor Use only with a cart stand tripod bracket or table recommended by the manufacturer or sold...

Страница 4: ...tric shock or other hazards 17 Safety Check Upon completion of any service or repair to the Monitor ask the service technician to perform safety checks to determine that the Monitor is in safe operating condition 18 Heat The product should be situated away from heat sources such as radiators heat registers stoves or other products including amplifiers that produce heat LCD PROJECT ION MONIT OR War...

Страница 5: ...ck At least two people must work together to move the Monitor set when transporting to prevent the Monitor from falling and consequently any serious injury or damage Do not touch the power cord with moisturized or watery hands when plugging to or unplugging from the outlet since it may be a cause of electric shock Do not spill water or drop the remote controller since it may be a cause of malfunct...

Страница 6: ...lter please do so from the outmost surface The Monitor set will not operate if the air filter has not been properly assembled Change the air filter if damaged or wet Clean the filter Do not remove the filter from the unit and use the vacuum cleaner to remove the dust LCD PROJECT ION MONIT OR Air Filter Change 11 Cautions When changing the air filter please do so after having brushed away dust on t...

Страница 7: ...ction glass of the lamp since it may minimize the screen brightness capability or cause shortage in its lifetime Shattering of the lamp may occur if it is used for an extremely long period of time Change the air filter when replacing the lamp Caution The screen brightness may be reduced or the light bulb may be shattered when the lamp has been used for a long period of time In this case you must p...

Страница 8: ... and re assemble in the opposite sequence Caution Reset the Lamp Timer Plug in the power cord into the outlet and turn on the Monitor set either using the remote controller or the Power button Please select Utilities Lamp time Initial Lamp time and reset the lamp time MENU VOL VOL LCD PROJECT ION MONIT OR Glossary 15 ...

Страница 9: ... may connect S Video input to enjoy a clearer and brighter picture images You can choose and make the connection with any one of Video 1 2 or 3 inputs LCD PROJECT ION MONIT OR Camcorder Playstation Connection 17 Watching the Camcorder Recording on Monitor Use the input jack provided at the side panel of the MONITOR set Use the same connection method for playstation Connect the camcorder and video ...

Страница 10: ...get the progressive scan 480p 576p DVD screen display VIDEO AUDIO L R DVD LCD PROJECT ION MONIT OR 19 Audio Connection Surround Speaker Connection Feel the realism with the surround sound effect You may minimize the volume of the Monitor set and listen to the sound The default status of Dolby sound is in Line out Internal Connect the Audio system to the monitor of the Monitor set Then press Menu S...

Страница 11: ...DIO L R DTV INPUT Digital Satellite Receiver LCD PROJECT ION MONIT OR External Input Connection Source Watching cable television is only possible after you have subscribed to the local broadcasting company and installed a cable receiver You may make the connection to any of the Video input 1 2 3 Cable TV Broadcasting Connection 21 VIDEO1 S VIDEO VIDEO AUDIO L R VIDEO3 CATV Receiver Input Cable TV ...

Страница 12: ... 269 85 0 VESA 37 927 85 1 VESA 35 156 56 3 VESA 37 879 60 3 VESA 800 600 48 077 72 2 VESA 46 875 75 0 VESA 53 674 85 1 VESA 832 624 49 726 75 1 Macintosh 48 193 48 077 59 3 59 8 Macintosh OAK 48 363 60 0 VESA 56 476 70 1 HP VESA 60 241 74 9 74 6 Macintosh 60 023 75 0 VESA 68 677 85 0 VESA 63 851 70 0 VESA 1152 864 67 5 75 0 VESA 77 094 85 0 VESA 61 769 66 0 SUN 71 713 76 0 SUN 60 60 0 VESA 1280 9...

Страница 13: ...ns the remote controller signal receiving window thus point the remote controller towards the screen when using it TimerLamp The timer lamp will be on when the on off of the timer set up is programmed LCD PROJECT ION MONIT OR 25 Side and Rear Panel Side Panel It is convenient to use the input jacks provided at the side panel when connecting to the camcorder or play station It is also convenient wh...

Страница 14: ...IA DVD DTV or pc can be selected altermately Use it when selecting DVD DTV or pc Sound Mode This feature allows you to choose the mode Each time the button is pressed it rotates from Normal Music Movie News User Sleep Timer This feature is used to set up the time of automatic turn off LCD PROJECT ION MONIT OR Basic Menu Guide 27 Basic Menu When the menu button is pressed the basic menu window will...

Страница 15: ...all for service The main power lamp flickering in orange The product is overheated and its temperature is extremely high for some reason Please check if the slots and openings of front and rear panels are blocked impeding its ventilation or if the filter is full of dust and needs some cleaning After checking them press the power button on the remote controller or the one on the Monitor set to turn...

Страница 16: ...on is pressed the video input changes as follows LCD PROJECT ION MONIT OR Connect Either DTV or PC with the Monitor and Press the MULTIMEDIA ButtonontheRemoteController Each time the MULTIMEDIA button is pressed DTV or PC input changes as follows If the connection has not been established No signal Please check input signal or press VIDEO1 key or MULTIMEDIA key will be displayed on the screen Watc...

Страница 17: ...When the Vol button is pressed an extended menu will be displayed on the screen VIDEO MULTI MEDIA POWER MENU RECALL DOLBY SOUND SOUND MODE SCREEN SIZE MUTE SCREEN MODE SLEEP VOL VOL MENU VOL VOL MENU VOL VOL LCD PROJECT ION MONIT OR Adjusting Screen Format Select Adjustment with Vol buttons When the Vol button is pressed a gauge menu will be displayed on the screen Use the Vol buttons to format th...

Страница 18: ...broadcasting normal Monitor screen size SCREEN SIZE LCD PROJECT ION MONIT OR 35 You may select the screen mode already provided by the factory at your preference without going through the adjustments yourself You may make the selection by pressing Menu Screen Mode VIDEO MULTI MEDIA POWER MENU RECALL DOLBY SOUND SOUND MODE SCREEN SIZE MUTE SCREEN MODE SLEEP VOL VOL SelectingScreenMode Press the Scr...

Страница 19: ... in NTSC signal and DTV mode only Brightness Contrast and Sharpness are the only three adjustments available LCD PROJECT ION MONIT OR Viewing the Sub Menu Press the buttons and select picture When Vol button is pressed an extended menu window will appear Select the sub item to be adjusted with the button once again When Vol button is pressed an gauge menu will be displayed on the screen MakingAdju...

Страница 20: ... is accentuated and it is moderate when watching news and documentary programs you adjust the sound quality and customize it at your preference LCD PROJECT ION MONIT OR 39 Using Equalizer You may adjust the equalizer provided and enjoy the sound quality at your preference Either high or low tone may be diversely adjusted as the way you want it Displaying the Menu Press the menu button The followin...

Страница 21: ... Select Sound Adjustment pressing the button When the Vol button is pressed an extended menu will appear MENU VOL VOL LCD PROJECT ION MONIT OR Adjusting Sound Range Select the sound range using the Vol buttons Adjust the sound range in the same method The sound range of the equalizer adjustment is 32 32 Exiting Sound Adjustment Press the Menu button until the menu window is disappeared from the sc...

Страница 22: ...pressing Menu Sound Pro Logic VIDEO MULTI MEDIA POWER MENU RECALL DOLBY SOUND SOUND MODE SCREEN SIZE MUTE SCREEN MODE SLEEP VOL VOL LCD PROJECT ION MONIT OR 43 ChoosingDolbyProLogic Press the Dolby sound button Each time you press the button it will be changed in the following sequence It may be adjusted by pressing Menu Sound Pro Logic DOLBY SOUND ...

Страница 23: ... will appear on the screen VIDEO MULTI MEDIA POWER MENU RECALL DOLBY SOUND SOUND MODE SCREEN SIZE MUTE SCREEN MODE SLEEP VOL VOL MENU VOL VOL MENU VOL VOL LCD PROJECT ION MONIT OR Choosing on Entry Select the entry to adjust pressing the Vol buttons When adjusting the Surround Balance Select S Balance pressing the buttons When the Vol button is pressed an extended menu will appear on the screen Ma...

Страница 24: ...will turn into yellow Press the buttons to adjust the time Press the Vol button and select minute as you have done above The word minute will turn into yellow and at this time press the buttons and adjust the minutes Choosing on time or off time You may select either On time or Off time pressing the Vol button after you had set up the current time When On time is selected the word On time will tur...

Страница 25: ...elect Menu Utilities Factory Set Checking Lamp Time Select Menu Utilities Lamp Time You can view the accumulated lamp usage time Adjusting to the Factory set You may enjoy the optimum picture and sound by selecting Menu Utilities Factory set Do not reset the Lamp Time without exchanging the lamp with a new one If the Lamp Time is reset without the lamp actually changed the accumulated time used wi...

Страница 26: ...VOL Select Utilities by pressing the Up Down buttons Select Utilities by pressing the buttons When the Vol button is pressed an extended menu window will appear MENU VOL VOL LCD PROJECT ION MONIT OR 51 Select Language Select Language by pressing the buttons When the Vol button is pressed an extended menu window will appear Select On Screen Language you want to be displayed by pressing the and Vol ...

Страница 27: ...e volume pressing the button Have you checked the Color Isn t the program itself broadcasting in black and white Have you checked the antenna connection Adjust the color pressing the buttons as explained in page 36 Check other broadcasting programs Turn the antenna towards where the broadcasting station is Have you checked the antenna Have you checked whether it has been interfered by vehicles or ...

Страница 28: ...nsland Brisbane 116 lpswich Rd Woollongabba 4102 07 3361 5858 Southport Shop 1 48 Ferry Rd Southport 4215 07 5591 3670 South Australia Adelaide 84A Richmond Rd Keswick 5053 08 8375 5710 Western Australia Perth 45 Sarich Court Osborne Park 6017 08 9445 5901 For Service in outer areas please contact your NEC retailer for the address of the nearest Authorized NEC Service Centre NEC Australia Pty Ltd ...

Отзывы: