background image

41

3. Convenient Features

 Preventing the Unauthorized Use of the Projector [SECURITY]

A keyword can be set for your projector using the Menu to avoid operation by an unauthorized user. When a keyword 
is set, turning on the projector will display the Keyword input screen. Unless the correct keyword is entered, the pro-
jector cannot project an image. 
• The [SECURITY] setting cannot be cancelled by using the [RESET] of the menu.

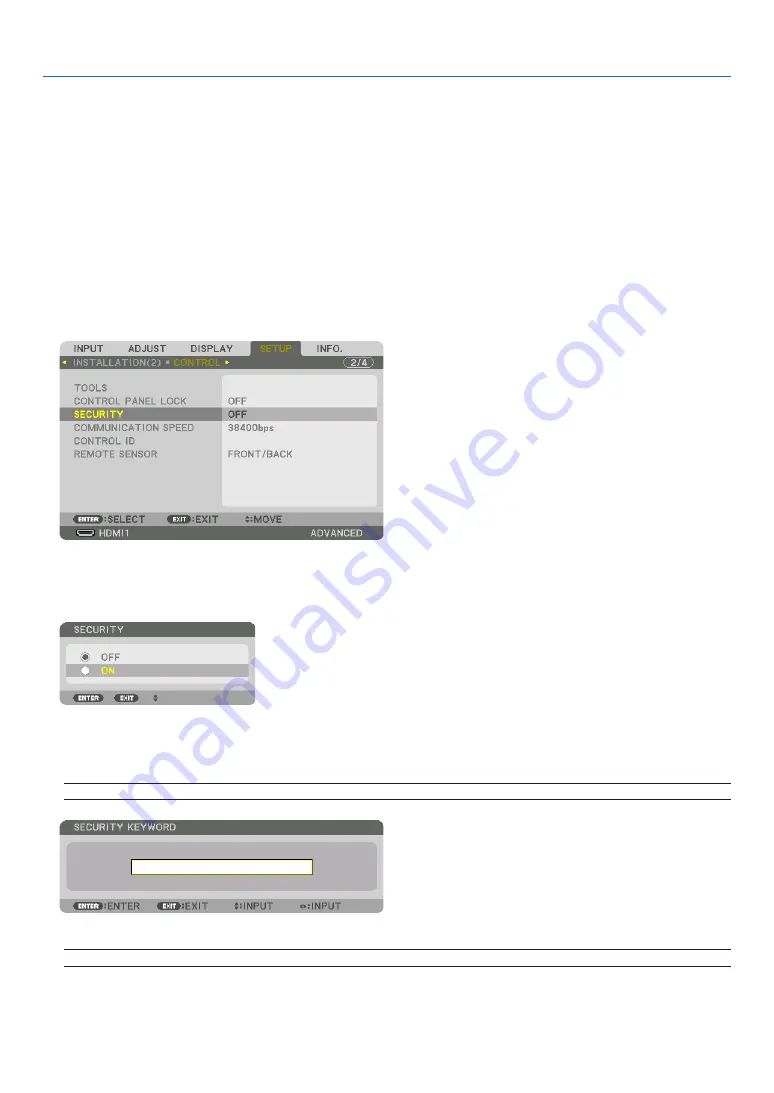
To enable the Security function:

1.  Press the MENU button.

  The menu will be displayed.

2.  Press the 

 button twice to select [SETUP] and press the 

 button or the ENTER button to select [MENU(1)].

3.  Press the 

 button to select [CONTROL].

4.  Press the 

 button three times to select [SECURITY] and press the ENTER button.

  The OFF/ON menu will be displayed.

5.  Press the 

 button to select [ON] and press the ENTER button.

  The [SECURITY KEYWORD] screen will be displayed.

6.  Type in a combination of the four 

▲▼◀▶

 buttons and press the ENTER button.

NOTE: A keyword must be 4 to 10 digits in length.

  The [CONFIRM KEYWORD] screen will be displayed.

NOTE: Make a note of your password and store it in a safe place.

Содержание NP-PA703UL

Страница 1: ...jector PA803UL PA703UL PA653UL User s Manual Please visit our web site for User s Manual in the latest version http www nec display com dl en pj_manual lineup html Model No NP PA803UL NP PA703UL NP PA653UL ...

Страница 2: ... a trademark applied for trademark rights in Japan the United States of America and other countries and areas Blu ray is a trademark of Blu ray Disc Association CRESTRON and CRESTRON ROOMVIEW are trademarks or registered trademarks of Crestron Electronics Inc in the United States and other countries Extron and XTP are registered trademarks of RGB Systems Inc in the United States Ethernet is either...

Страница 3: ...should be easily accessible CAUTION TO PREVENT SHOCK DO NOT OPEN THE CABINET THERE ARE HIGH VOLTAGE COMPONENTS INSIDE REFER SERVICING TO QUALIFIED SERVICE PERSONNEL This symbol warns the user that uninsulated voltage within the unit may be sufficient to cause electrical shock Therefore it is dangerous to make any kind of contact with any part inside of the unit This symbol alerts the user that imp...

Страница 4: ...uropean Union Member States Outside the European Union If you wish to dispose of used electrical and electronic products outside the European union please contact your local authority and ask for the correct method of disposal For EU The crossed out wheeled bin implies that used batteries should not be put to the general household waste There is a separate collection system for used batteries to a...

Страница 5: ...Doing so may result in the projector falling and causing injury We are not liable for any accident or and damage resulting from improper installation or handling misuse modi fication or natural disasters Do not install the projector in the following places Attached substances such as oil chemicals and moisture may cause deformation or cracks of the cabinet corrosion of the metal parts or malfuncti...

Страница 6: ...ng light which could injure them Keep any items magnifying glass etc out of the light path of the projector The light path being projected from the lens is extensive therefore any kind of abnormal objects that can redirect light coming out of the lens can cause an unpredictable outcome such as a fire or injury to the eyes Do not place any objects which are easily affected by heat in front of a pro...

Страница 7: ...N use a power strip equipped with a switch and a breaker A minimum of two persons are required to carry the projector Otherwise the projector may tumble or drop caus ing personal injury If intense light like laser beams enters from the lens it could lead to malfunction Caution on Handling the Optional Lens When shipping the projector with the lens remove the lens before shipping the projector Alwa...

Страница 8: ...eplace the light module 4 Contact qualified distributor for light module replacement and further information Laser Safety Caution For USA This product is classified as Class 3R of IEC 60825 1 Second edition 2007 03 Complies with FDA performance standards for laser products except for deviations pursuant to Laser Notice No 50 dated June 24 2007 For other regions This product is classified as Class ...

Страница 9: ...C HL NP40ZL Tele 31 7 23 8 31 7 Wide 41 0 31 9 41 0 NP41ZL Tele 12 8 9 2 12 8 Wide 27 7 20 6 27 7 NP43ZL Tele 6 6 4 7 6 6 Wide 12 9 9 3 12 9 Vertical angle unit degree Lens unit Zoom Lens position Upper most Center Reference value Lower most VU VC VD NP40ZL Tele 29 3 18 3 21 6 Wide 38 4 25 0 29 2 NP41ZL Tele 11 7 6 9 8 3 Wide 25 6 15 7 18 7 NP43ZL Tele 6 0 3 5 4 2 Wide 11 8 7 0 8 4 VC VC HC HC VU ...

Страница 10: ...anatory labels of the LASER PRODUCT in CLASS 3R conforming to IEC 60825 1 Second edition and in Class 1 conforming to IEC 60825 1 Third edition are stuck on the below indicated positions For USA Label 1 Label 1 Label 2 Label 2 For other regions Label 1 ...

Страница 11: ...used in accordance with the instruction manual may cause harmful interference to radio communications Operation of this equipment in a residential area is likely to cause harmful interference in which case the user will be required to correct the interference at his own expense Supplier s declaration of conformity for USA only This device complies with Part 15 of FCC Rules Operation is subject to ...

Страница 12: ... 3D images Allow a distance of 2 m 7 feet or greater between the screen and a user Viewing 3D images from too close a distance can strain your eyes Avoid viewing 3D images for a prolonged period of time Take a break of 15 minutes or longer after every hour of viewing If you or any member of your family has a history of light sensitive seizures consult a doctor before viewing 3D images While viewin...

Страница 13: ...the temperature inside the projector will rise too high causing the over temperature protector to automatically turn off the projectors power 20 cm 7 9 or greater 13 cm 5 1 or greater Intake vent Exhaust vent NOTE The drawing shows the proper clearance required for the left and right of the projector assuming sufficient clearance has been kept for the front back and top of the projector Please con...

Страница 14: ...ecautions 11 Operating Range for Wireless Remote Control 12 2 Projecting an Image Basic Operation 13 Flow of Projecting an Image 13 Connecting Your Computer Connecting the Power Cord 14 Using the power cord stopper 15 Turning on the Projector 16 Performing Lens Calibration 16 Note on Startup screen Menu Language Select screen 17 Selecting a Source 18 Adjusting the Picture Size and Position 20 Adju...

Страница 15: ...using this projector 44 When videos cannot be viewed in 3D 46 Controlling the Projector by Using an HTTP Browser 47 Storing Changes for Lens Shift Zoom and Focus LENS MEMORY 54 To store your adjusted values in REF LENS MEMORY 55 To call up your adjusted values from REF LENS MEMORY 57 4 Multi Screen Projection 60 Things that can be done using multi screen projection 60 Case 1 Using a single project...

Страница 16: ...iptions Functions DISPLAY 99 PIP PICTURE BY PICTURE 99 GEOMETRIC CORRECTION 101 EDGE BLENDING 106 MULTI SCREEN 107 Menu Descriptions Functions SETUP 109 MENU 1 109 MENU 2 110 INSTALLATION 1 111 INSTALLATION 2 115 CONTROL 116 NETWORK SETTINGS 123 SOURCE OPTIONS 128 POWER OPTIONS 130 Returning to Factory Default RESET 132 Menu Descriptions Functions INFO 133 USAGE TIME 133 SOURCE 1 134 SOURCE 2 134 ...

Страница 17: ...en size 152 Lens types and throw distance 152 Tables of screen sizes and dimensions 153 Lens shifting range 153 Compatible Input Signal List 155 Specifications 158 Cabinet Dimensions 161 Pin assignments and signal names of main connectors 162 Changing the Background Logo Virtual Remote Tool 164 Troubleshooting 165 Feature of each indicator 165 Indicator Message Status message 165 Indicator Message...

Страница 18: ...r 24FU2631 for the power cord 7N080533 24FU2621 for the power cord 7N080030 For the preventive measure from dropping off the power cord Cable cover 24DU4661 Lens theft prevention screw 24V00941 This screw makes it dif ficult to remove the lens mounted on the projec tor page 139 For North America only Limited warranty For customers in Europe You will find our current valid Guarantee Policy on our W...

Страница 19: ...lenses adapted to a variety of places of installation and projection methods In addition the lenses can be mounted and removed in one touch Note that no lens is mounted upon shipment from the factory Please purchase optional lenses separately Motorized lens control function for easily adjusting the position of the projected image The position of the projected image lens shift Zoom and Focus can be...

Страница 20: ...led from a computer Moreover it enables to output and control image via an Extron XTP transmitter connected with the projector Convenient utility software User Supportware provided as standard This projector supports our utility software NaViSet Administrator 2 Virtual Remote Tool etc NaViSet Administrator 2 helps you control the projector by a computer via wired LAN connection Virtual Remote Tool...

Страница 21: ...started is to take your time and do everything right the first time Take a few minutes now to review the user s manual This may save you time later on At the beginning of each section of the manual you ll find an overview If the section doesn t apply you can skip it ...

Страница 22: ...able Tilt Foot page 26 Indicator Section page 8 Lens Release Button page 140 Adjustable Tilt Foot page 26 Exhaust vent Heated air is exhausted from here How to paste the input selection character sticker of the remote control Peel off the cover of the sticker and align the sticker holes with Buttons 1 to 6 before pasting Please take care not to let the sticker contact the buttons when pasting The ...

Страница 23: ...e other end into an active wall outlet page 14 This security slot supports the MicroSaver Security System Built in Security Slot Cable cover connection right and left Screw holes and grooves for the optional cable cover page 7 Intake vent page xi 148 Security Bar Attach an anti theft device The security bar accepts security wires or chains up to 0 18 inch 4 6 mm in diameter ...

Страница 24: ... in the projector falling or causing injury Mounting Preparations 1 Connect the power cord and cables to the projector the connection cords are omitted from the diagrams 2 Prepare a Phillips screwdriver 1 Insert the two round protrusions on the left and right edges of the cable cover into the grooves in the bottom of the projector to line it up NOTE Be careful not to let the power cord and cables ...

Страница 25: ...8 165 166 167 3 STATUS Indicator page 165 166 167 4 LIGHT Indicator page 165 166 167 5 TEMP Indicator page 165 166 167 6 INPUT Button page 18 7 MENU Button page 74 8 Volume Buttons page 27 74 9 ENTER Button page 74 10 EXIT Button page 74 11 FOCUS Button page 23 12 ZOOM L CALIB Button page 25 13 SHIFT HOME POSITION Button page 21 ...

Страница 26: ...ial communication protocol If you are writing your own program typical PC control codes are on page 173 13 REMOTE Terminal Stereo Mini Use this terminal for wired remote control of the pro jector using the NEC remote control RD 465E Connect the projector and our remote control RD 465E using a commercially available wired remote control cable NOTE When a remote control cable is connected to the REM...

Страница 27: ...e 74 28 EXIT Button page 74 1 Infrared Transmitter page 12 2 POWER ON Button page 16 3 STANDBY Button page 28 4 FREEZE Button page 32 5 BLANK Button page 30 6 MUTE Button page 30 7 AV MUTE Button page 30 8 TEST Button page 85 29 Button page 74 30 ENTER Button page 74 31 L CLICK Button 32 R CLICK Button 33 VOL FOCUS Button page 23 27 34 D ZOOM ZOOM Button page 25 32 35 SHUTTER Button page 30 36 LEN...

Страница 28: ...Remote Control Precautions Handle the remote control carefully If the remote control gets wet wipe it dry immediately Avoid excessive heat and humidity Do not short heat or take apart batteries Do not throw batteries into fire If you will not be using the remote control for a long time remove the batteries Ensure that you have the batteries polarity aligned correctly Do not use new and old batteri...

Страница 29: ...h 15 m 591 inch 15 m 591 inch 15 m 591 inch 15 m 591 inch The infrared signal operates by line of sight up to a distance of above meters and within a 60 degree angle of the remote sensor on the projector cabinet The projector will not respond if there are objects between the remote control and the sensor or if strong light falls on the sensor Weak batteries will also prevent the remote control fro...

Страница 30: ...rojector page 16 Step 3 Selecting a source page 18 Step 4 Adjusting the picture size and position page 20 Correcting keystone distortion CORNERSTONE page 36 101 Step 5 Adjusting a picture and sound Optimizing a computer signal automatically page 27 Turning up or down volume page 27 Step 6 Making a presentation Step 7 Turning off the projector page 28 Step 8 After use page 29 2 Projecting an Image ...

Страница 31: ... directly in the wall outlet Do not use any plug converter CAUTION This equipment is designed to be used in the condition of the power cord connected to earth If the power cord is not connected to the earth it may cause electric shock Please make sure the power cord is earthed properly To prevent the power cord from coming loose make sure that all the prongs of the power cord plug are fully in ser...

Страница 32: ...nnected during normal projector operation Use caution when picking up the projector Using the power cord stopper To prevent the power cord from accidently removing from the AC IN of the projector use the power cord stopper Required tool Phillips screwdriver 1 Mount the power cord stopper over the power plug that connected to the AC IN terminal 2 Fasten the screw on the power cord stopper ...

Страница 33: ... SECURITY feature is turned on page 41 After you turn on your projector ensure that the computer or video source is turned on NOTE A blue screen blue background is displayed when no signal is being input by factory default menu settings Sleep state Blinking Power On Blinking in green Blinking blue light Steady blue light page 165 Performing Lens Calibration After mounting the separately available ...

Страница 34: ...elect the menu language later LANGUAGE on page 78 and 109 NOTE If the message PLEASE SET DATE AND TIME is shown please set the current date and time page 120 In the case this message is not shown the DATE AND TIME SETTING is recommended to complete Keep the lens cap off the lens while the projector s power is on If the lens cap is on it could be warped due to high temperature If the STATUS indicat...

Страница 35: ...ut source and display it The input source will change as follows HDMI1 HDMI2 DisplayPort COMUPTER HDBaseT HDMI1 Press it briefly to display the INPUT screen Press the buttons to match the target input terminal and then press the ENTER button to switch the input To delete the menu display in the INPUT screen press the MENU or EXIT button TIP If no input signal is present the input will be skipped U...

Страница 36: ... screen will be displayed page 128 5 Select a source as the default source and press the ENTER button 6 Press the EXIT button a few times to close the menu 7 Restart the projector The source you selected in step 5 will be projected NOTE Even when AUTO is turned on the HDBaseT will not be automatically selected To set your network as the default source select HDBaseT TIP When the projector is in St...

Страница 37: ...nd the focus ring to adjust the picture size and position In this chapter drawings and cables are omitted for clarity Adjusting the projected image s vertical and horizontal position Lens shift page 21 Adjusting the focus Focus page 22 Finely adjusting the size of an image Zoom page 25 Adjusting the projected image s inclination Tilt foot page 26 ...

Страница 38: ...o could result in fingers being pinched by the moving lens 1 Press either SHIFT HOME POSITION button on the cabinet or LENS SHIFT button on the remote control The LENS SHIFT screen will be displayed 2 Press the buttons to move the projected image To set back the lens to the home position Press and hold the SHIFT HOME POSITION button over 2 seconds The lens mounted on the projector goes back to the...

Страница 39: ...ojected image Width of projected image Description of symbols V indicates vertical height of the projected image H indicates horizontal width of the projected image Focus Recommend to perform the focus adjustment after leaving the projector under the state the TEST PATTERN has been projected for over 30 minutes Please refer to page 85 in the User s Manual about the TEST PATTERN ...

Страница 40: ...e CENTER on on screen menu press either or button to align focus around the optical axis The picture shows and example when the lens shift is moved upward The focus for the lower part of the screen is aligned When the lens is at the center the focus for the center of the screen is aligned Optical axis 3 Press button to select the PERIPHERY on the on screen menu and then press either or button to a...

Страница 41: ...licable lens NP43ZL 1 Press the FOCUS button on the cabinet Press buttons to adjust focus In another way press and hold the CTL button and then press VOL FOCUS button on the remote control PERIPHERY LENS FOCUS is not available for this lens unit ...

Страница 42: ... ZOOM adjustment screen will be displayed on or buttons on the cabinet or the remote control are available to adjust ZOOM while the ZOOM adjustment screen is displayed on On the remote control while pressing on the CTL button press the D ZOOM ZOOM or button The zoom is adjusted ...

Страница 43: ...GEOMETRIC CORRECTION page 101 The tilt foot can be lengthened by a maximum of 10 mm 0 4 The tilt foot can be used to tilt the projector by a maximum of 1 4 NOTE Do not lengthen the tilt foot any more than 10 mm 0 4 Doing so will make the projector unstable Do not use the tilt foot for any purpose other than adjusting inclination of the projector installation angle Handling the tilt foot improperly...

Страница 44: ...not optimize the computer signal try to adjust HORIZONTAL VERTICAL CLOCK and PHASE manually page 90 91 Turning Up or Down Volume Sound level from the AUDIO OUT terminal can be adjusted Important Do not turn up the volume to the maximum level on the external speaker system connected to the AUDIO OUT of the projector Doing so may produce an unexpected loud sound at the time of turning on or off the ...

Страница 45: ...n blue Standby Blinks in orange CAUTION Parts of the projector may become temporarily heated if the projector is turned off with the POWER button or if the AC power supply is disconnected during normal projector operation Use caution when picking up the projector NOTE While the POWER indicator is blinking blue in short cycles the power cannot be turned off You cannot turn off the power for 60 seco...

Страница 46: ... projector is turned off 1 Unplug the power cord Loosen the screw coun terclockwise until it starts racing Draw off the power cord stopper 2 Disconnect any other cables 3 Mount the lens cap on the lens 4 Before moving the projector screw in the tilt foot if they have been lengthened ...

Страница 47: ...urning off the Image and Sound The projected video and the output sound from the sound output terminal will disappear momentarily Press the BLANK button The projected video will be cut off Press the MUTE button The audio will be cut off Press the AV MUTE button The projected video and audio will be cut off Press the buttons one more time for the cancelled video and audio to appear again TIP The vi...

Страница 48: ...ess the MENU button on the remote control TIP Once the projector is powered off the On Screen Menu displaying position will be reset to the default factory setting position This function does not influence to the display position of input terminal information and message It enables to move the menu by mouse click when a commercially available USB mouse is connected It enables to move the menu posi...

Страница 49: ...E Depending on an input signal the maximum magnification may be less than four times or the function may be restricted To do so 1 Press the D ZOOM button to magnify the picture 2 Press the button The area of the magnified image will be moved 3 Press the D ZOOM button Each time the D ZOOM button is pressed the image is reduced NOTE The image will be enlarged or reduced at the center of the screen D...

Страница 50: ... ECO2 Brightness will be at about 60 The cooling fan will also slow down accordingly Lower power consumption considerably More eco friendly setting than NORMAL and ECO1 LONG LIFE Brightness is about 30 This setting speeds up the cooling fan and optimizes the service life of the optical parts The most eco friendly setting among the options To turn on the LIGHT MODE do the following 1 Press ECO butt...

Страница 51: ...orarily reduced depending on the operating condition of the projector When the room temperature reaches 33 C or higher and the temperature inside the projector rises the screen becomes darker and darker in stages equivalent to ECO2 Depending on the installation angle of the projector the screen may become dark This is one of the protection functions called Forced ECO MODE When Forced ECO MODE is i...

Страница 52: ...ng to LIGHT MODE immediately after the time of power on and the time of power off The CARBON SAVINGS SESSION message will be displayed in the POWER OFF ARE YOU SURE message at the time of power off TIP The formula shown below is used to calculate the amount of CO2 emission reduction Amount of CO2 emission reduction Power consumption in NORMAL LIGHT MODE Power consumption in current setting CO2 con...

Страница 53: ...aller than the area of the raster Projected image The drawing shows the upper right corner 2 Pick up any one of the corners and align the corner of the image with a corner of the screen 3 Press the Geometric button either on the cabinet or the remote control Display the GEOMETRIC CORRECTION screen of the on screen menu 4 Move the cursor onto MODE by button and press the ENTER The mode selection sc...

Страница 54: ... screen 7 Use the button to select one icon which points in the direction you wish to move the projected image frame 8 Press the ENTER button 9 Use the button to move the projected image frame as shown on the example 10 Press the ENTER button 11 Use the button to select another icon which points in the direction On the CORNERSTONE screen select EXIT or press the EXIT button on the remote control ...

Страница 55: ... In the state CORNERSTONE has been selected for MODE in the GEOMETRIC CORRECTION Press the Geometric button for 2 or more seconds Run DISPLAY GEOMETRIC CORRECTION RESET in the on screen menu Using CORNERSTONE correction can cause the image to be slightly blurred because the correction is made electronically A commercially available USB mouse is available for CORNERSTONE correction Operation for th...

Страница 56: ...jection screen where you want to shift the on screen menu The nearest corner of the on screen menu indication frame will shift to the clicked position 3 Click the wheel button to close the menu indication frame Geometric correction The USB mouse can be used for CORNERSTONE CORRECTION HORIZONTAL CORNER VERTICAL CORNER and WARP In this clause the CORNERSTONE CORRECTION by an USB mouse is explained a...

Страница 57: ... corner will move to the mouse clicked position 3 Repeat the step 2 for correcting all distortion After completion of distortion correction right click on the projection screen The shape of mouse pointer will be changed to normal 4 Left click EXIT on the correction screen to finish ...

Страница 58: ... function 1 Press the MENU button The menu will be displayed 2 Press the button twice to select SETUP and press the button or the ENTER button to select MENU 1 3 Press the button to select CONTROL 4 Press the button three times to select SECURITY and press the ENTER button The OFF ON menu will be displayed 5 Press the button to select ON and press the ENTER button The SECURITY KEYWORD screen will ...

Страница 59: ...n enabled To turn on the projector when SECURITY is enabled 1 Press the POWER button The projector will be turned on and display a message to the effect that the projector is locked 2 Press the MENU button 3 Type in the correct keyword and press the ENTER button The projector will display an image NOTE The security disable mode is maintained until the main power is turned off or unplugging the pow...

Страница 60: ...tton The SECURITY KEYWORD screen will be displayed 4 Type in your keyword and press the ENTER button When the correct keyword is entered the SECURITY function will be disabled NOTE If you forget your keyword contact your dealer Your dealer will provide you with your keyword in exchange for your request code Your request code is displayed in the Keyword Confirmation screen In this example NB52 YGK8...

Страница 61: ...tor before watching if you or any of your family members have a history of suffering from seizures caused by light sensitivity Please stop watching immediately and take a rest when you feel physically unwell while watching vomiting gid diness nausea headaches sore eyes blurred vision cramps and dumbness in the limbs etc Please consult a doctor if the symptoms persist Please watch a 3D video direct...

Страница 62: ... switching to 3D image the following functions will be cancelled and disabled BLANKING PIP PICTURE BY PICTURE GEOMETRIC CORRECTION EDGE BLENDING GEOMETRIC CORRECTION and EDGE BLENDING adjustment values will be maintained The output may not automatically switch to a 3D video depending on the 3D input signal Check the operating conditions described in the user manual of the Blu ray player Please con...

Страница 63: ...ctor The power supply of the 3D eyewear is turned off Please turn on the power supply of the 3D eyewear The internal battery of the 3D eyewear is flat Please charge or replace the battery The viewer is located too far away from the screen Please get closer to the screen until the video can be seen in 3D Please turn the L R INVERT in the on screen menu to OFF Due to multiple 3D projectors working a...

Страница 64: ...se the projector in a network consult with your network administrator about network settings The display s or button s response can be slowed down or operation may not be accepted depending the settings of your network Should this happen consult your network administrator The projector may not respond if its buttons are repeatedly pressed in rapid intervals Should this happen wait a moment and rep...

Страница 65: ... of the URL Example 2 When the IP address of the projector is 192 168 73 1 access is gained to the network setting by specifying http 192 168 73 1 index html for the address or the entry column of the URL PROJECTOR ADJUSTMENT POWER This controls the power of the projector ON Power is switched on OFF Power is switched off VOLUME This controls the volume of the projector Increases the volume adjustm...

Страница 66: ...ment value The functions that can be controlled will vary depending on the signal being input to the projector page 88 89 SOURCE SELECT This switches the input connector of the projector HDMI1 Switches to the HDMI 1 IN connector HDMI2 Switches to the HDMI 2 IN connector DisplayPort Switches to the DisplayPort COMPUTER Switches to the COMPUTER IN connector HDBaseT Switch to image input sent from a ...

Страница 67: ... address subnet mask and gateway to the projector from your DHCP server DHCP OFF Set IP address subnet mask and gateway to the projector assigned by your network administrator IP ADDRESS Set your IP address of the network connected to the projector SUBNET MASK Set your subnet mask number of the network connected to the projector GATEWAY Set the default gateway of the network connected to the proje...

Страница 68: ...urn on the Alert Mail feature Clearing a checkmark will turn off the Alert Mail feature Sample of a message to be sent from the projector Subject Projector Projector Information THE COOLING FAN HAS STOPPED INFORMATION PROJECTOR NAME xxxxx LIGHT HOURS USED xxxx H SENDER S ADDRESS Enter sender s address SMTP SERVER NAME Enter the SMTP server name to be connected to the projector RECIPIENT S ADDRESS ...

Страница 69: ...isable to connect with the XTP transmitter SAVE Click this button to save your settings to the projector s memory NOTE If you forget your password contact your dealer Please check 24 digits serial number XXXX XXXX XXXX XXXX XXXX XXXX displayed on the column for the password What is PJLink PJLink is a standardization of protocol used for controlling projectors of different manufacturers This standa...

Страница 70: ...e adjustable zoom focus and les shift range LENS MEMORY STORE Store the current adjusted values in memory for each input signal MOVE Applies the adjusted values of LENS SHIFT ZOOM and FOCUS to the current signal RESET Return the adjusted valued to the last condition REF LENS MEMORY PROFILE1 PROFILE2 Select a stored PROFILE number STORE Store each adjusted value of LENS SHIFT ZOOM and FOCUS for the...

Страница 71: ... set from 0 to 10 seconds in increments of 1 second OUT Set how long the light will take to fade out after the SHUTTER button is pressed The time can be set from 0 to 10 seconds in increments of 1 second Storing Changes for Lens Shift Zoom and Focus LENS MEMORY This function serves to store the adjusted values when using the LENS SHIFT ZOOM and FOCUS buttons of the pro jector Adjusted values can b...

Страница 72: ...t Features To store your adjusted values in REF LENS MEMORY 1 Press the MENU button The menu will be displayed 2 Press the button to select SETUP and press the ENTER button 3 Press the button to select INSTALLATION 1 ...

Страница 73: ...button The PROFILE selection screen appears 6 Press the buttons to select the PROFILE number then press the ENTER button Return to the REF LENS MEMORY settings screen 7 Select STORE and press the ENTER button The confirmation screen will be displayed 8 Press the button to select and YES and press the ENTER button Select a PROFILE number and save the adjusted LENS SHIFT ZOOM and FOCUS values to it ...

Страница 74: ... function page 97 To call up your adjusted values from REF LENS MEMORY 1 Press the MENU button The menu will be displayed 2 Press the button to select SETUP and press the ENTER button 3 Press the button to select INSTALLATION 1 4 Press the button to select REF LENS MEMORY and press the ENTER button The REF LENS MEMORY screen will be displayed ...

Страница 75: ...umber then press the ENTER button Return to the REF LENS MEMORY settings screen 7 Select MOVE and press the ENTER button The lens will shift based on the adjusted values stored in the selected PROFILE 8 Press the button to select and YES and press the ENTER button The adjusted values will be applied to the current signal 9 Press the MENU button The menu will be closed ...

Страница 76: ...number To automatically apply the stored values at the time of source selection 1 From the menu select SETUP REF LENS MEMORY LOAD BY SIGNAL and press the ENTER button 2 Press the button to select and ON and press the ENTER button This will move the lens automatically to the position at the time of source selection according to the adjusted values NOTE The Lens Memory function may not produce a com...

Страница 77: ...time PIP PICTURE BY PICTURE Case 2 Using four projectors to project video with a resolution of 3840 2160 pixels TILING Case 1 Using a single projector to project two types of videos PIP PICTURE BY PICTURE Connection example and projection image In the case of PICTURE BY PICTURE In the case of PIP On screen menu operations Display DISPLAY PIP PICTURE BY PICTURE MODE screen in the on screen menu and...

Страница 78: ...OTE When setting up the projector assign a unique control ID to each projector Set the Color setting and DeepColor setting on your Blu ray player or computer to Auto Refer to the owner s manual ac companied with your Blu ray player or computer for more information Connect an HDMI output of your Blu ray player or computer to the first projector and then connect to HDBaseT IN Ethernet port of the se...

Страница 79: ...vertical direction 3 In the screen for setting the horizontal order select 1st UNIT or 2nd UNIT look at the screens the one on the left is the 1st UNIT while the one on the right is the 2nd UNIT 4 In the screen for setting the vertical order select the 1st UNIT or the 2nd UNIT look at the screens the one at the top is the 1st UNIT while the one at the bottom is the 2nd UNIT 3 Adjust the lens shift...

Страница 80: ... damage and failure The following installation is recommended when combining the installation of two projectors for multi screen projec tion Please leave sufficient space on the left and right of the projector Cabinet WARNING Please request the retail store for special installation services such as when mounting the projector to the ceiling Never carry out the installation by yourself The projecto...

Страница 81: ...eft bottom right or bottom left of the screen the size of the sub display can be selected and the position can be fine tuned Switch the main display with the sub display Main Display Sub Display Picture by picture function Display the main display and sub display side by side The main display and sub display can be set up and adjusted as follows page 100 Selecting the display boundary ratio of the...

Страница 82: ...seT model The PIP PICTURE IN PICTURE or PICTURE BY PICTURE screen set up under MODE is projected page 99 When the signal name is displayed in grey this means that it cannot be selected The signal can also be selected by pressing the PIP button or PBP POP button on the remote control 4 Press the MENU button The on screen menu will disappear 5 When returning to single screen display the PIP PICTURE ...

Страница 83: ... and then press the ENTER button Display the screen for switching the display positions 3 Select ON using the button and then press the ENTER button The video of the main display will switch with that of the sub display When turned OFF When turned ON Sub display video Main display video Sub display video Main display video The signal output from the HDBaseT OUT Ethernet terminal does not change ev...

Страница 84: ...ed for both the main display and sub display These operations cannot be ap plied individually Momentary deletion of video audio Video pause PIP PICTURE BY PICTURE cannot be used when a 3D video is being displayed When using the PIP PICTURE BY PICTURE function DYNAMIC CONTRAST can not be used PIP PICTURE BY PICTURE cannot be used when the signal input has a resolution of 1920 1200 or more The HDBas...

Страница 85: ...e becomes square in the appropriate size and then make optical adjustments lens shift focus and zoom Adjust the brightness of each projector using REF LIGHT ADJUST under LIGHT MODE In addition use REF WHITE BALANCE to adjust the CONTRAST BRIGHTNESS and UNIFORMITY Before explaining use of the Edge Blending function This section explains the case for Example Placing two projectors side by side As sh...

Страница 86: ...ble EDGE BLENDING 1 Press the Edge Blend button The EDGE BLENDING screen will be displayed Align the cursor with MODE and then press the ENTER but ton The mode screen will be displayed 2 Select MODE ON and press the ENTER button This enables the Edge Blending function The following menu items are available TOP BOTTOM LEFT RIGHT BLACK LEVEL and BLEND CURVE 3 Select RIGHT for Projector A and LEFT fo...

Страница 87: ...BOTTOM to OFF Adjust RANGE and POSITION to determine an area of overlapped edges of images projected from each projector Turning on MARKER will display markers in magenta and green The magenta marker is used for RANGE and green one for POSITION RANGE Determine an area of overlapped edges of images POSITION Determine the position of overlapped edges of images Green marker Turn on RIGHT Magenta mark...

Страница 88: ...he projector is running turn on or off MARKER from the menu BLEND CURVE Adjust the brightness of the overlapped section on the screens According to the necessity adjust the brightness of the overlapped section on the screens by the BLEND CURVE AND BLACK LEVEL Set the MODE to ON for selecting BLEND CURVE and BLACK LEVEL Selecting an option for the BLEND CURVE By controlling the graduation of the ov...

Страница 89: ... This function is enabled only when MODE is turned on Adjustable area varies depending on what combination of TOP BOTTOM LEFT and RIGHT are turned on Example Adjusting the Black Level when placing two projectors side by side Width of overlap Adjust CENTER Adjust CENTER Projector A s image Projector B s image Adjust CENTER RIGHT Adjust CENTER LEFT 1 Select DISPLAY EDGE BLENDING BLACK LEVEL and pres...

Страница 90: ...TTOM LEFT CENTER LEFT TOP RIGHT CENTER RIGHT BOTTOM RIGHT TOP CENTER CENTER CENTER BOTTOM CENTER TOP RIGHT CENTER RIGHT TOP CENTER TIP The number of black level division screens maximum of nine divisions changes depending on the number of edge blending positions selected top bottom right left In addition when the top bottom and left right ends are selected the corner division screen appears The ed...

Страница 91: ...projector cabinet to select the item you want to adjust or set You can use the buttons on the remote control or the projector cabinet to select the tab you want 5 Press the ENTER button on the remote control or the projector cabinet to display the submenu window 6 Adjust the level or turn the selected item on or off by using the buttons on the remote control or the projector cabinet Changes are st...

Страница 92: ... to select an option in a dialog box Source Indicates the currently selected source Menu mode Indicates the current menu mode BASIC or ADVANCED Off Timer remaining time Indicates the remaining countdown time when the OFF TIMER is preset Slide bar Indicates settings or the direction of adjustment LIGHT MODE symbol Indicates LIGHT MODE is set Key Lock symbol Indicates the CONTROL PANEL LOCK is enabl...

Страница 93: ...NTATION VIDEO MOVIE GRAPHIC sRGB DICOM SIM GAMMA CORRECTION 1 DYNAMIC NATURAL BLACK DETAIL SCREEN SIZE 2 LARGE MEDIUM SMALL COLOR TEMPERATURE 3 DYNAMIC CONTRAST OFF MOTION IMAGE STILL IMAGE LIGHT ADJUST WHITE BALANCE CONTRAST R 0 CONTRAST G 0 CONTRAST B 0 BRIGHTNESS R 0 BRIGHTNESS G 0 BRIGHTNESS B 0 COLOR CORRECTION RED 0 HUE SATURATION GREEN 0 HUE SATURATION BLUE 0 HUE SATURATION YELLOW 0 HUE SAT...

Страница 94: ...E OFF OFF KEYSTONE CORNERSTONE HORIZONTAL CORNER VERTICAL CORNER WARP PC TOOL KEYSTONE HORIZONTAL VERTICAL TILT THROW RATIO CORNERSTONE TOP LEFT TOP TOP RIGHT LEFT RIGHT BOTTOM LEFT BOTTOM BOTTOM RIGHT HORIZONTAL CORNER TOP LEFT TOP TOP RIGHT LEFT RIGHT BOTTOM LEFT BOTTOM BOTTOM RIGHT VERTICAL CORNER TOP LEFT TOP TOP RIGHT LEFT RIGHT BOTTOM LEFT BOTTOM BOTTOM RIGHT WARP TOP LEFT TOP TOP RIGHT LEFT...

Страница 95: ...PLAY ON OFF ON MESSAGE DISPLAY ON OFF ON ID DISPLAY ON OFF ON 3D CAUTION MESSAGE ON OFF ON DISPLAY TIME AUTO 45 SEC MANUAL AUTO 5 SEC AUTO 15 SEC AUTO 45 SEC MENU 2 MENU ANGLE 0 90 270 MENU POSITION HORIZONTAL POSITION VERTICAL POSITION RESET INSTALLA TION 1 ORIENTATION AUTO AUTO DESKTOP FRONT CEILING REAR DESKTOP REAR CEILING FRONT SCREEN SCREEN TYPE FREE FREE 4 3 SCREEN 16 9 SCREEN 16 10 SCREEN ...

Страница 96: ...04 00 03 30 03 00 02 30 02 00 01 30 01 00 00 30 00 00 00 30 01 00 01 30 02 00 02 30 03 00 03 30 04 00 04 30 05 00 05 30 06 00 06 30 07 00 07 30 08 00 08 30 09 00 09 30 10 00 10 30 11 00 11 30 12 00 12 30 13 00 DATE AND TIME SETTINGS DATE MM DD YYYY TIME HH MM INTERNET TIME SERVER OFF ON IP ADDRESS UPDATE SUMMER TIME SETTINGS ENABLE OFF ON MON START 1 2 3 4 5 6 7 8 9 10 11 12 DAY START FIRST WEEK S...

Страница 97: ...IONS AUTO ADJUST NORMAL OFF NORMAL FINE AUDIO SELECT HDMI1 HDMI1 HDMI1 COMPUTER HDMI2 HDMI2 HDMI2 COMPUTER DisplayPort DisplayPort DisplayPort COMPUTER HDBaseT HDBaseT HDBaseT COMPUTER DEFAULT INPUT SELECT LAST LAST AUTO HDMI1 HDMI2 DisplayPort COMPUTER HDBaseT SEAMLESS SWITCHING OFF OFF ON BACKGROUND BLUE BLUE BLACK LOGO HDBaseT OUT SELECT AUTO AUTO HDMI1 HDMI2 DisplayPort HDBaseT EDID VERSION HD...

Страница 98: ...ERTICAL FREQUENCY SYNC TYPE SYNC POLARITY SCAN TYPE SOURCE NAME ENTRY NO SOURCE 4 SIGNAL TYPE BIT DEPTH VIDEO LEVEL SAMPLING FREQUENCY 3D FORMAT WIRED LAN IP ADDRESS SUBNET MASK GATEWAY MAC ADDRESS VERSION 1 FIRMWARE DATA FIRMWARE2 OTHERS DATE TIME PROJECTOR NAME MODEL NO SERIAL NUMBER CONTROL ID 5 DETECTED PROJECTORS LENS ID CONDITIONS INTAKE TEMPERATURE EXHAUST TEMPERATURE ATMOSPHERIC PRESSURE I...

Страница 99: ...inal 3 DisplayPort This projects the video of the device connected to the DisplayPort IN terminal 4 COMPUTER This projects the video of the device connected to the computer video input terminal This projects the analog RGB signal or component signal 5 HDBaseT Projecting the HDBaseT signal ENTRY LIST Displays a list of signals See the following pages TEST PATTERN Closes the menu and switches to the...

Страница 100: ...played and no additional patterns can be registered You should thus delete adjustment values of signals that are no longer needed Displaying the Entry list 1 Press the MENU button The menu will be displayed 2 Press the or button to select INPUT The INPUT list will be displayed This screen belongs to a HDBaseT model 3 Use the or to select ENTRY LIST and press the ENTER button The ENTRY LIST windows...

Страница 101: ... the or button to select EDIT and press the ENTER button The EDIT window will be displayed SOURCE NAME Enter a signal name Up to 18 alphanumeric characters can be used INPUT The input terminal can be changed Switching between HDMI DisplayPort Computer HDBaseT is possible LOCK Set so that the selected signal cannot be deleted when ALL DELETE is executed The changes made after LOCK execution cannot ...

Страница 102: ...ignal 5 Press the or button to select PASTE and press the ENTER button Data on the clipboard will be pasted to the signal Deleting all the signals from the Entry List ALL DELTE 1 Press the or button to select ALL DELETE and press the ENTER button The confirmation message will be displayed 2 Press the or button to select YES and press the ENTER button NOTE The locked signal cannot be deleted Using ...

Страница 103: ... customize each gamma or color Your settings can be stored in PRESET 1 to PRESET 7 AUTO Automatically distinguish the optimal setting for the input signal HIGH BRIGHT Recommended for use in a brightly lit room PRESENTATION Recommended for making a presentation using a PowerPoint file VIDEO Recommended for typical TV program viewing MOVIE Recommended for movies GRAPHIC Recommended for graphics sRGB...

Страница 104: ...ended for graphics sRGB Standard color values DICOM SIM Recommended for DICOM simulation format Selecting Gamma Correction Mode GAMMA CORRECTION Each mode is recommended for DYNAMIC Creates a high contrast picture NATURAL Natural reproduction of the picture BLACK DETAIL Emphasizes detail in dark areas of the picture NOTE This function is not available when DICOM SIM is selected for DETAIL SETTINGS...

Страница 105: ...ust the white balance Contrast for each color RGB to adjust the white level of the screen Brightness for each color RGB is used to adjust the black level of the screen COLOR CORRECTION Corrects the color for all signals Adjusts the tone for the colors red green blue yellow magenta and cyan RED HUE Direction Magenta direction Direction Yellow direction SATURATION Direction Vivid Direction Weak GREE...

Страница 106: ...OTE When TEST PATTERN is displayed CONTRAST BRIGHTNESS SHARPNESS COLOR and HUE cannot be adjusted RESET The settings and adjustments for PICTURE will be returned to the factory default settings with the exception of the following Preset numbers and REFERENCE within the PRESET screen The settings and adjustments under DETAIL SETTINGS within the PRESET screen that are not currently selected will not...

Страница 107: ...tion adjusts the clock frequencies that eliminate the horizontal banding in the image This adjustment may be necessary when you connect your computer for the first time PHASE Use this item to adjust the clock phase or to reduce video noise dot interference or cross talk This is evident when part of your image appears to be shimmering Use PHASE only after the CLOCK is complete NOTE The CLOCK and PH...

Страница 108: ...ou project the signal with the same resolution horizontal and vertical frequency its adjustments will be called up and applied To delete adjustments stored in memory from the menu you select SETUP RESET CURRENT SIGNAL and reset the adjustments BLANKING Adjusts the display range blanking at the top bottom left and right edges of the input signal Selecting Overscan Percentage OVERSCAN Select oversca...

Страница 109: ...50 4 3 WXGA 1600 900 16 9 UXGA 1600 1200 4 3 WSXGA 1680 1050 16 10 FHD 1080P 1920 1080 16 9 WUXGA 1920 1200 16 10 WQXGA 2560 1600 16 10 Quad HD 3840 2160 16 9 Quad HD 4096 2160 19 7 Options Function AUTO The projector will automatically determine the incoming signal and display it in its aspect ratio The projector may erroneously determine the aspect ratio depending on its signal If this occurs se...

Страница 110: ...and right in 16 9 ZOOM The image of a squeeze signal 16 9 is stretched left and right in 4 3 Parts of the displayed image are cropped at the left and right edges and therefore not visible FULL Project to full screen size TIP Image position can be adjusted vertically using POSITION when the 16 9 15 9 or 16 10 aspect ratios are selected The term letterbox refers to a more landscape oriented image wh...

Страница 111: ...block noise or mosaic like patterns Selecting Interlaced Progressive Conversion Process Mode DEINTERLACE This function allows you to select an interlaced to progressive conversion process for video signals NORMAL Automatically distinguishes a moving image from a static image to create a distinct image Please select MOVIE if there are any obvious jitter and noises MOVIE Select when projecting movin...

Страница 112: ...level when connecting an external device to the HDMI 1 IN terminal HDMI 2 IN terminal DisplayPort input terminal and HDBaseT IN terminal of the projector AUTO The video level is switched automatically based on the information from the device outputting the signal Depending on the connected device this setting may not be made properly In this case switch to NORMAL or ENHANCED from the menu and view...

Страница 113: ...single or multiple projectors and carry out the settings for projecting 3D videos Image setting for 3D glasses made by Infitec SINGLE Use a single projector to project 3D videos DUAL LEFT Use a dedicated projector for displaying videos on the left DUAL RIGHT Use a dedicated projector for displaying videos on the right FORMAT Select the 3D video format recording transmission format Select to match ...

Страница 114: ... from the ENTRY LIST page 83 Note that performing CUT or ALL DELETE in the ENTRY LIST will delete lens memory adjustments as well as source adjust ments This deletion will not take effect until other adjustments is loaded For storing each adjustment of lens shift zoom and focus as common value for all input signal store them as reference lens memory To store your adjusted values in LENS MEMORY 1 P...

Страница 115: ...automatically apply the adjusted values at the time of source selection 1 From the menu select SETUP INSTALLATION 1 REF LENS MEMORY LOAD BY SIGNAL and press the ENTER button 2 Press the button to select and ON and press the ENTER button This will move the lens automatically to the position at the time of source selection according to the adjusted values NOTE The Lens Memory function may not produc...

Страница 116: ...Please refer to 4 2 Displaying Two Pictures at the Same Time page 64 for details PIP SETTING Select the display position position adjustment and size of the sub display in the PIP screen START POSITION Selection of the display position of the sub display when switching to the PIP screen HORIZONTAL POSITION Adjust the display position of the sub display in the horizontal direction The respective co...

Страница 117: ...movement is half the resolution of the projector Reference point Adjust using the horizon tal position Sub display Main display Reference point Adjust using the vertical position TOP LEFT TOP RIGHT BOTTOM LEFT BOTTOM RIGHT Reference point Reference point BORDER Select the display boundary of the main display and sub display of the PICTURE BY PICTURE screen Display boundary Main display Sub display...

Страница 118: ...iagonal direction to the screen VERTICAL Adjustments when projecting from the top or bottom direction to the screen TILT Adjusts the distortion when performing trapezoidal correction with the screen moved in the vertical direction using the lens shift THROW RATIO Adjusts according to the projection ratio of the optional lens used Model name of lens unit Adjustment range NP40ZL 8 11 NP41ZL 13 30 NP...

Страница 119: ...le VERTICAL CORNER Performs correction for projection onto a wall lying at an angle to the vertical direction Reverse angle correction is also possible NOTE When the maximum adjustment range is exceeded distortion adjustment is disabled Set up the projector at an optimal angle as the deterioration in the image quality increases as the distortion adjustment volume gets larger Please note that the i...

Страница 120: ...ide will move in a parallel manner VERTICAL CORNER When Point d in the drawing is moved and the left side and Point e are moved the right side will move in a parallel manner Adjustment points of the HORIZONTAL CORNER screen and movement points of the projection screen a b b c d e f g h a c d e f g h Point b will be displaced in a parallel manner at the same time as Points a b c Point g will be dis...

Страница 121: ...he cursor will change into an adjustment point yellow in color 3 Press the buttons to adjust the corners or sides of the screen and then press the ENTER The cursor will back to yellow box Explanation for correcting distortion Eight adjustment points can be moved independently For left and right sides use buttons for adjusting the range of distortion and buttons for adjusting the distortion peak Fo...

Страница 122: ...l correction is carried out in geometric correction the brightness may be affected and the picture quality may be degraded RESET Reset the adjustment value that has been set up as MODE in GEOMETRIC CORRECTION return to the initial value This is ineffective when MODE is set OFF Reset can be executed by pressing and holding the Geometeric button on the remote control for over 2 seconds ...

Страница 123: ...d when an item is selected page 69 CONTROL Enable TOP BOTTOM LEFT and RIGHT functions MARKER Set whether to display marker or not when adjusting the range and display position When turned on a magenta marker for adjusting the range adjustment and a green marker for adjusting the display position will be displayed RANGE Adjust the range width of the edge blending POSITION Adjust the display positio...

Страница 124: ...o divide The edge blending width will also be automatically set to that width TILING This assigns the divided screens to the projectors The edge blending function will also be set automatically ZOOM HORIZONTAL ZOOM This enlarges the video area in the horizontal direction VERTICAL ZOOM This enlarges the video area in the vertical direction HORIZONTAL POSITION This shifts the video area in the horiz...

Страница 125: ...ted and projected If the tiling conditions are not satisfied adjust the video screen of the projector at each installation position using the zoom function Assign a unique control ID to each projector Set the Color setting and DeepColor setting on your Blu ray player or computer to Auto Refer to the owner s manual accompanied with your Blu ray player or computer for more information Connect an HDM...

Страница 126: ...lock is canceled Turning ON OFF Control ID ID DISPLAY ID DISPLAY This option turns on or off the ID number which is displayed when the ID SET button on the remote control is pressed page 121 3D CAUTION MESSAGE This selects whether to display a caution message or not when switching to a 3D video The default condition when shipped from the factory is ON OFF The 3D caution message screen will not be ...

Страница 127: ...ng Input terminal and message displaying position are not influenced by the MENU POSITION It enables to move the menu by mouse click when a commercially available USB mouse is connected It enables to move the menu position by the and buttons holding to press the CTL button on the remote control or mouse click While the MENU POSITION of the on screen menu is displayed on and the menu is moved by th...

Страница 128: ... ceiling Never install the projector on your own This may result in the projector falling down and causing injury to people AUTO This automatically detects and projects the DESKTOP FRONT and CEILING FRONT NOTE The DESKTOP REAR and CEILING REAR will not be detected Please select manually DESKTOP FRONT CEILING REAR DESKTOP REAR CEILING FRONT TIP Check whether the automatic DESKTOP FRONT is installed...

Страница 129: ...according to the detected temperature and atmospheric pressure by the built in sensor NORMAL The built in fans run at the appropriate speed based on the detection by the built in temperature sensor HIGH The built in fans run at high speed HIGH ALTITUDE The built in fans run at high speed Select this option when using the projector at altitudes approximately 5500 feet 1700 meters or higher NOTE Mak...

Страница 130: ... for CONSTANT BRIGHTNESS REF LIGHT ADJUST is available when NORMAL is selected for LIGHT MODE and OFF is selected for CONSTANT BRIGHTNESS TIP Brightness normally decreases with use but by selecting CONSTANT BRIGHTNESS mode sensors inside the projector detect brightness and automatically adjust the output thereby maintaining a constant brightness throughout the life of the light module However if o...

Страница 131: ... STORE to the current signal RESET Reset selected PROFILE number REF LENS MEMORY to the factory default settings LOAD BY SIGNAL When you switch signals the lens will shift to the lens shift zoom and focus values for the selected PRO FILE number If no adjusted values have been saved to LENS MEMORY the lens will apply REF LENS MEMORY adjusted values Alternatively if no adjusted values have been save...

Страница 132: ...nd the picture is projected CLOSE The light source does not come on when the power is turned on When the SHUTTER button is pressed the shutter is released and the light source is turned on FADE IN TIME Set how long the light will take to fade in after the SHUTTER button is pressed The time can be set from 0 to 10 seconds in increments of 1 second FADE OUT TIME Set how long the light will take to f...

Страница 133: ...d for the administrator mode MENU MODE Select either BASIC or ADVANCED menu page 76 NOT SAVE SETTING VALUES Placing a check mark will not save your projector settings Clear this check box to save your projector settings NEW PASSWORD CONFIRM PASS WORD Assign a password for the administrator mode Up to 10 alphanumeric characters ...

Страница 134: ...ilt in clock The clock will keep working for about a month after the main power is turned off If the main power is not supplied to the projector for a month or more it requires to set DATE AND TIME SETTINGS feature again Setting a new program timer 1 On the PROGRAM TIMER screen use the or button to select SETTINGS and press the ENTER button The PROGRAM LIST screen will be displayed 2 Select a blan...

Страница 135: ...e PROGRAM TIMER screen 6 Select EXIT and press the ENTER button You will be returned to the TOOLS screen NOTE Up to 30 different timer settings can be programmed The Program Timer is executed on a set time basis not in a program basis Once the program not marked with a check in REPEAT has been executed the check mark in the ACTIVE check box will be cleared automatically and the program will be dis...

Страница 136: ...reen select a program you want to edit and press the ENTER button 2 Change the settings on the EDIT screen 3 Select OK and press the ENTER button The programmed settings will be changed You will be returned to the PROGRAM LIST screen Changing the order of programs 1 On the PROGRAM LIST screen select a program whose order you want to change and press the button 2 Press the button to select or 3 Pre...

Страница 137: ...his function is for using a commercially available USB mouse via the USB A port on this projector BUTTON Select for using the mouse either by right or left hand SENSITIVITY Select the sensitivity of mouse among FAST MIDDLE and LOW NOTE This setting is not guaranteed motion of all commercially available USB mouses Disabling the Cabinet Buttons CONTROL PANEL LOCK This option turns on or off the CONT...

Страница 138: ...l display the menu for canceling the Control ID Assigning or Changing the Control ID 1 Turn on the projector 2 Press the ID SET button on the remote control The CONTROL ID screen will be displayed If the projector can be operated with the current remote control ID the AC TIVE will be displayed If the projector cannot be operated with the current remote control ID the INACTIVE will be displayed To ...

Страница 139: ... BACK and HDBaseT NOTE The remote control of the projector will not be able to receive signals if the power supply of the HDBaseT transmission device connected to the projector is switched on when this has been set to HDBaseT TIP If the remote control system does not function when direct sunlight or strong illumination strikes the remote control sensor of the projector change to other option ...

Страница 140: ...ection Select WIRED LAN PROFILES PROFILE 1 or PROFILE 2 Two settings can be set for wired LAN Next turn on or off for DHCP IP ADDRESS SUBNET MASK and GATEWAY and select OK and press the ENTER button page 124 To recall LAN settings stored in the profile number Select PROFILE 1 or PROFILE 2 for wired LAN and then select OK and press the ENTER button page 124 To connect a DHCP server Turn on DHCP for...

Страница 141: ...DHCP Place a check mark to automatically assign an IP address to the projector from your DHCP server Clear this check box to register the IP address or subnet mask number obtained from your network administrator IP ADDRESS Set your IP address of the network connected to the projector when DHCP is turned off Up to 12 numeric characters SUBNET MASK Set your subnet mask number of the network connecte...

Страница 142: ...projector name Up to 16 alphanu meric characters and symbols DOMAIN Set a host name and domain name of the projector HOST NAME Set a host name of the projector Up to 16 alphanumeric characters DOMAIN NAME Set a domain name of the projector Up to 60 alphanumeric characters ...

Страница 143: ...jector Up to 60 alphanumeric characters SENDER S AD DRESS Specify the sender s address Up to 60 alphanu meric characters and symbols SMTP SERVER NAME Type in the SMTP server name to be connected to the projector Up to 60 alphanumeric characters RECIPIENT S AD DRESS 1 2 3 Type in your recipient s address Up to 60 alphanu meric characters and symbols TEST MAIL Send a test mail to check if your setti...

Страница 144: ...work supported by AMX s NetLinx control system TIP When using a device that supports AMX Device Discovery all AMX NetLinx control system will recognize the device and download the appropriate Device Discovery Module from an AMX server Placing a checkmark will enable detecting the projector from AMX Device Discovery Clearing a checkmark will disable detecting the projector from AMX Device Discovery...

Страница 145: ...ector is turned on LAST Sets the projector to default to the previous or last active input each time the projector is turned on AUTO Searches for an active source in order of HDMI1 HDMI2 DisplayPort COMPUTER HDBaseT and displays the first found source HDMI1 Displays the digital source from the HDMI 1 IN connector every time the projector is turned on HDMI2 Displays the digital source from the HDMI...

Страница 146: ...R and the input terminal for the sub screen is one among the HDMI 1 IN HDMI 2 IN DisplayPort IN terminals or HDBaseT IN Ethernet port the signal from the sub screen will be output If the set input terminals for main and sub screen for PIP and PICTURE BY PICTURE are differed from the selected input terminals any image will be output 4K60p and 4K50p signals can not be output EDID VERSION Switch the ...

Страница 147: ...eep the projector automatically detects and projects synchronizing signal input from the selected terminals among Computer HDMI1 2 DisplayPort and HDBaseT by this function OFF AUTO POWER ON SELECT function becomes inactive HDMI1 HDMI2 DisplayPort COMPUTER HDBaseT When the projector detects the computer signal input from the selected terminal automatically it will be turned ON and will project the ...

Страница 148: ...ween 30 minutes and 16 hours OFF 0 30 1 00 2 00 4 00 8 00 12 00 16 00 2 Press the ENTER button on the remote control 3 The remaining time starts counting down and it is displayed at the bottom of the On Screen Menu 4 The projector will turn off after the countdown is complete NOTE To cancel the preset time set OFF for the preset time or turn off the power When the remaining time reaches 3 minutes ...

Страница 149: ...ANCE STATIC CONVERGENCE ADMINISTRATOR MODE CONTROL PANEL LOCK SECURITY COMMUNICATION SPEED DATE AND TIME SETTINGS CONTROL ID STANDBY MODE FAN MODE REF LENS MEMORY EDID VERSION HDCP VERSION LIGHT HOURS USED TOTAL CARBON SAVINGS WIRED LAN ALL DATA INCLUDING ENTRY LIST Reset all the adjustments and settings for all the signals including the ENTRY LIST to the factory preset except LANGUAGE BACKGROUND ...

Страница 150: ...formation included is as follows TIP Pressing the HELP button on the remote control will show the INFO menu items USAGE TIME LIGHT HOURS USED H TOTAL CARBON SAVINGS kg CO2 TOTAL CARBON SAVINGS This displays the estimated carbon saving information in kg The carbon footprint factor in the carbon saving cal culation is based on the OECD 2008 Edition page 35 ...

Страница 151: ...ENCY VERTICAL FREQUENCY SYNC TYPE SYNC POLARITY SCAN TYPE SOURCE NAME ENTRY NO SOURCE 2 SIGNAL TYPE BIT DEPTH VIDEO LEVEL SAMPLING FREQUENCY 3D FORMAT SOURCE 3 INPUT TERMINAL RESOLUTION HORIZONTAL FREQUENCY VERTICAL FREQUENCY SYNC TYPE SYNC POLARITY SCAN TYPE SOURCE NAME ENTRY NO ...

Страница 152: ...135 5 Using On Screen Menu SOURCE 4 SIGNAL TYPE BIT DEPTH VIDEO LEVEL SAMPLING FREQUENCY 3D FORMAT WIRED LAN IP ADDRESS SUBNET MASK GATEWAY MAC ADDRESS VERSION 1 FIRMWARE DATA FIRMWARE2 ...

Страница 153: ...TIONS Arrow direction of the Z AXIS in the figure represents the top of the projector X AXIS Display the projector image at an angle of 100 100 degrees to the horizontal in the X axis direction X AXIS value of the projector Horizontal plane X axis Gravity direction Y AXIS Display the projector image at an angle of 100 100 degrees to the horizontal in the Y axis direction Y AXIS value of the projec...

Страница 154: ...S Display the projector image at an angle of 100 100 degrees to the vertical in the Z axis direction Z AXIS value of the projector Horizontal plane Z axis Gravity direction HDBaseT SIGNAL QUALITY OPERATION MODE LINK STATUS HDMI STATUS ...

Страница 155: ...es Remove the separately sold lens when moving the projector If not the lens could be subject to shock while the projector is being moved damaging the lens and the lens shift mechanism When dismounting the lens from the projector return the lens position to the home position before turning off the power Failure to do so may prevent the lens from being mounted or dismounted because of narrow space ...

Страница 156: ...lowly all the way in Guiding notch Protrusion Arrow 4 Turn the lens clockwise Turn until a click is heard The lens is now fastened onto the projector TIP Mounting the lens theft prevention screw Fasten the lens theft prevention screw included with the projector to the bottom of the projector so that the lens cannot be removed easily ...

Страница 157: ...ns release button at the bottom of lens mounting section on the projector s front panel fully in turn the lens counterclockwise The lens comes off NOTE Check the following areas if the lens unit cannot be removed even when the lens release button is pressed 1 The lens release button may be locked sometimes In that case turn the lens fully to the right The lens release button lock will be released ...

Страница 158: ...or Please use a computer cable attached with a ferrite core Select the source name for its appropriate input connector after turning on the projector Input connector INPUT button on the projector cabinet Button on the remote control COMPUTER IN 4 COMPUTER 4 COMPUTER COMPUTER IN AUDIO IN AUDIO OUT Stereo mini plug audio cable not supplied NOTE Please check the operating manual of the computer as th...

Страница 159: ...cable Use a certified High Speed HDMI Cable or High Speed HDMI Cable with Ethernet Cautions when connecting a DisplayPort cable Use a certified DisplayPort cable Depending on the computer some time may be required until the image is displayed Some DisplayPort cables commercially available have locks To disconnect the cable press the button on the top of the cable s connector then pull the cable ou...

Страница 160: ...eck is connected via a scan converter etc the display may not be correct during fast forwarding and rewinding Use a DVI to HDMI cable compliant with DDWG Digital Display Working Group DVI Digital Visual Interface revision 1 0 stan dard The cable should be within 197 5 m long Turn off the projector and the PC before connecting the DVI to HDMI cable To project a DVI digital signal Connect the cables...

Страница 161: ... setting when shipped the computer signal and component signal are automatically distinguished and switched If the signals cannot be distinguished select COMPONENT under ADJUST VIDEO SIGNAL TYPE in the on screen menu of the projector To connect to a video device with a D connector use the sold separately D connector converter adapter model ADP DT1E COMPUTER IN 15 pin to RCA female 3 cable adapter ...

Страница 162: ... will provide improved image contrast and more detailed dark areas For more information on settings refer to the instruction manual of the audio video equipment to be connected When connecting the HDMI 1 IN or HDMI 2 IN connector of the projector to the Blu ray player the projector s video level can be made settings in accordance with the Blu ray player s video level In the menu select ADJUST VIDE...

Страница 163: ...r external de vices Connection example RS 232C LAN AUDIO IN HDMI IN Wired Remote DC IN HDBaseT COMPUTER IN HDBaseT IN Ethernet Computer for control use Computer for output use Example of a transmission device Our company s remote control RD 465E HDMI output video device NOTE Please use a shielded twisted pair STP cable of Category 5e or higher for the LAN cable sold commercially The maximum transm...

Страница 164: ...ther At the same time this projector is not guaran teed to work correctly in the connection with an other device as a monitor When outputting HDMI signals turn on the power of the video device on the output side and keep it connected before inputting video signals into this device The HDMI output terminals of the projector are equipped with repeater functions When a device is connected to the HDMI...

Страница 165: ...tand If not the projector may fall over and result in injury damage and malfunction Design and manufacturing conditions for the stand Please engage an installation service provider for the design and manufacture of the customized stand to be used for portrait projection Please ensure that the following are complied with when designing the stand 1 Secure sufficient space between the projector and t...

Страница 166: ...rawing showing the dimensional requirements is not an actual stand design drawing Side View Front View Screw holes for 4 M4 use Tilt foot remove 130 or greater 200 Horizontal adjuster Exhaust Intake air Intake air Rear foot 250 Please refer to the previous page ...

Страница 167: ...which provides a LAN connection using a LAN cable To use a LAN connection you are required to set the LAN on the projector menu Select SETUP NETWORK SETTINGS WIRED LAN page 124 Example of LAN connection Example of wired LAN connection LAN Server Hub LAN cable not supplied NOTE Use a Category 5 or higher LAN cable ...

Страница 168: ...e cabinet If heavily soiled use a mild detergent Never use strong detergents or solvents such as alcohol or thinner When cleaning the ventilation slits or the speaker using a vacuum cleaner do not force the brush of the vacuum cleaner into the slits of the cabinet Vacuum the dust off the ventilation slits Clogged ventilation slits may cause a rise in the internal temperature of the projector resul...

Страница 169: ...286 5 2 7 3 335 770 8 5 19 6 750 1500 19 1 38 1 400 272 382 6 9 9 7 447 1028 11 4 26 1 999 1998 25 4 50 8 500 340 478 8 6 12 1 559 1285 14 2 32 6 1247 2497 31 7 63 4 TIP Calculation of the throw distance from the screen size NP40ZL lens throw distance inch m H x 0 8 to H x 1 1 33 0 8 m min to 478 12 1 m max NP41ZL lens throw distance inch m H x 1 3 to H x 3 0 54 1 4 m min to 1285 32 6 m max NP43ZL...

Страница 170: ... 400 339 2 861 6 212 0 538 5 500 424 0 1077 0 265 0 673 1 Lens shifting range This projector is equipped with a lens shift function for adjusting the position of the projected image by buttons The lens can be shifted within the range shown below Desk front projection 100 V 100 H 10 H 10 H 50 V 10 V 20 H 20 H Width of projected image Height of projected image Description of symbols V indicates vert...

Страница 171: ... be moved upwards 0 5 79 5 201 9 cm 39 6 101 cm downwards 0 1 79 5 201 9 cm 8 20 cm when the lens is at the center position For a ceiling front installation the above figures are inverted Adjustment range in the horizontal direction The projected image can be moved to the left 0 2 127 2 323 1 cm 25 5 64 5 cm to the right 0 2 127 2 323 1 cm 25 5 64 5 cm Figures differ by several because the calcula...

Страница 172: ... 1080i 1920 1080 16 9 48 50 60 HDTV 720p 1280 720 16 9 50 60 SDTV 480p 720 1440 480 4 3 16 9 60 SDTV 576p 720 1440 576 4 3 16 9 50 SDTV 480i 1440 480 4 3 16 9 60 SDTV 576i 1440 576 4 3 16 9 50 DisplayPort Signal Resolution dots Aspect Ratio Refresh Rate Hz VGA 640 480 4 3 60 SVGA 800 600 4 3 60 XGA 1024 768 4 3 60 HD 1280 720 16 9 60 WXGA 1280 768 15 9 60 1280 800 16 10 60 Quad VGA 1280 960 4 3 60...

Страница 173: ...0 900 16 10 60 75 85 WXGA 1600 900 16 9 60 UXGA 1600 1200 4 3 60 WSXGA 1680 1050 16 10 60 Fill HD 1920 1080 16 9 60 WUXGA 1920 1200 16 10 60 Reduced Blanking 2K 2048 1080 17 9 60 Full HD 1920 1080 16 9 60 MAC 13 640 480 4 3 67 MAC 16 832 624 4 3 75 MAC 19 1024 768 4 3 75 MAC 21 1152 870 4 3 75 MAC 23 1280 1024 5 4 65 Analog Component Signal Resolution dots Aspect Ratio Refresh Rate Hz HDTV 1080p 1...

Страница 174: ...ion dots Aspect Ratio Refresh Rate Hz 3D Format 1920 1080p 16 9 23 98 24 Frame Packing Side By Side Half Top And Bottom 25 Side By Side Half Top And Bottom 29 97 30 Frame Packing Side By Side Half Top And Bottom 50 Side By Side Half Top And Bottom 59 94 60 Side By Side Half Top And Bottom 1280 720p 23 98 24 Frame Packing Side By Side Half Top And Bottom 25 Side By Side Half Top And Bottom 29 97 30...

Страница 175: ...al Analog WUXGA 1920 1200 with Advanced AccuBlend Pixel clock frequency less than 165 MHz Digital Quad HD 4096 2160 with Advanced AccuBlend Pixel clock frequency less than 600 MHz HDBaseT 300 MHz Input signals R G B H V RGB 0 7Vp p 75Ω Y 1 0Vp p 75Ω with Negative Polarity Sync Cb Cr Pb Pr 0 7Vp p 75Ω H V Sync 4 0Vp p TTL Composite Sync 4 0Vp p TTL Sync on G 1 0Vp p 75Ω with Sync Component Y 1 0Vp ...

Страница 176: ... 200 240 V AC Link down 0 11 W 100 130 V AC 0 16 W 200 240 V AC Rated input current PA803UL 11 8 A 100 130 V AC 5 2 A 200 240 V AC PA703UL 00 0 A 100 130 V AC 0 0 A 200 240 V AC PA653UL 10 2 A 100 130 V AC 4 5 A 200 240 V AC Power cord specification 15 A or higher 6 External dimensions W H D 22 8 width 8 2 height 19 5 depth 580 width 208 height 494 depth mm including protruding parts 22 8 width 8 ...

Страница 177: ...separately NP40ZL Throw ratio 0 79 1 11 1 F2 0 2 5 f 13 3 18 6 mm NP41ZL Throw ratio 1 30 3 02 1 F1 7 2 0 f 21 8 49 8 mm NP43ZL Throw ratio 2 99 5 93 1 F2 2 2 6 f 49 7 99 8 mm NOTE The above throw ratio is for projecting on 100 screen ...

Страница 178: ... 8 Appendix INPUT MENU FOCUS SHIFT EXIT ZOOM ENTER L CALIB HOME POSITION 494 19 4 580 22 8 208 8 2 205 8 1 125 4 9 250 9 8 200 7 9 56 5 2 2 490 19 3 Cabinet Dimensions Lens center Lens center Unit mm inch ...

Страница 179: ...11 13 15 17 19 2 4 6 8 10 12 14 16 18 Pin No Signal Pin No Signal 1 TMDS Data 2 11 TMDS Clock Shield 2 TMDS Data 2 Shield 12 TMDS Clock 3 TMDS Data 2 13 CEC 4 TMDS Data 1 14 Disconnection 5 TMDS Data 1 Shield 15 SCL 6 TMDS Data 1 16 SDA 7 TMDS Data 0 17 DDC CEC grounding 8 TMDS Data 0 Shield 18 5 V power supply 9 TMDS Data 0 19 Hot plug detection 10 TMDS Clock DisplayPort IN Connector 1 3 5 7 9 11...

Страница 180: ...nection HDBT2 6 RxD HDBT1 7 Disconnection HDBT3 8 Disconnection HDBT3 USB A Port Type A 1 3 2 4 Pin No Signal 1 VBUS 2 D 3 D 4 Grounding PC CONTROL Port D Sub 9 Pin 1 2 3 4 5 6 7 8 9 Pin No Signal 1 Unused 2 RxD reception data 3 TxD transmission data 4 Unused 5 Grounding 6 Unused 7 RTS transmission request 8 CTS transmission allowed 9 Unused ...

Страница 181: ...Virtual Remote Tool please visit our web site and download it http www nec display com dl en index html NOTE Remote Control Window is not available for changing the background logo Please see the HELP menu of the Virtual Remote Tool about how to display the Toolbar Logo data graphics that can be sent to the projector with Virtual Remote Tool has the following restrictions Only via serial or LAN co...

Страница 182: ...ambient temperature is too high low Indicator Message Status message POWER STATUS LIGHT TEMP Projector status Power is off Off Off Off Off In the state of Standby Standby mode is NORMAL and the network is ready Orange Blink 1 Off Off Off In the state of Standby Standby mode is NORMAL and the network is unavail able Orange Blink 2 Off Off Off In the state of Standby Standby mode is NORMAL and the n...

Страница 183: ...ivated OFF time as the proogram timer is activated Powered state Blue Blink 3 Off Status varies Off Preparing for powering ON Blue Blink 5 Off Off Off 1 Repetition to light on for 1 5 seconds off for 1 5 seconds 2 Repetition to light on for 1 5 seconds off for 7 5 seconds 3 Repetition to light on for 2 5 seconds off for 0 5 seconds 4 Repetition to light on for 0 5 seconds off for 0 5 seconds on fo...

Страница 184: ...perly contact your dealer Red Blink 5 Red Light Red Light Off Error requiring service support Contact your dealer or service person nel Make sure to check and inform indicator status for asking to repair Red Light Status varies Status varies Off 1 Repetition to light on for 1 5 seconds off for 1 5 seconds 2 Repetition to light on for 1 5 seconds off for 7 5 seconds 3 Repetition to light on for 2 5...

Страница 185: ... state Indicator Blinks in orange Standby state Waiting to link with the network Indicator Lights in orange Standby state The network is linked Link up network Link down network for approx 10 seconds Power consumption High Low Power On Input signal Input signal Operation on the web browser via the HTTP server See page 47 No operation No communication with the link up network No signal input for ap...

Страница 186: ...eT IN Ethernet HDBaseT OUT Ethernet LAN PC CONTROL Indicator Lights in blue Powered ON state Indicator Lights in green Sleep state Indicator Blinks in orange with long interval Standby state The network is unavailable Power consumption High Low Power On Input signal Power Off Power On No operation No signal in put for approx 10 seconds ...

Страница 187: ...iable for any trouble and failure caused by this installation The signal may not be supported depending on the HDBaseT transmission device In addition RS232C interface may not be supported Be sure to connect the projector and notebook PC while the projector is in standby mode and before turning on the power to the notebook PC In most cases the output signal from the notebook PC is not turned on un...

Страница 188: ... See the Indicator Message page 165 Cross color in RGB mode Press the AUTO ADJ button on the projector cabinet or the remote control page 27 Adjust the computer image manually with CLOCK PHASE in IMAGE OPTIONS in the menu page 90 For more information contact your dealer ...

Страница 189: ...e projected image may not be displayed correctly Should this happen deactivate the notebook PC s LCD screen when the projector display is in use Each notebook PC has a different way of deactivate reactivate the local LCD screens as described in the previous step Refer to your computer s documentation for detailed information Image displayed is incorrect when using a Mac When using a Mac with the p...

Страница 190: ...UTE OFF 02H 13H 00H 00H 00H 15H NOTE Contact your local dealer for a full list of the PC Control Codes if needed Cable Connection Communication Protocol Baud rate 115200 38400 19200 9600 4800 bps Data length 8 bits Parity No parity Stop bit 1 bit X on off None Communications procedure Full duplex NOTE Depending on the equipment a lower baud rate may be recommended for long cable runs PC Control Po...

Страница 191: ...Item Information Baud rate 115200 38400 19200 9600 4800 bps Data length 8 bits Parity bit No parity Stop bit 1 bit Flow control None Communications procedure Full duplex 2 Connection via network Communication Protocol Connection via LAN Item Information Communication speed Set automatically 10 100 Mbps Supported standard IEEE802 3 10BASE T IEEE802 3u 100BASE TX Auto Negotiation Use the TCP port nu...

Страница 192: ...175 8 Appendix Status command Response Error Status error temp Temperature error error fan Fan trouble error light Light source trouble error lens Lens trouble error system System trouble ...

Страница 193: ...ess and or the contrast Input source s resolution and frequency are supported by the projector Image is too dark Remains unchanged even though you adjust the brightness and or the contrast Image is distorted Image appears to be trapezoidal unchanged even though you carry out the KEYSTONE adjustment Parts of the image are lost Still unchanged even though you press the AUTO ADJ button Still unchange...

Страница 194: ...lu ray player Video camera Video game or other Manufacturer Model number Signal cable NEC standard or other manufacturer s cable Model number Length inch m Distribution amplifier Model number Switcher Model number Adapter Model number Projector PC Blu ray player Projector Model number Serial No Date of purchase Light operating time hours LIGHT MODE NORMAL ECO1 ECO2 LONG LIFE Information on input s...

Страница 195: ... and labor warranty and InstaCare service program Visit our web site at www necdisplay com click on support center register product and submit your completed form online Upon receipt we will send a confirmation letter with all the details you will need to take advantage of fast reliable warranty and service programs from the industry leader NEC Display Solutions of America Inc ...

Страница 196: ... NEC Display Solutions Ltd 2017 2019 7N952583 ...

Отзывы: