background image

65

4. Using the Viewer

Using the toolbar

1.  Press the MENU button.

  The toolbar will be displayed.
  The SOURCE screen will be displayed as Viewer connection screen.

2.  Use the 

 or 

 button to select an item and use the 

 or 

 button to select its available option.

  When the cursor is placed, the selected item will be changed to yellow.
  The 

 or 

 shows more available choices.

3.  Press the ENTER button.

  The selected item will be displayed.

4.  Press the MENU button two times.

  The  toolbar  will  be  closed  and  the  SOURCE  list  will  be  displayed.  Press  the  MENU  button  again  to  close  the 

SOURCE list.

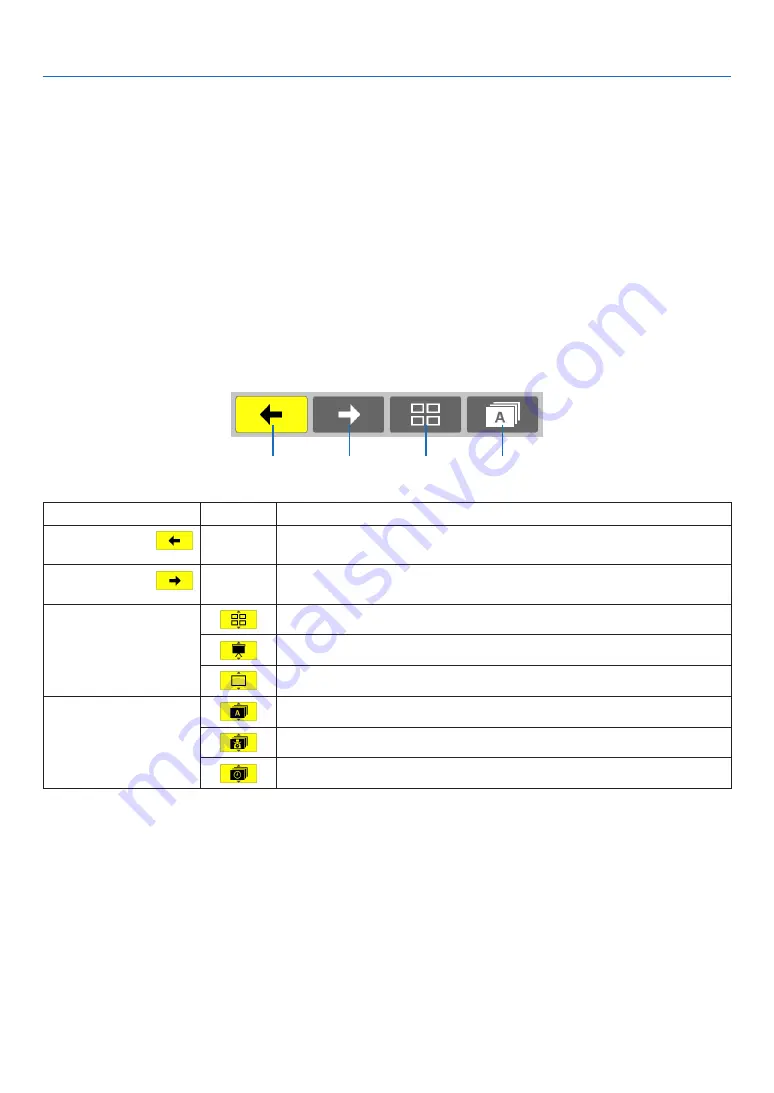
Thumbnail toolbar

Menu

Options

Description

(1) Back 

Goes back to the previous image. When the cursor reaches the top left of 
the screen, it will go to the previous page.

(2) Forward 

Goes to the next image. When the cursor reaches the bottom right of the 
screen, it will go to the next page.

(3) Display

Closes the menu and returns to the thumbnail screen.

Closes the menu and starts the slideshow from the highlighted item.

Closes the menu and displays the slide screen.

(4) Order

Displays the icons alphabetically by name. (number before alphabet)

Displays the icons in descending order of file size.

Displays the icons in the order of creation date

(1)

(2)

(3)

(4)

Содержание NP-M271X

Страница 1: ...Portable Projector M361X M311X M271X M311W M271W User s Manual The M361X and M271X are not distributed in North America Model No NP M361X NP M311X NP M271X NP M311W NP M271W...

Страница 2: ...Protected Access WPA WPA2 are registered trademarks of the Wi Fi Alli ance Blu ray is a trademark of Blu ray Disc Association CRESTRON and ROOMVIEW are registered trademarks of Crestron Electronics In...

Страница 3: ...Class B digital apparatus meets all requirements of the Canadian Interference Causing Equipment Regula tions Machine Noise Information Regulation 3 GPSGV The highest sound pressure level is less than...

Страница 4: ...couraged to try to correct the interference by one or more of the following measures Reorient or relocate the receiving antenna Increase the separation between the equipment and receiver Connect the e...

Страница 5: ...icking up the projector Prevent foreign objects such as paper clips and bits of paper from falling into your projector Do not attempt to retrieve any objects that might fall into your projector Do not...

Страница 6: ...and unplug the power cord if the projector is not to be used for an extended period of time When using a LAN cable only models with the RJ 45 LAN port For safety do not connect to the connector for pe...

Страница 7: ...no one is under the projector Glass fragments could fall if the lamp has been burned out About High Altitude mode Set FAN MODE to HIGH ALTITUDE when using the projector at altitudes approximately 5500...

Страница 8: ...Connecting Your Computer Connecting the Power Cord 14 Turning on the Projector 15 Note on Startup screen Menu Language Select screen 16 Selecting a Source 17 Selecting the computer or video source 17...

Страница 9: ...ection Tool in Image Express Utility Lite 57 What you can do with GCT 57 Projecting an Image from an Angle GCT 57 4 Using the Viewer 59 What you can do with the Viewer 59 Projecting images stored in a...

Страница 10: ...ecting to a Wired LAN 110 Connecting to a Wireless LAN Optional NP02LM series 111 7 Maintenance 114 Cleaning the Filters 114 2 Cleaning the Lens 116 3 Cleaning the Cabinet 116 4 Replacing the Lamp and...

Страница 11: ...rojector CD ROM User s manual PDF and the utility software 7N951851 For North America only Limited warranty For customers in Europe You will find our current valid Guarantee Policy on our Web Site www...

Страница 12: ...after the projector is turned off from the remote control or cabinet control panel The projector has a feature called Direct Power Off This feature allows the projector to be turned off even when proj...

Страница 13: ...ac OS and Viewer PPT Converter 3 0 Image Express Utility Lite for Windows can be started from a commercially available USB memory or SD card without the need of installing on your computer AUTO POWER...

Страница 14: ...ont Top Controls page 6 Lens Remote Sensor page 9 Intake Vent Filter Cover page 114 120 Zoom Lever page 20 Lens Cover Focus Ring page 20 Adjustable Tilt Foot page 19 Adjustable Tilt Foot Lever page 19...

Страница 15: ...Do not pull the lens cover with excessive force or apply strong pressure in either the up or down direction Doing so can cause damage to the lens cover sliding mechanism AC Input Connect the supplied...

Страница 16: ...2 POWER Indicator page 14 15 24 122 3 STATUS Indicator page 122 4 LAMP Indicator page 117 122 5 ECO Button page 27 6 SOURCE Button page 17 7 AUTO ADJ Button page 23 8 MENU Button page 70 9 Volume But...

Страница 17: ...109 6 USB PC Port Type B page 39 104 7 MONITOR OUT COMP 1 Connector Mini D Sub 15 Pin page 106 8 AUDIO OUT Mini Jack Stereo Mini page 106 9 S VIDEO IN Connector Mini DIN 4 Pin page 107 10 VIDEO IN Co...

Страница 18: ...Y Button page 17 14 ID SET Button page 88 15 Numeric Keypad Button CLEAR Button page 88 16 FREEZE Button page 26 17 AV MUTE Button page 26 18 MENU Button page 70 19 EXIT Button page 70 20 Button page...

Страница 19: ...30 30 30 22 feet 7 m 22 feet 7 m Remote control Remote sensor on projector cabinet Remote control The infrared signal operates by line of sight up to a distance of about 22 feet 7 m and within a 60 d...

Страница 20: ...on Tool GCT function allows you to correct distortion of images projected on a curved wall page 57 USB Display and GCT functions are not supported by Mac Name of software program Features PC Control U...

Страница 21: ...al core 1 5 GHz or higher recommended Windows XP Pentium M 1 0 GHz equivalent or higher required Dual core 1 0 GHz or higher recommended Memory Windows 7 Windows Vista 512 MB or more required 1 GB or...

Страница 22: ...512 MB or higher required Network environment Wired or wireless LAN required that supports TCP IP Only wireless LAN units built into Mac are guaranteed to work with Image Express Utility Lite Easy Con...

Страница 23: ...projector page 15 Step 3 Selecting a source page 17 Step 4 Adjusting the picture size and position page 18 Correcting keystone distortion KEYSTONE page 21 Step 5 Adjusting a picture and sound Optimiz...

Страница 24: ...ed power cord s three pin plug to the AC IN of the projector and then connect the other plug of the supplied power cord in the wall outlet The projector s power indicator will flash for a few seconds...

Страница 25: ...R ON button on the remote control The POWER indicator will turn to blue and the projector will become ready to use TIP When the message Projector is locked Enter your password is displayed it means th...

Страница 26: ...ture of the projector is too high the projector detects abnormal high temperature In this condition the projector will not turn on to protect the internal system If this happens wait for the projector...

Страница 27: ...urned on 1 Press the MENU button The menu will be displayed 2 Press the button twice to select SETUP and press the H but ton or the ENTER button to select GENERAL 3 Press the button four times to sele...

Страница 28: ...justing the throw angle the height of an image Tilt foot page 19 Adjusting the left and right tilt of an image Rear foot page 19 Finely adjusting the size of an image Zoom lever page 20 Adjusting the...

Страница 29: ...can be extended up to 1 6 inch 40 mm There is approximately 10 degrees up of adjustment for the front of the projector Rotate the rear foot to the desired height in order to square the image on the p...

Страница 30: ...20 2 Projecting an Image Basic Operation Zoom Use the ZOOM lever to adjust the image size on the screen Zoom Lever Focus Use the FOCUS ring to obtain the best focus Focus Ring...

Страница 31: ...made narrower depending on a signal or its aspect ratio selection Adjusting with buttons on the cabinet 1 Press the or button with no menus displayed The keystone bar will be displayed 2 Use the or to...

Страница 32: ...with the remote control 1 Press the KEYSTONE button The Keystone bar will be displayed 2 Use the or button to correct the keystone distortion Adjust so that the right and left sides are parallel 3 Pre...

Страница 33: ...to Adjust operation cannot optimize the computer signal try to adjust HORIZONTAL VERTICAL CLOCK and PHASE manually page 79 80 Turning Up or Down Volume Sound level from the speaker can be adjusted TIP...

Страница 34: ...L is selected for STANDBY MODE Power On Steady blue light Standby Steady orange light CAUTION Parts of the projector may become temporarily heated if the projector is turned off with the POWER button...

Страница 35: ...5 Put the projector and accessories in the supplied soft case Place the projector in the soft case with the lens facing upward as shown below This is to prevent the lens from damage NOTE When placing...

Страница 36: ...he lamp power may be restored to its original level temporarily To restore the image even if you press the AV MUTE button immediately after the start of the power saving function the lamp brightness m...

Страница 37: ...lowering the lamp power Steady Green light ECO Lamp power consumption approx 60 brightness The lamp life will extend longer than the one on NORMAL mode by controlling power appropriate for the lamp T...

Страница 38: ...UTO ECO NORMAL or ECO This feature is called as CARBON METER There are two messages TOTAL CARBON SAVINGS and CARBON SAVINGS SESSION The TOTAL CARBON SAVINGS message shows the total amount of CO2 emiss...

Страница 39: ...menu To enable the Security function 1 Press the MENU button The menu will be displayed 2 Press the button twice to select SETUP and press the button or the ENTER button to select GEN ERAL 3 Press th...

Страница 40: ...enabled To turn on the projector when SECURITY is enabled 1 Press the POWER button The projector will be turned on and display a message to the effect that the projector is locked 2 Press the MENU bu...

Страница 41: ...button The SECURITY KEYWORD screen will be displayed 4 Type in your keyword and press the ENTER button When the correct keyword is entered the SECURITY function will be disabled NOTE If you forget you...

Страница 42: ...lock the logo to prevent it from changing Control Functions Power On Off signal selection picture freeze picture mute audio mute Logo transfer to the projector and remote control operation on your PC...

Страница 43: ...rom Microsoft s web page Download and install the it on your computer Logo data graphics that can be sent to the projector with Virtual Remote Tool has the following restrictions Only via serial or LA...

Страница 44: ...played 2 Click Install Virtual Remote Tool on the menu window The installation will start When the installation is complete the Welcome window will be displayed 3 Click Next END USER LICENSE AGREEMENT...

Страница 45: ...to complete the uninstallation For Windows XP 1 Click Start and then Control Panel The Control Panel window will be displayed 2 Double click Add Remove Programs The Add Remove Programs window will be...

Страница 46: ...Setup window will be displayed Follow the instructions on the screens When Easy Setup is completed the Virtual Remote Tool screen will be displayed NOTE When POWER SAVING is selected for STANDBY MODE...

Страница 47: ...ol Displaying the help file using the taskbar 1 Click the Virtual Remote Tool icon on the taskbar when Virtual Remote Tool is running The pop up menu will be displayed 2 Click Help The Help screen wil...

Страница 48: ...ath the mouse speed slider in the Mouse Properties dialog box Pointer Options tab Wait at least 5 seconds after disconnecting the USB cable before reconnecting it and vice versa The computer may not i...

Страница 49: ...work in POWER SAVING of STANDBY MODE page 91 When USB Display is used the sound is output from the COMPUTER 2 AUDIO IN Mini Jack Stereo Mini Image and sound may not be synchronized 1 Start the compute...

Страница 50: ...e a picture 3 Sound Turns on or off AV MUTE Sound mute play the sound and turns up or down the volume 4 Others Uses Update HTTP Server Settings and Information The HTTP Server cannot be selected when...

Страница 51: ...dress index html Use Image Express Utility Lite contained on the supplied NEC Projector CD ROM TIP The factory setting IP address is DHCP ON NOTE To use the projector in a network consult with your ne...

Страница 52: ...ng by specifying http pj nec co jp index html for the address or the entry column of the URL Example 2 When the IP address of the projector is 192 168 73 1 access is gained to the network setting by s...

Страница 53: ...78 SOURCE SELECT This switches the input connector of the projector COMPUTER 1 Switches to the COMPUTER 1 IN connector COMPUTER 2 Switches to the COMPUTER 2 IN connector HDMI Switches to the HDMI IN...

Страница 54: ...t your IP address of DNS server connected to the projector Setting for WIRED LAN ENABLE Turn on wired LAN connection DISABLE Turn off wired LAN connection Setting for WIRELESS LAN with the optional US...

Страница 55: ...ommunication devices such as PC or access point in your wireless network When you use WEP your image transmission speed will slow down WPA PSK TKIP WPA PSK AES WPA2 PSK TKIP and WPA2 PSK AES are not a...

Страница 56: ...o not forget your password However if you forget your password consult with your dealer HTTP PASSWORD Set a password for HTTP server A password must be 10 characters or less AMX BEACON Turn on or off...

Страница 57: ...RESTRON CONTROL IP ADDRESS Set your IP address of CRESTRON SERVER IP ID Set your IP ID of CRESTRON SERVER TIP The CRESTRON settings are required only for use with CRESTRON ROOMVIEW For more informatio...

Страница 58: ...PC Control Utility Pro 4 Pro 5 page 50 51 Step 1 Install PC Control Utility Pro 4 Pro 5 on the computer Step 2 Connect the projector to a LAN Step 3 Start PC Control Utility Pro 4 Pro 5 To run PC Cont...

Страница 59: ...ation is complete the Welcome window will be displayed 3 Click Next END USER LICENSE AGREEMENT screen will be displayed Read END USER LICENSE AGREEMENT carefully 4 If you agree click I accept the term...

Страница 60: ...e Control Panel in Windows and disable its standby sleep mode before running the scheduler Example For Windows 7 Select Control Panel System and Security Power Options Change when the computer sleeps...

Страница 61: ...s page 111 and Controlling the Projector by Using an HTTP Browser page 41 Step 3 Start PC Control Utility Pro 5 1 Open your Applications folder in Mac OS 2 Click the PC Control Utility Pro 5 folder 3...

Страница 62: ...he complicated network settings can be simplified and the computer will automatically connect to the projector The screen of your computer can be sent to up to four projectors at the same time USB Dis...

Страница 63: ...te do the same procedures stated as in Uninstalling Virtual Remote Tool Read Virtual Remote Tool as Image Express Utility Lite page 35 Step 2 Connect the projector to a LAN Connect the projector to th...

Страница 64: ...ted for STANDBY MODE from the menu the projector that is turned off will not be displayed in the select window for destination TIP Viewing the Help file of Image Express Utility Lite Displaying the He...

Страница 65: ...rox 6MB from the IEU_Lite removable media folder in the supplied NEC Projector CD ROM to the root directory of your removable media 2 Insert your removable media into your computer The AutoPlay screen...

Страница 66: ...page 111 and Controlling the Projector by Using an HTTP Browser page 41 Step 3 Start Image Express Utility Lite for Mac OS 1 Open your Applications folder in Mac OS 2 Double click the Image Express U...

Страница 67: ...about Multi point Correction and Parameters Correction see the help file of Image Express Utility Lite page 54 56 Your correction data can be stored in the projector or your computer which can be res...

Страница 68: ...6 After completing right click the mouse The green frame and the mouse pointer will disappear from the projected image area This will complete the cor rection 7 Click the X close button on the 4 point...

Страница 69: ...ble presentations can be conducted simply with the projector Supported graphic format is JPEG The Viewer displays the thumbnail screen JPEG Exif only on which you can jump to any specific image you wi...

Страница 70: ...SB memory in your computer refer to the document or help file that comes with your Windows We do not warrant that the USB port of the projector will support all USB memories in the market Supported im...

Страница 71: ...tor page 63 Exiting the Viewer page 63 Preparation Before starting the Viewer store images to the USB memory using your computer W IR EL ES S WIREL ES S Starting the Viewer 1 Turn on the projector pag...

Страница 72: ...on to select the next slide The slide on the right will be displayed The or button can be used to select the next right slide or the previous left slide in the thumbnail screen Pressing the MENU butto...

Страница 73: ...ot operate correctly If this happens turn off the projector and unplug the power cord Wait 3 minutes then connect the power cord and turn on the projector Exiting the Viewer 1 Press the MENU button wi...

Страница 74: ...his icon is used to return to the upper parent folder 6 Folder icon This icon shows that the USB memory has folders 7 Page up Page down icon This icon shows further folders or image files are availabl...

Страница 75: ...e displayed Press the MENU button again to close the SOURCE list Thumbnail toolbar Menu Options Description 1 Back Goes back to the previous image When the cursor reaches the top left of the screen it...

Страница 76: ...se 4 Counter clockwise rotation Close the menu and rotate the image 90 counter clockwise Slideshow toolbar Menu Options Description 1 Stop Closes the menu and changes to the slide screen 2 Back Goes b...

Страница 77: ...the same name will be created where JPEG files will be saved to The projector s Viewer does not support index file with extension idx Install Viewer PPT Converter 3 0 on the computer NOTE To install o...

Страница 78: ...3 0 once with the privilege used for installation Then exit from Viewer PPT Converter 3 0 without doing anything Starting Click Window s Start All Programs NEC Projector User Supportware Viewer PPT Co...

Страница 79: ...onvert and then click Open 4 Click Next 5 Select the USB memory drive for Card Drive and type in Index name Index name must be eight alphanumeric characters or less 2 byte character and file with a lo...

Страница 80: ...rojector cabinet to select the item you want to adjust or set You can use the buttons on the remote control or the projector cabinet to select the tab you want 5 Press the ENTER button on the remote c...

Страница 81: ...ton to select an option in a dialog box Source Indicates the currently selected source Off Timer remaining time Indicates the remaining countdown time when the OFF TIMER is preset Slide bar Indicates...

Страница 82: ...16 9 15 9 16 10 WIDE ZOOM NATIVE M311W M271W AUTO 4 3 16 9 15 9 16 10 LETTERBOX NATIVE POSITION Not available on M311W M271W 0 96 to 96 SETUP GENERAL AUTO KEYSTONE ON OFF ON KEYSTONE 0 KEYSTONE SAVE...

Страница 83: ...AUTO NTSC3 58 NTSC4 43 PAL PAL M PAL N PAL60 SECAM S VIDEO AUTO AUTO NTSC3 58 NTSC4 43 PAL PAL M PAL N PAL60 SECAM WXGA MODE M361X M311X M271X OFF M311W M271W ON OFF ON DEINTERLACE ON OFF ON HDMI SETT...

Страница 84: ...SS SSID NETWORK TYPE WEP WPA CHANNEL SIGNAL LEVEL VERSION FIRMWARE DATA OTHERS PROJECTOR NAME MODEL NO SERIAL NUMBER LAN UNIT TYPE CONTROL ID when CONTROL ID is set RESET CURRENT SIGNAL ALL DATA CLEAR...

Страница 85: ...nected to your VIDEO input VCR DVD player or document camera S VIDEO Selects what is connected to your S VIDEO input VCR or DVD player NOTE A frame may freeze for a brief period of time when a video i...

Страница 86: ...rightly lit room PRESENTATION Recommended for making a presentation using a PowerPoint file VIDEO Recommended for typical TV program viewing MOVIE Recommended for movies GRAPHIC Recommended for graphi...

Страница 87: ...ot available when DICOM SIM is selected for DETAIL SETTINGS Selecting Screen Size for DICOM SIM SCREEN SIZE This function will perform gamma correction appropriate for the screen size LARGE For screen...

Страница 88: ...htness level or the back raster intensity SHARPNESS Controls the detail of the image COLOR Increases or decreases the color saturation level HUE Varies the color level from green to blue The red level...

Страница 89: ...ion adjusts the clock frequencies that eliminate the horizontal banding in the image This adjustment may be necessary when you connect your computer for the first time PHASE Use this item to adjust th...

Страница 90: ...mory for the current signal The next time you project the signal with the same resolution horizontal and vertical frequency its adjustments will be called up and applied To delete adjustments stored i...

Страница 91: ...ge is displayed in 16 9 aspect ratio 15 9 The image is displayed in 15 9 aspect ratio 16 10 The image is displayed in 16 10 aspect ratio WIDE ZOOM M361X M311X M271X The image is stretched left and rig...

Страница 92: ...tically de termined NOTE To display a letterbox signal prop erly select LETTERBOX NOTE To display a squeezed signal prop erly select 16 9 TIP Image position can be adjusted vertically using POSITION w...

Страница 93: ...KEYSTONE You can correct vertical distortion manually page 21 TIP When this option is highlighted pressing the ENTER button will display its slide bar for adjustment Saving Vertical Keystone Correctio...

Страница 94: ...n in applications where the screen material is not white NOTE Selecting WHITEBOARD reduces lamp brightness Setting Eco Mode ECO MODE The ECO MODE increases lamp life while lowering power consumption a...

Страница 95: ...after the countdown is complete NOTE To cancel the preset time set OFF for the preset time or turn off the power When the remaining time reaches 3 minutes before the projector is turned off the THE PR...

Страница 96: ...off the menu The preset choices are MANUAL AUTO 5 SEC AUTO 15 SEC and AUTO 45 SEC The AUTO 45 SEC is the fac tory preset Selecting a Color or Logo for Background BACKGROUND Use this feature to displa...

Страница 97: ...ROL PANEL LOCK function NOTE This CONTROL PANEL LOCK does not affect the remote control functions When the control panel is locked pressing and holding the EXIT button on the projector cabinet for abo...

Страница 98: ...on In this case the buttons on the projector cabinet can be used Your setting will not be affected even when RESET is done from the menu Pressing and holding the ENTER button on the projector cabinet...

Страница 99: ...tude mode AUTO The built in fans automatically run at a variable speed according to the internal temperature HIGH The built in fans run at high speed HIGH ALTITUDE The built in fans run at a high spee...

Страница 100: ...cognized on M361X M311X M271X In this case select OFF NOTE The OFF is selected at the time of shipment of M361X M311X M271X The ON is selected at the time of shipment of M311W M271W Enabling the deint...

Страница 101: ...ail Alert functions Buttons other than POWER button on the cabinet Buttons other than POWER ON button on the remote control Virtual Remote Tool USB Display fucntion NOTE When CONTROL PANEL LOCK CONTRO...

Страница 102: ...s option is selected you can enable the projector to automatically turn off at the selected time 5min 10min 20min 30min 60min if there is no signal received by any input or if no operation is performe...

Страница 103: ...LAN connection will be turned on SETTINGS DHCP ON IP address subnet mask and gateway will be automatically assigned to the projector from your DHCP server OFF Specify IP address subnet mask and gate...

Страница 104: ...EASY CONNECTION Select EASY CONNECTION to execute a wireless LAN easily using Image Express Utility Lite on the supplied NEC Projector CD ROM PROFILE 1 Up to two settings for the USB wireless LAN uni...

Страница 105: ...GS WIRELESS LAN PROFILE 1 or PROFILE 2 Make necessary settings for SETTINGS and click SAVE From the projector menu select SETUP WIRELESS LAN PROFILE PROFILE 1 or PROFILE 2 To select an SSID Access the...

Страница 106: ...r changes from 0 to 100 Hours and starts counting down If the remaining lamp time reaches 0 hours the projector will not turn on The message to the effect that the lamp or the filters should be replac...

Страница 107: ...EX HORIZONTAL FREQUENCY VERTICAL FREQUENCY SIGNAL TYPE VIDEO TYPE SYNC TYPE SYNC POLARITY SCAN TYPE WIRED LAN IP ADDRESS SUBNET MASK GATEWAY MAC ADDRESS WIRELESS LAN IP ADDRESS SUBNET MASK GATEWAY MAC...

Страница 108: ...98 5 Using On Screen Menu VERSION FIRMWARE Version DATA Version OTHERS PROJECTOR NAME MODEL NO SERIAL NUMBER LAN UNIT TYPE CONTROL ID when CONTROL ID is set...

Страница 109: ...sage time see Clearing Lamp Hour Meter CLEAR LAMP HOURS below Clearing Lamp Hour Meter CLEAR LAMP HOURS Resets the lamp clock back to zero Selecting this option displays submenu for a confirmation Sel...

Страница 110: ...mage can be is approximately 25 0 64 m measured diagonally when the projector is roughly 35 inches 0 9 m from the wall or screen The largest the image can be is 300 7 6 m when the projector is about 4...

Страница 111: ...en Size Screen Size Unit cm inch 200 180 150 120 100 80 1 1 7 4 5 9 9 3 3 6 7 7 0 2 7 5 5 8 2 2 9 4 6 1 8 3 3 9 1 5 2 3 1 1 2 1 2 3 9 0 1 5 6 0 40 7 8 3 0 6 60 30 25 1 1 4 5 0 9 3 7 646 2 W 403 9 H 25...

Страница 112: ...41 1048 217 5514 361 9174 19 476 10 8 6 5 210 5334 168 4267 126 3200 43 1100 228 5792 379 9635 20 500 10 8 6 5 240 6096 192 4877 144 3658 50 1257 261 6626 434 11018 23 572 10 7 6 5 270 6858 216 5486...

Страница 113: ...d 104 F 40 C Eco mode selected automatically at 95 F to 104 F 35 C to 40 C Do not expose the projector to moisture dust or smoke This will harm the screen image Ensure that you have adequate ventilati...

Страница 114: ...l from the notebook PC is not turned on unless connected to the projector before being powered up If the screen goes blank while using your remote control it may be the result of the computer s screen...

Страница 115: ...e with video decoded outputs of the NEC ISS 6020 switcher NOTE An image may not be displayed correctly when a Video or S Video source is played back via a commercially available scan converter This is...

Страница 116: ...multaneously view on a monitor the computer analog image you re projecting NOTE Daisy chain connection is not possible When audio equipment is connected the projector speaker is disabled AUDIO IN PHON...

Страница 117: ...O NOTE The AUDIO IN L and R jacks RCA are shared between the Video and S Video inputs NOTE Refer to your VCR owner s manual for more information about your equipment s video output requirements NOTE A...

Страница 118: ...ector Input connector SOURCE button on the projector cabinet Button on the remote control COMPUTER 1 IN COMPUTER 1 COMPUTER 1 COMPUTER 2 IN COMPUTER 2 COMPUTER 2 NOTE Refer to your DVD player s owner...

Страница 119: ...control HDMI IN HDMI HDMI TIP For users of audio video equipment with an HDMI connector Select Enhanced rather than Normal if HDMI output is switchable between Enhanced and Normal This will provide im...

Страница 120: ...t RJ 45 which provides a LAN connection using a LAN cable To use a LAN connection you are required to set the LAN on the projector menu Select SETUP WIRED LAN page 93 Example of LAN connection Example...

Страница 121: ...cted to a network First use the wired LAN to connect the projector to a network and then use the HTTP server to set the wireless LAN After setting the wireless LAN by using the HTTP server set NETWORK...

Страница 122: ...Keep the cap for later use NOTE Do not force to insert the USB Wireless LAN Unit 4 Put the USB LAN port cover back into place Insert the catch of the USB LAN port cover into the groove of the projecto...

Страница 123: ...ireless LAN Unit To enable direct communication i e peer to peer between personal computers and projectors you need to select the Ad Hoc mode Use the HTTP server function to make the settings page 41...

Страница 124: ...the filter unit and the filter cover CAUTION Before cleaning the filters turn off the projector disconnect the power cord and then allow the cabinet to cool Failure to do so can result in electric sh...

Страница 125: ...t with the filter cover and push the six protru sions into place Make sure all six mounting points are aligned properly 7 Put the filter unit back to the projector cabinet Insert two catches of the ti...

Страница 126: ...Never use strong detergents or solvents such as alcohol or thinner When cleaning the vents or the speaker using a vacuum cleaner do not force the brush of the vacuum cleaner into the slits of the cabi...

Страница 127: ...r screw and two lamp housing screws You could receive an electric shock Do not break the glass on the lamp housing Keep finger prints off the glass surface on the lamp housing Leaving finger prints on...

Страница 128: ...There is an interlock on this case to prevent the risk of electrical shock Do not attempt to circumvent this interlock 2 Remove the lamp housing by holding it Interlock To replace the lamp 1 Remove th...

Страница 129: ...trol for 10 seconds to reset the lamp clock back to zero When the lamp time clock is reset to zero the LAMP indicator goes out 4 Reattach the lamp cover 1 Slide the lamp cover back until it snaps into...

Страница 130: ...r Soap and water will damage the filter membrane Put filters into place Incorrect attachment of a filter may cause dust and dirt to get into the inside of the projector TIP While the material of filte...

Страница 131: ...o place Make sure all six mounting points are aligned properly 5 Put the filter unit back to the projector cabinet Insert two catches of the tip of the filter unit into the groove of the cabinet Push...

Страница 132: ...work conflict Both the built in wired LAN and the wireless LAN cannot be connected to the same network at the same time To use both built in wired LAN and wireless LAN at the same time connect them to...

Страница 133: ...k PC is not turned on unless connected to the projector before being powered up If the screen goes blank while using your remote control it may be the result of the computer s screen saver or power ma...

Страница 134: ...the projected image may not be displayed correctly Should this happen deactivate the notebook PC s LCD screen when the projector display is in use Each notebook PC has a different way of deactivate re...

Страница 135: ...eo Mini Audio Outputs 1 RGB D Sub 15P 1 Stereo Mini Audio PC Control 1 PC Control Port D Sub 9P Wired LAN Port 1 RJ 45 10BASE T 100BASE TX Wireless LAN Port Optional IEE 802 11 b g n optional USB Wire...

Страница 136: ...n Desktop Front Desktop Rear Ceiling Front Ceiling Rear Dimensions 13 4 W 3 9 H 10 1 D 339 mm W 99 mm H 257 mm D not including protrusions Weight 6 59 lbs 2 99 kg 6 39 lbs 2 9 kg 6 59 lbs 2 99 kg 6 39...

Страница 137: ...127 8 Appendix 257 10 1 99 3 9 339 13 4 100 3 9 108 4 3 59 4 2 34 175 6 9 200 7 9 150 5 9 130 5 1 Cabinet Dimensions Lens center Lens center Holes for ceiling mount Unit mm inch...

Страница 138: ...7 8 Pin No RGB Signal Analog YCbCr Signal 1 Red Cr 2 Green or Sync on Green Y 3 Blue Cb 4 Ground 5 Ground 6 Red Ground Cr Ground 7 Green Ground Y Ground 8 Blue Ground Cb Ground 9 No Connection 10 Syn...

Страница 139: ...resolution on XGA model M361X M311X M271X 2 Native resolution on WXGA model M311W M271W 3 The projector may fail to display these signals correctly when AUTO is selected for ASPECT RATIO in the on scr...

Страница 140: ...2H PICTURE MUTE OFF 02H 11H 00H 00H 00H 13H SOUND MUTE ON 02H 12H 00H 00H 00H 14H SOUND MUTE OFF 02H 13H 00H 00H 00H 15H NOTE Contact your local dealer for a full list of the PC Control Codes if neede...

Страница 141: ...Lamp cover is installed correctly AUTO POWER OFF is turned off only models with the AUTO POWER OFF function OFF TIMER is turned off only models with the OFF TIMER function Video and Audio Image is to...

Страница 142: ...r s cable Model number Length inch m Distribution amplifier Model number Switcher Model number Adapter Model number Installation environment Screen size inch Screen type White matte Beads Polarization...

Страница 143: ...English only visit our website at http www nec display com ap en_projector tco index html The TCO certification designed by TCO Development is an international environmental and ergonomics standard f...

Страница 144: ...and labor warranty and InstaCare service program Visit our web site at www necdisplay com click on support center register product and submit your completed form online Upon receipt we will send a co...

Страница 145: ...NEC Display Solutions Ltd 2012 7N951851...

Отзывы: